使用注解装配Bean
一、使用@Component(或@Named)注解
先来观察一下@Component这个注解的声明:
@Target({ElementType.TYPE})
@Retention(RetentionPolicy.RUNTIME)
@Documented
@Indexed
public @interface Component {
    String value() default "";
}
从声明可以看出,@Target指明@Component可以标注的目标为ElementType.TYPE,TYPE包含类、接口(包括注解)和枚举类型,@Component注解有一个属性为value(注意String value() 不是方法,而是类型为String的value变量,默认值为""),用来指定Bean的名称。
装配一个Bean
下面是一段使用@Component注解装配Bean的示例代码:
package zb.spring.beans.pojo;

@Component()
public class Student {
    private String name;

    public String getName() {
        return name;
    }

    public Student setName(String name) {
        this.name = name;
        return this;
    }

    public void introduce(){
        System.out.println("我的名字叫" + name);
    }
}
没错,这样就装配了一个Bean,仅仅是在Student类上添加了一个@Component注解,装配的Bean的名称为类名首字母小写,当然也可以指定名称,如@Component("student")。做完了这些,我们还没有一个用来容纳这个Bean的Spring IoC容器(或应用上下文)。
创建应用上下文
现在观察下面的代码:
package zb.spring.beans;

public class BeansTest {
    public static void main(String[] args) {
        ApplicationContext ctx = new AnnotationConfigApplicationContext(Student.class);

        Student student = (Student) ctx.getBean("student");
        student.introduce();

    }
}
在这段代码中,首先声明并创建==ApplicationContext==(应用上下文)。注意子类使用的是==AnnotationConfigApplicationContext==,即基于注解配置的应用上下文,传入Student.class参数用来发现@Component注解(如果被注解标注的类不能被发现,那么它也仅仅是一个标注,没有任何逻辑上的作用)。
然后通过ApplicationContext的getBean(String)方法传入Bean的名称获取已经装配进容器的Student的一个实例,并且调用该实例的introduce()方法。执行结果为:

我们发现name属性为null,这是很正常的,因为我们除了声明Student为一个Bean之外,并没有给name属性设置任何值。
使用@Value注解给属性设值
将Student稍稍改动一下:
@Component
public class Student {
    @Value("Jason")
    private String name;

    public String getName() {
        return name;
    }

    public Student setName(String name) {
        this.name = name;
        return this;
    }

    public void introduce(){
        System.out.println("我的名字叫" + name);
    }
}
再次执行:

通过@Value注解,就给name属性设置了一个默认值。
使用@ComponentScan扫描多个Bean
通过这种方式能很方便地装配一个Bean,但实际中我们要为很多类装配Bean,那么就要考虑添加一个“中介”,使用这个“中介”初始化AnnotationConfigApplicationContext类,然后再由这个中介去发现更多的Bean。在zb.spring.beans.config包中添加StudentConfig类,代码如下:
package zb.spring.beans.config;

@ComponentScan(basePackages = {"zb.spring.beans.pojo"})
public class StudentConfig {
}
main方法中做如下更改:
ApplicationContext ctx = new AnnotationConfigApplicationContext(StudentConfig.class);
其中StudentConfig类就是一个“中介”,本身并没有任何逻辑,通过使用@ComponentScan注解,标注将会扫描整个zb.spring.beans.pojo包,该包下所有被@Component标注的类都会被发现并装配进容器中。可以看到,basePackages使用的是复数形式,并且包名由大括号包裹,说明basePackages是一个数组,可以传入多个需要扫描的包。如果没有指明basePackages的值,则默认扫描该“中介”所在的包。
在@ComponentScan中,还有一个属性basePackageClasses,从名字可以看出是一个类数组,这个类可以是一个@Component标注的类,也可以是另一个“中介”。
二、使用@Bean注解
同样先观察一下@Bean注解的声明:
@Target({ElementType.METHOD, ElementType.ANNOTATION_TYPE})
@Retention(RetentionPolicy.RUNTIME)
@Documented
public @interface Bean {
    @AliasFor("name")
    String[] value() default {};

    @AliasFor("value")
    String[] name() default {};

    /** @deprecated */
    @Deprecated
    Autowire autowire() default Autowire.NO;

    boolean autowireCandidate() default true;

    String initMethod() default "";

    String destroyMethod() default "(inferred)";
}
声明中可以看出,Target为方法和注解,在value属性和name属性上分别有@AliasFor("name")和@AliasFor("value"),这表示value和name是相同的。
装配一个Bean
在上面的例子中我们将Student的所有注解都去除,并将“中介”的代码改成如下所示:
package zb.spring.beans.config;

@Configuration
public class StudentConfig {
    @Bean
    public Student jason(){
        return new Student().setName("Jason");
    }

	@Bean
	public Student tom(){
		return new Student().setName("Tom");
	}
}
在“中介”类中,将@Bean注解到jason()或tom()方法上,则方法返回的对象会被作为Bean装配进容器中,Bean的名称默认为方法名,若要指定Bean名称,则可以通过设置Bean的value或name。
StudentConfig类上用的注解是@Configuration,而不是@Component,如果查看@Configuration的声明会发现,@Configuration也是由@Component声明的,如下所示:
@Target({ElementType.TYPE})
@Retention(RetentionPolicy.RUNTIME)
@Documented
@Component
public @interface Configuration {
    @AliasFor(
        annotation = Component.class
    )
    String value() default "";
}
这表示@Configuration本质上还是@Component,但要注意是是,被@Configuration标注的类下的Bean如果也被@Configuration标注,并不会做特殊处理,只会是一个普通的Bean,换句话说,该“中介”不会再接受其它的“中介”了。
使用@Configuration标注的类一般使用@Bean注解装配的方式装配Bean
以下是main方法:
package zb.spring.beans;

public class BeansTest {
    public static void main(String[] args) {
        ApplicationContext ctx = new AnnotationConfigApplicationContext(StudentConfig.class);

        Student jason = (Student) ctx.getBean("jason");
        Student tom = (Student) ctx.getBean("tom");

        jason.introduce();
        tom.introduce();
    }
}
执行结果为:

装配依赖于另一个Bean的Bean
我们知道在实际业务中类与类之间是相互依赖的,那么Spring IoC容器中Bean和Bean之间也需要相互依赖。
例如学生考试时需要依赖于笔:
package zb.spring.beans.pojo;

public class Pen {
    private String color;

    public Pen(String color){
        this.color = color;
    }
}
package zb.spring.beans.pojo;

public class Student {
    private String name;
    private Pen pen;

    public String getName() {
        return name;
    }

    public Student setName(String name) {
        this.name = name;
        return this;
    }

    public Pen getPen() {
        return pen;
    }

    public Student setPen(Pen pen) {
        this.pen = pen;
        return this;
    }

    public void introduce(){
        System.out.println("我的名字叫" + name);
    }

    public void write(){
        System.out.println(name + "使用" + pen.getColor() + "颜色的笔写了一行字");
    }
}
在装配Student这个Bean时需要将装配进Spring IoC容器的Pen装进Student中,观察下面的配置代码:
package zb.spring.beans.config;

@Configuration
public class StudentConfig {

    @Bean
    public Pen pen(){
        return new Pen("炭黑");
    }

    @Bean
    public Student jason(){
        Student jason = new Student();
        jason.setName("Jason");
        jason.setPen(pen());

        return jason;
    }
}
通过在setPen时调用装配Pen的方法可以从容器中获取Pen的Bean实例。
在main方法中调用Student类的write()方法:
public class BeansTest {
    public static void main(String[] args) {
        ApplicationContext ctx = new AnnotationConfigApplicationContext(StudentConfig.class);

        Student jason = (Student) ctx.getBean("jason");

        jason.introduce();
        jason.write();
    }
}
运行结果为:

当然,可能你会有疑问,这不就是调用'pen()方法返回一个对象吗?但是new Pen() == new Pen()可是不成立的,我需要是的Spring IoC中的Pen实例,而不是重新new一个。
其实在StudentConfig这个类中,pen()方法已经被@Bean注解标注了,那么在被Spring管理的其他Bean调用pen()方法时会被拦截并且注入Spring IoC中的Pen类的Bean(若在其他地方直接调用pen()方法则不会被管理)。下面修改main方法来验证一下:
ApplicationContext ctx = new AnnotationConfigApplicationContext(StudentConfig.class);

Student jason = (Student) ctx.getBean("jason");

Pen p1 = (Pen) ctx.getBean("pen");
Pen p2 = jason.getPen();
Pen p3 = new StudentConfig().pen();

System.out.println(p1);
System.out.println(p2);
System.out.println(p3);
运行结果:

可以看到前两个是同一个Bean实例,而直接调用pen()方法则会创建新的实例。
三、使用@Autowired注解自动装配
同样先观察@Autowired注解的声明:
@Target({ElementType.CONSTRUCTOR, ElementType.METHOD, ElementType.PARAMETER, ElementType.FIELD, ElementType.ANNOTATION_TYPE})
@Retention(RetentionPolicy.RUNTIME)
@Documented
public @interface Autowired {
    boolean required() default true;
}
Target有构造器、方法、参数、属性和注解,意味着@Autowired注解可以用在这四种类型上面。@Autowired有一个boolean类型的required属性,用于指定自动注入的Bean是否为必须,如果指定required为true,则容器中没有这个bean时会报异常。一般来说不会将required设为false,否则需要进行判空操作,以免出现空指针异常。
自动装配
在前面介绍的都是显式装配,其实在便利性方面,最强大的还是Spring的自动化配置,并且在大部分的情况下建议使用自动装配,因为这样可以减小配置的复杂度。(在Spring boot项目中,Controller依赖Service对象及Service依赖DAO层对象都是通过@Autowired自动装配完成的)
通过方法装配
将上一小节“装配依赖于另一个Bean的Bean”中的代码稍稍改一下:
@Component
public class Pen {
    @Value("炭黑")
    private String color;

    public String getColor() {
        return color;
    }
}
@Component("jason")
public class Student {
    @Value("jason")
    private String name;
    private Pen pen;

    public String getName() {
        return name;
    }

    public Student setName(String name) {
        this.name = name;
        return this;
    }

    public Pen getPen() {
        return pen;
    }

    @Autowired
    public Student setPen(Pen pen) {
        this.pen = pen;
        return this;
    }

    public void introduce(){
        System.out.println("我的名字叫" + name);
    }

    public void write(){
        System.out.println(name + "使用" + pen.getColor() + "颜色的笔写了一行字");
    }
}
在Student类中标注Student类为Bean,Bean的名称为"jason",属性name为"Jason",在setPen(Pen pen)方法上则标注了@Autowired注解。下面是配置类,去除了显式注入Bean的语句:
package zb.spring.beans.config;

@Configuration
@ComponentScan(basePackages = {"zb.spring.beans.pojo"})
public class StudentConfig {}
main方法改回原样:
ApplicationContext ctx = new AnnotationConfigApplicationContext(StudentConfig.class);

Student jason = (Student) ctx.getBean("jason");

jason.introduce();
jason.write();
运行结果为:

可以看到成功注入Pen。在方法上使用@Autowired注解,则此方法会被自动调用并且根据参数的类型自动从Spring IoC容器中找到匹配的Bean进行装配(有兴趣的可以在set方法中打印一条语句,即使setPen()方法没有显式调用过也会被Spring自动调用)。
通过参数装配
通过参数自动装配类似于通过方法装配,只是将@Autowired注解标注在参数上:
@Component("jason")
public class Student {

    @Value("Jason")
    private String name;

    private Pen pen;

    public Student(@Autowired Pen pen){
        this.pen = pen;
    }

    public String getName() {
        return name;
    }

    public Student setName(String name) {
        this.name = name;
        return this;
    }

    public Pen getPen() {
        return pen;
    }

    public Student setPen(Pen pen) {
        this.pen = pen;
        return this;
    }

    public void introduce(){
        System.out.println("我的名字叫" + name);
    }

    public void write(){
        System.out.println(name + "使用" + pen.getColor() + "颜色的笔写了一行字");
    }
}
在Student类中并没有空构造方法,而是带有@Autowired标注的Pen参数的构造方法,当Spring扫描到@Component注解时,Spring会自动发现这个构造方法并找到合适的Bean注入到参数上。运行结果同上。
通过属性装配
通过属性装配类似,将@Autowired标注到属性上即可:
@Autowired
private Pen pen;
运行结果同上。
@Primary和@Qualifier注解解决自动装配的歧义性
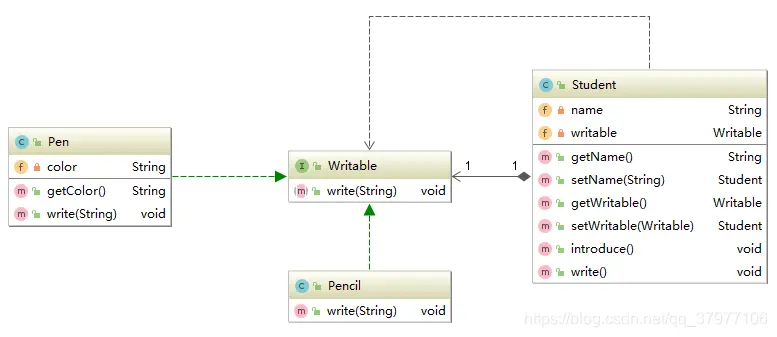
自动装配非常简单,但在某些情况下可能会出现歧义,如有一个Pen类和Pencil类都继承自Writable接口,而Student依赖于Writable而不是具体的Pen或Pencil,如下类图:

具体代码如下:
package zb.spring.beans.pojo;

public interface Writable {
    public void write(String sentence);
}
package zb.spring.beans.pojo;

@Component
public class Pen implements Writable{
    @Value("炭黑")
    private String color;

    public String getColor() {
        return color;
    }

    public void write(String sentence) {
        System.out.println("用" + color + "色的钢笔写下了\"" + sentence + "\"");
    }
}
package zb.spring.beans.pojo;

@Component
public class Pencil implements Writable {
    public void write(String sentence) {
        System.out.println("用铅笔写下了\"" + sentence + "\"");
    }
}
package zb.spring.beans.pojo;

@Component("jason")
public class Student{

    @Value("Jason")
    private String name;

    @Autowired
    private Writable writable;

    public String getName() {
        return name;
    }

    public Student setName(String name) {
        this.name = name;
        return this;
    }

    public Writable getWritable() {
        return writable;
    }

    public Student setWritable(Writable writable) {
        this.writable = writable;
        return this;
    }

    public void introduce(){
        System.out.println("我的名字叫" + name);
    }

    public void write(){
        System.out.print(name);
        writable.write("我是" + name);
    }
}
在Student类中,属性Writable被标注为@Autowired,那么应该是注入Pen呢还是Pencil呢?
下面看一下运行结果:
Caused by: org.springframework.beans.factory.NoUniqueBeanDefinitionException: No qualifying bean of type 'zb.spring.beans.pojo.Writable' available: expected single matching bean but found 2: pen,pencil
	at org.springframework.beans.factory.config.DependencyDescriptor.resolveNotUnique(DependencyDescriptor.java:217)
	at org.springframework.beans.factory.support.DefaultListableBeanFactory.doResolveDependency(DefaultListableBeanFactory.java:1215)
	at org.springframework.beans.factory.support.DefaultListableBeanFactory.resolveDependency(DefaultListableBeanFactory.java:1164)
	at org.springframework.beans.factory.annotation.AutowiredAnnotationBeanPostProcessor$AutowiredFieldElement.inject(AutowiredAnnotationBeanPostProcessor.java:593)
	... 14 more
运行报错。其中第一行有一句为:expected single matching bean but found 2: pen,pencil(期望匹配单个bean但是发现了2个:pen和pencil)。
在这种情况下我们可以通过@Primary或@Qualifier消除歧义:
使用@Primary
@Primary单词的意思是优先,顾名思义就是被标注的bean优先,比如在Pen这个类上加一个@Primary标注:
@Component
@Primary
public class Pen implements Writable{
    @Value("炭黑")
    private String color;

    public String getColor() {
        return color;
    }

    public void write(String sentence) {
        System.out.println("用" + color + "色的钢笔写下了\"" + sentence + "\"");
    }
}
运行结果为:

因为Pen被标注了@Primary优先,所以在寻找Writable的实现类的实例时不再有歧义(查看@Primary的声明发现并没有定义任何属性,也就是说一个接口的实现类中@Primary只能有一个,不会再定义精确的优先级,如果定义两个@Primary将会报错:more than one 'primary' bean found among candidates: [pen, pencil])。
使用@Qualifier
@Primary是在接口的实现类中定义优先级,而@Qualifier则是在@Autowired自动注入时指定bean的名称,比@Primary更加的灵活。在Student类中进行如下修改:
@Autowired
@Qualifier("pencil")
private Writable writable;
此时运行结果为:

注意使用了@Qualifier之后@Primary注解将不会生效。
- 感谢你赐予我前进的力量


