

为何不推荐使用@Async的默认线程池配置-带你深度阅读Spring Async源码
最近看了一篇关于线程池的文章,突然想起来很久以前有文章说过要慎用Spring的 Async注解,可能会发生OOM,猜测应该是 Async注解默认使用的线程池可能最大线程数太大,或者使用的是无界队列,会导致线程无限增加。
今天刚好有空,就来阅读一下 Aysnc的源码验证一下我的猜想。
准备
为了不被其他代码所干扰,我创建了一个全新的项目,使用的jdk版本和依赖版本为:JDK 8,org.springframework.boot:spring-boot-starter-parent:2.2.5.RELEASE。
接下来创建三个类:Application主类、AsyncService类和一个AsyncTest测试类。其中AsyncService有一个标记了@Async注解的方法,AsyncTest测试类会调用这个异步方法。这三个类的代码如下:
/**
 * @author <a href="mailto:me@flycat.tech">Bryon Zen</a>
 * @since 2024/8/14
 */
@EnableAsync
@SpringBootApplication
public class Application {
    public static void main(String[] args) {
        SpringApplication.run(Application.class);
    }
}
/**
 * @author <a href="mailto:me@flycat.tech">Bryon Zen</a>
 * @since 2024/8/14
 */
@Service
public class AsyncService {
    @Async
    public void thisIsAnAsyncMethod() {
        System.out.println("线程名称:" + Thread.currentThread().getName() + "开始");
        try {
            Thread.sleep(5000);
        } catch (InterruptedException e) {
            throw new RuntimeException(e);
        }
        System.out.println("线程名称:" + Thread.currentThread().getName() + "结束");
    }
}
/**
 * @author <a href="mailto:me@flycat.tech">Bryon Zen</a>
 * @since 2024/8/14
 */
@SpringBootTest(classes = Application.class)
public class AsyncTest {
    @Resource
    private AsyncService asyncService;

    @Test
    public void start() throws Exception{
        long start = System.currentTimeMillis();
        asyncService.thisIsAnAsyncMethod();
        long end = System.currentTimeMillis();

        System.out.println("调用完成,用时" + (end - start) + "ms");
        Thread.sleep(5000);
    }
}
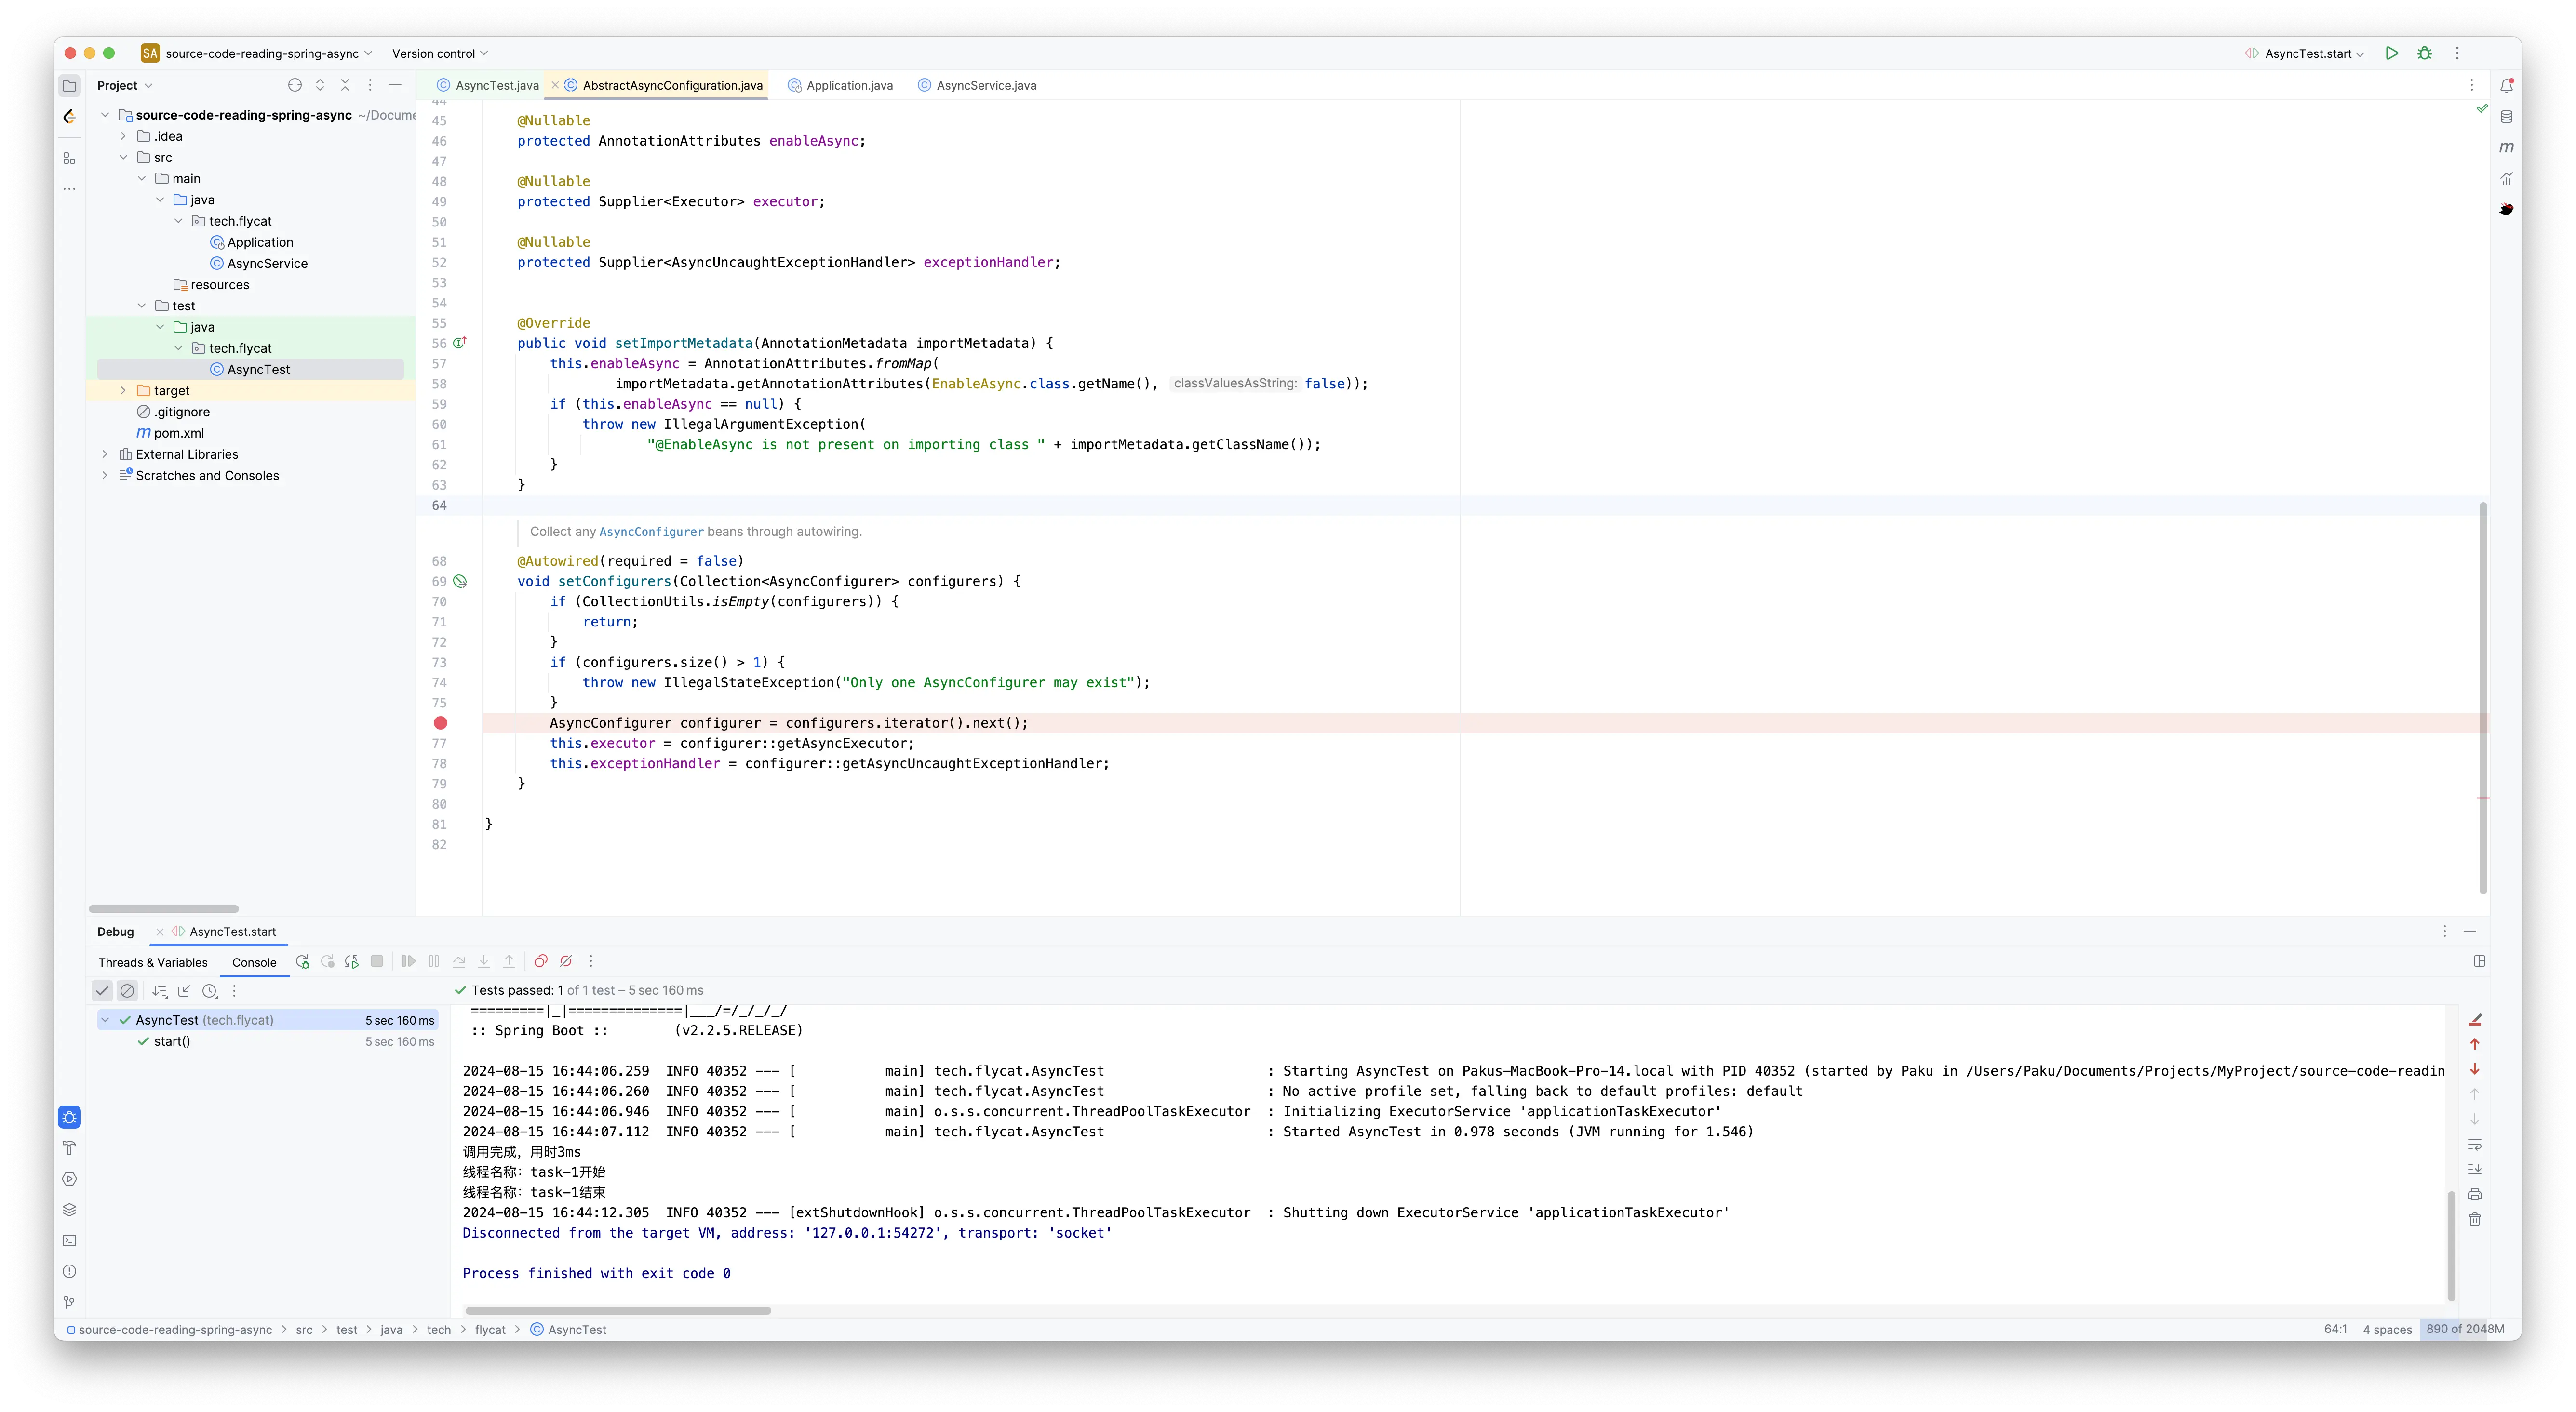
在AsyncService.thisIsAnAsyncMethod方法睡眠了5秒,在睡眠前以及睡眠后分别打印了一条消息,在测试类中,打印了调用该异步方法的调用时间。
在Application类中加上 @EnableAsync注解,使异步注解生效。以下是执行测试类之后的结果。

可以看到,调用时长仅为2ms,说明异步注解生效了。
从@EnableAsync注解开始
Async注解的源码该从哪里开始读起呢?既然是标记了 @EnableAsync这个注解才生效,那我们可以将它作为阅读源码的突破口。
点进 @EnableAsync源码,并点击download源码,观察源码发现了@Import(AsyncConfigurationSelector.class)的代码。@Import是非常常用的一个用来显式地导入Spring Bean配置的注解。
@Target(ElementType.TYPE)
@Retention(RetentionPolicy.RUNTIME)
@Documented
// 关键的导入配置的代码
@Import(AsyncConfigurationSelector.class)
public @interface EnableAsync {
		// 此处省略其他代码
}
接下来进入AsyncConfigurationSelector源码。
/**
 * 选择应该使用哪一个AbstractAsyncConfiguration的实现类来
 */
public class AsyncConfigurationSelector extends AdviceModeImportSelector<EnableAsync> {

	private static final String ASYNC_EXECUTION_ASPECT_CONFIGURATION_CLASS_NAME =
			"org.springframework.scheduling.aspectj.AspectJAsyncConfiguration";

	/**
	 * 根据adviceMode的值返回ProxyAsyncConfiguration或AspectJAsyncConfiguration
	 */
	@Override
	public String[] selectImports(AdviceMode adviceMode) {
		return switch (adviceMode) {
			case PROXY -> new String[] {ProxyAsyncConfiguration.class.getName()};
			case ASPECTJ -> new String[] {ASYNC_EXECUTION_ASPECT_CONFIGURATION_CLASS_NAME};
		};
	}

}
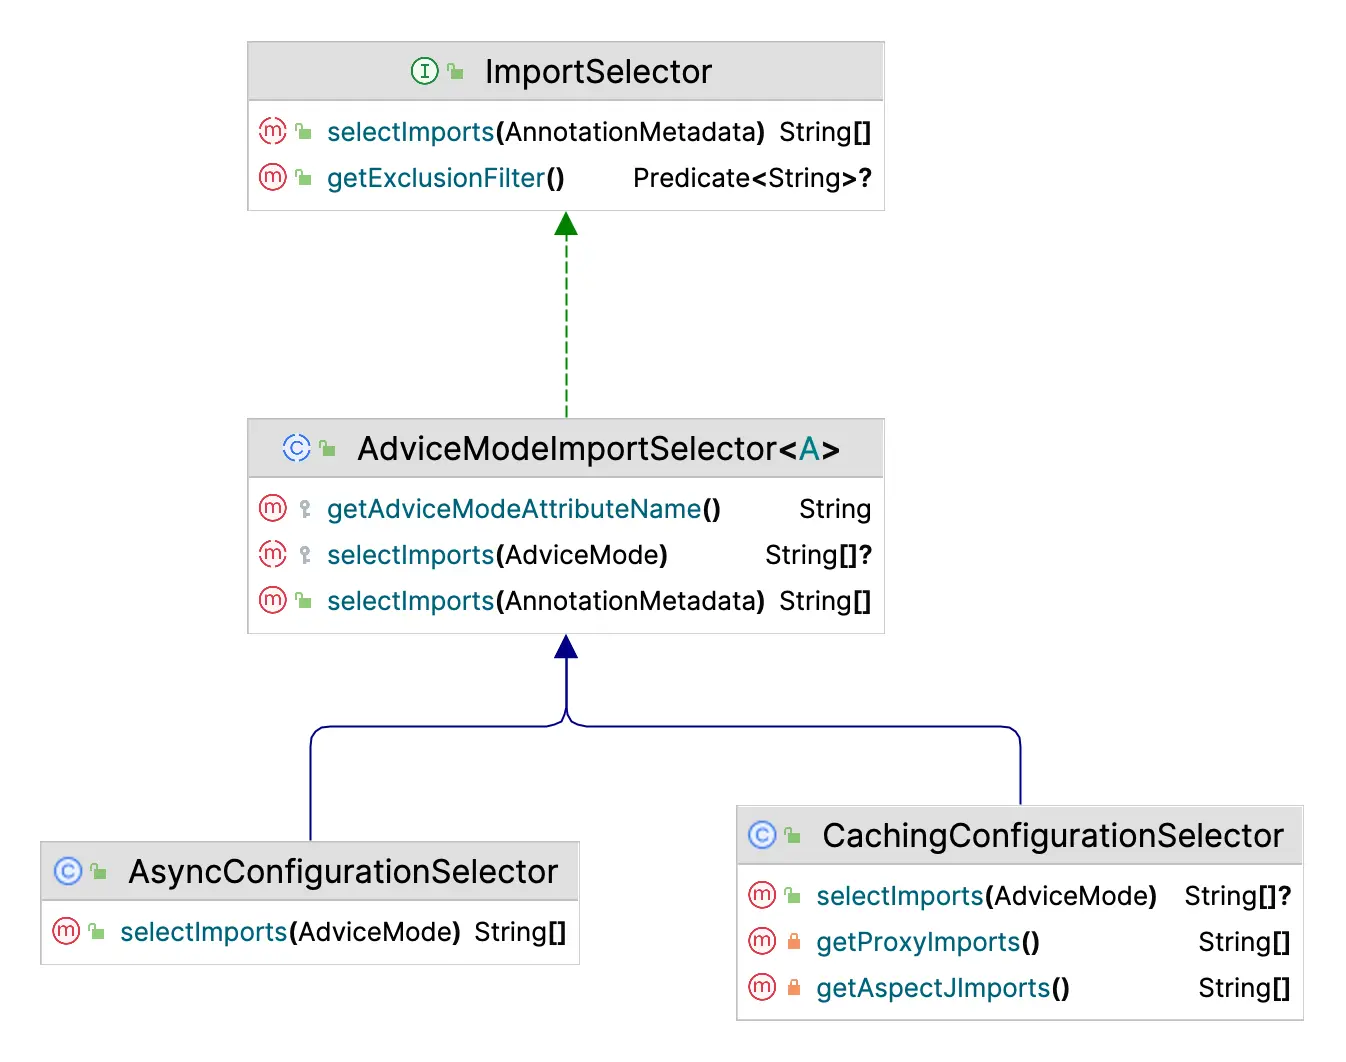
这个类中只有一个selectImports方法,根据adviceMode判断应该加载ProxyAsyncConfiguration类还是ASYNC_EXECUTION_ASPECT_CONFIGURATION_CLASS_NAME对应的AspectJAsyncConfiguration类。显然这个方法无法给我们太多信息。但是可以看到AsyncConfigurationSelector是继承自AdviceModeImportSelector的,再点进AdviceModeImportSelector类中看看。
public abstract class AdviceModeImportSelector<A extends Annotation> implements ImportSelector {

	/**
	 * 获取advice mode的默认key名称
	 */
	public static final String DEFAULT_ADVICE_MODE_ATTRIBUTE_NAME = "mode";

	/**
	 * 获取advice mode的默认key名称
	 */
	protected String getAdviceModeAttributeName() {
		return DEFAULT_ADVICE_MODE_ATTRIBUTE_NAME;
	}

	/**
	 * 继承自ImportSelector的方法,@Import之所以能生效,就是因为Spring容器加载的时候会调用该方法,并加载这个方法返回的所有全限定名称的类
	 */
	@Override
	public final String[] selectImports(AnnotationMetadata importingClassMetadata) {
    // 获取当前类的具体泛型类型,也就是EnableAsync
		Class<?> annType = GenericTypeResolver.resolveTypeArgument(getClass(), AdviceModeImportSelector.class);
		Assert.state(annType != null, "Unresolvable type argument for AdviceModeImportSelector");

    // 获取EnableAsync注解的所有定义的字段以及对应的值
		AnnotationAttributes attributes = AnnotationConfigUtils.attributesFor(importingClassMetadata, annType);
		if (attributes == null) {
			throw new IllegalArgumentException(String.format("@%s is not present on importing class '%s' as expected", annType.getSimpleName(), importingClassMetadata.getClassName()));
		}

    // 获取mode对应的值
		AdviceMode adviceMode = attributes.getEnum(getAdviceModeAttributeName());
    // 调用selectImports,selectImports是一个钩子函数,也就是设计模式中的模板方法模式
		String[] imports = selectImports(adviceMode);
		if (imports == null) {
			throw new IllegalArgumentException("Unknown AdviceMode: " + adviceMode);
		}
		return imports;
	}

	/**
	 * 钩子函数,根据adviceMode来决定加载哪些类由子类来决定
	 */
	@Nullable
	protected abstract String[] selectImports(AdviceMode adviceMode);

}
初看这个方法还是不太能明白的,annType是个什么东西,attributes里面又有什么?总不能把每个方法都看一遍吧。其实很简单,打个断点debug一下就知道了,这也是阅读源码的神器。

debug后发现这个annType就是 EnableAsync注解,根据名称来猜测,这个方法获取的就是之前子类AsyncConfigurationSelector中继承AdviceModeImportSelector所定义的泛型,可以翻上去回看一下。
接下来attributes中的数据跟EnableAsync注解中定义的字段完全一致,所以可以猜想这行代码就是获取注解的参数。
做完这些之后,接下来将获取到的adviceMode传递给selectImports方法,而这个方法是一个抽象方法,在子类AsyncConfigurationSelector中执行具体的代码。
由于在添加EnableAsync注解时没有指定任何参数,所以这里的adviceMode是默认的 PROXY,回看AsyncConfigurationSelector方法,实际加载的就是 ProxyAsyncConfiguration类。
扩展
这里用到了设计模式中的模版方法模式,既然是模版方法模式,那肯定是有多个类似流程的子类,查看AdviceModeImportSelector的子类发现,果然还有一个CachingConfigurationSelector,这个类的泛型是
EnableCaching注解,也就是Spring的缓存模块。这里的代码非常值得我们借鉴。
下面看一下所提到的类的类图。
ProxyAsyncConfiguration类
既然默认加载的是ProxyAsyncConfiguration类,那么我们现在目光放在ProxyAsyncConfiguration类上面,首先看一下ProxyAsyncConfiguration的类继承图。
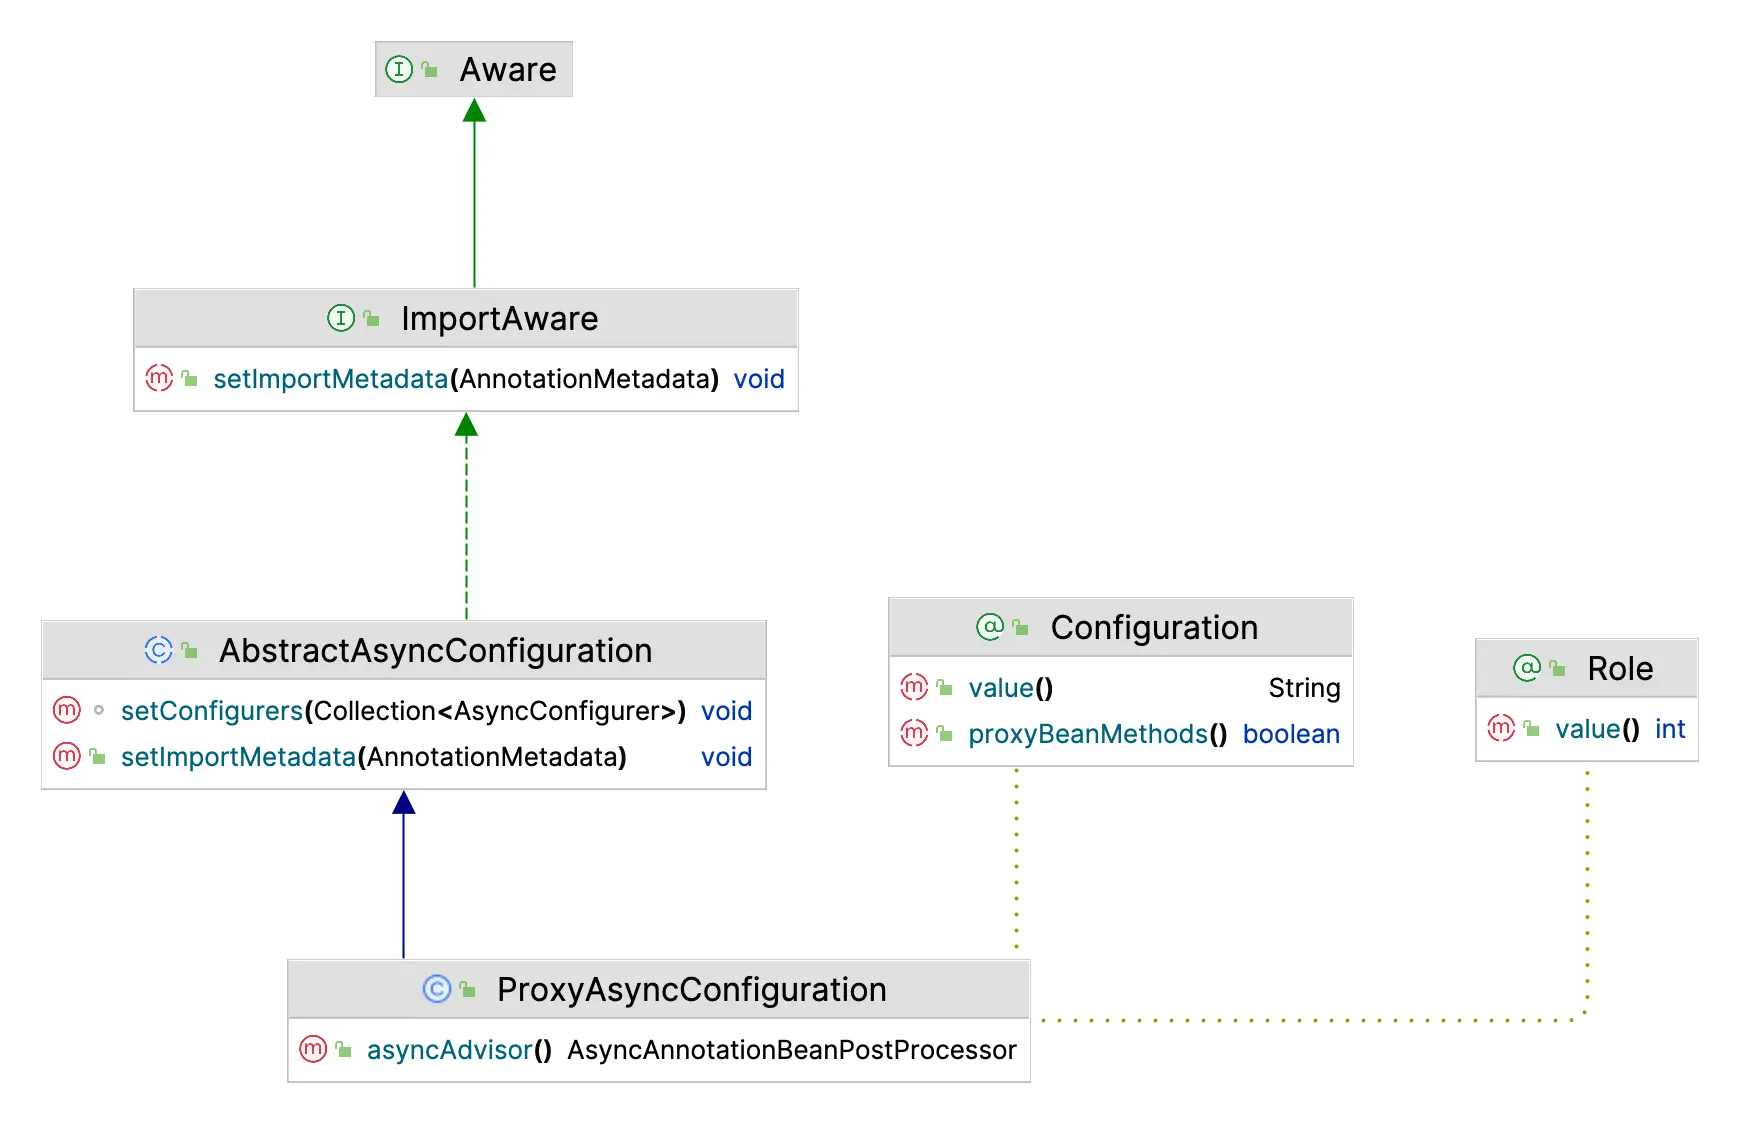
从这个类图可以简单分析一下,ProxyAsyncConfiguration继承自AbstractAsyncConfiguratio抽象类,而AbstractAsyncConfiguration实现了ImportAware接口,抽象类AbstractAsyncConfiguration中有两个方法,分别是setImportMetadata和setConfigurers,在ProxyAsyncConfiguration中只有一个asyncAdvisor。Configuration和Role是两个注解。
首先来看一下抽象类AbstractAsyncConfiguration中的两个方法的代码:
/**
 * 用于开启Spring异步方法能力的抽象类,提供了部分公共代码
 */
@Configuration
public abstract class AbstractAsyncConfiguration implements ImportAware {
	@Nullable
	protected AnnotationAttributes enableAsync;
	@Nullable
	protected Supplier<Executor> executor;
	@Nullable
	protected Supplier<AsyncUncaughtExceptionHandler> exceptionHandler;

	@Override
	public void setImportMetadata(AnnotationMetadata importMetadata) {
    // 获取EnableAsync注解的元数据
		this.enableAsync = AnnotationAttributes.fromMap(
				importMetadata.getAnnotationAttributes(EnableAsync.class.getName(), false));
		if (this.enableAsync == null) {
			throw new IllegalArgumentException("@EnableAsync is not present on importing class " + importMetadata.getClassName());
		}
	}

	/**
	 * 通过自动注入获取配置类
	 */
	@Autowired(required = false)
	void setConfigurers(Collection<AsyncConfigurer> configurers) {
		if (CollectionUtils.isEmpty(configurers)) {
			return;
		}
		if (configurers.size() > 1) {
			throw new IllegalStateException("Only one AsyncConfigurer may exist");
		}
		AsyncConfigurer configurer = configurers.iterator().next();
		this.executor = configurer::getAsyncExecutor;
		this.exceptionHandler = configurer::getAsyncUncaughtExceptionHandler;
	}
}
可以看到,setImportMetadata方法中只做了获取EnableAsync注解的元数据这一个动作,并且保存在enableAsync变量中。
而在setConfigurers方法中我们发现,这里通过自动注入AsyncConfigurer子类的Bean来获取相关配置,并且将配置赋值给this.executor和this.exceptionHandler变量。
我们发现,这个this.executor的类型是 Supplier<Executor>,这不就是我们经常用的线程池执行器吗,Async注解异步能力就是依赖这个执行器实现的,那我有理由相信这里的代码已经接近此次阅读源码的目标,没想到这么简单。话不多说,我们打个断点验证一下猜想,看看这个默认的executor到底有什么坑。
不过事情似乎并不是那么顺利,测试用例已经执行完了,但是并没有进入断点,说明线程池并不是在这里配置的。那只能继续往下看了。
现在我们将目光转移到ProxyAsyncConfiguration类,先看下ProxyAsyncConfiguration类的代码:
@Configuration
@Role(BeanDefinition.ROLE_INFRASTRUCTURE)
public class ProxyAsyncConfiguration extends AbstractAsyncConfiguration {

	@Bean(name = TaskManagementConfigUtils.ASYNC_ANNOTATION_PROCESSOR_BEAN_NAME)
	@Role(BeanDefinition.ROLE_INFRASTRUCTURE)
	public AsyncAnnotationBeanPostProcessor asyncAdvisor() {
		Assert.notNull(this.enableAsync, "@EnableAsync annotation metadata was not injected");
		// 这里定义了一个后置处理器,很容易猜测它的作用就是在Bean创建完成后,对标记了@Async注解的方法执行异步逻辑
    AsyncAnnotationBeanPostProcessor bpp = new AsyncAnnotationBeanPostProcessor();
		// 给后置处理器配置线程池和异常处理器
    bpp.configure(this.executor, this.exceptionHandler);
		// 获取EnableAsync注解中的annotation参数,默认情况下是使用@Async注解定义异步方法,这里也可以自定义
    Class<? extends Annotation> customAsyncAnnotation = this.enableAsync.getClass("annotation");
		if (customAsyncAnnotation != AnnotationUtils.getDefaultValue(EnableAsync.class, "annotation")) {
			bpp.setAsyncAnnotationType(customAsyncAnnotation);
		}
		bpp.setProxyTargetClass(this.enableAsync.getBoolean("proxyTargetClass"));
		bpp.setOrder(this.enableAsync.<Integer>getNumber("order"));
		return bpp;
	}
}
在asyncAdvisor可以看到,首先定义了一个AsyncAnnotationBeanPostProcessor,在它的上面实现了BeanPostProcessor接口,说明它是一个Spring的后置处理器,在Bean创建前和创建后分别可以执行一些自定义操作。
AsyncAnnotationBeanPostProcessor的代码我们待会再看,先继续往下看。
在第12行中给后置处理器配置了线程池和异常处理器,不过根据前面debug的结果来看,这个地方的线程池应该是空的。
继续往下看第14行,不得不说,有些写Spring源码的人真的很规范,这里看变量名称和方法名称就能对它的作用猜个大概,应该就是用来自定义异步注解配置的功能,默认情况下我们都是使用@Async注解来标记异步方法,其实也可以自己指定,不过一般不会用到吧。
后面的代码就是一些配置操作了。
目前为止还无法确定默认的线程池是如何创建出来的,不过前面看到了一个AsyncAnnotationBeanPostProcessor后置处理器类,应该能从这里面找到一些突破口。
AsyncAnnotationBeanPostProcessor
按照惯例,先来看一下AsyncAnnotationBeanPostProcessor的类图。
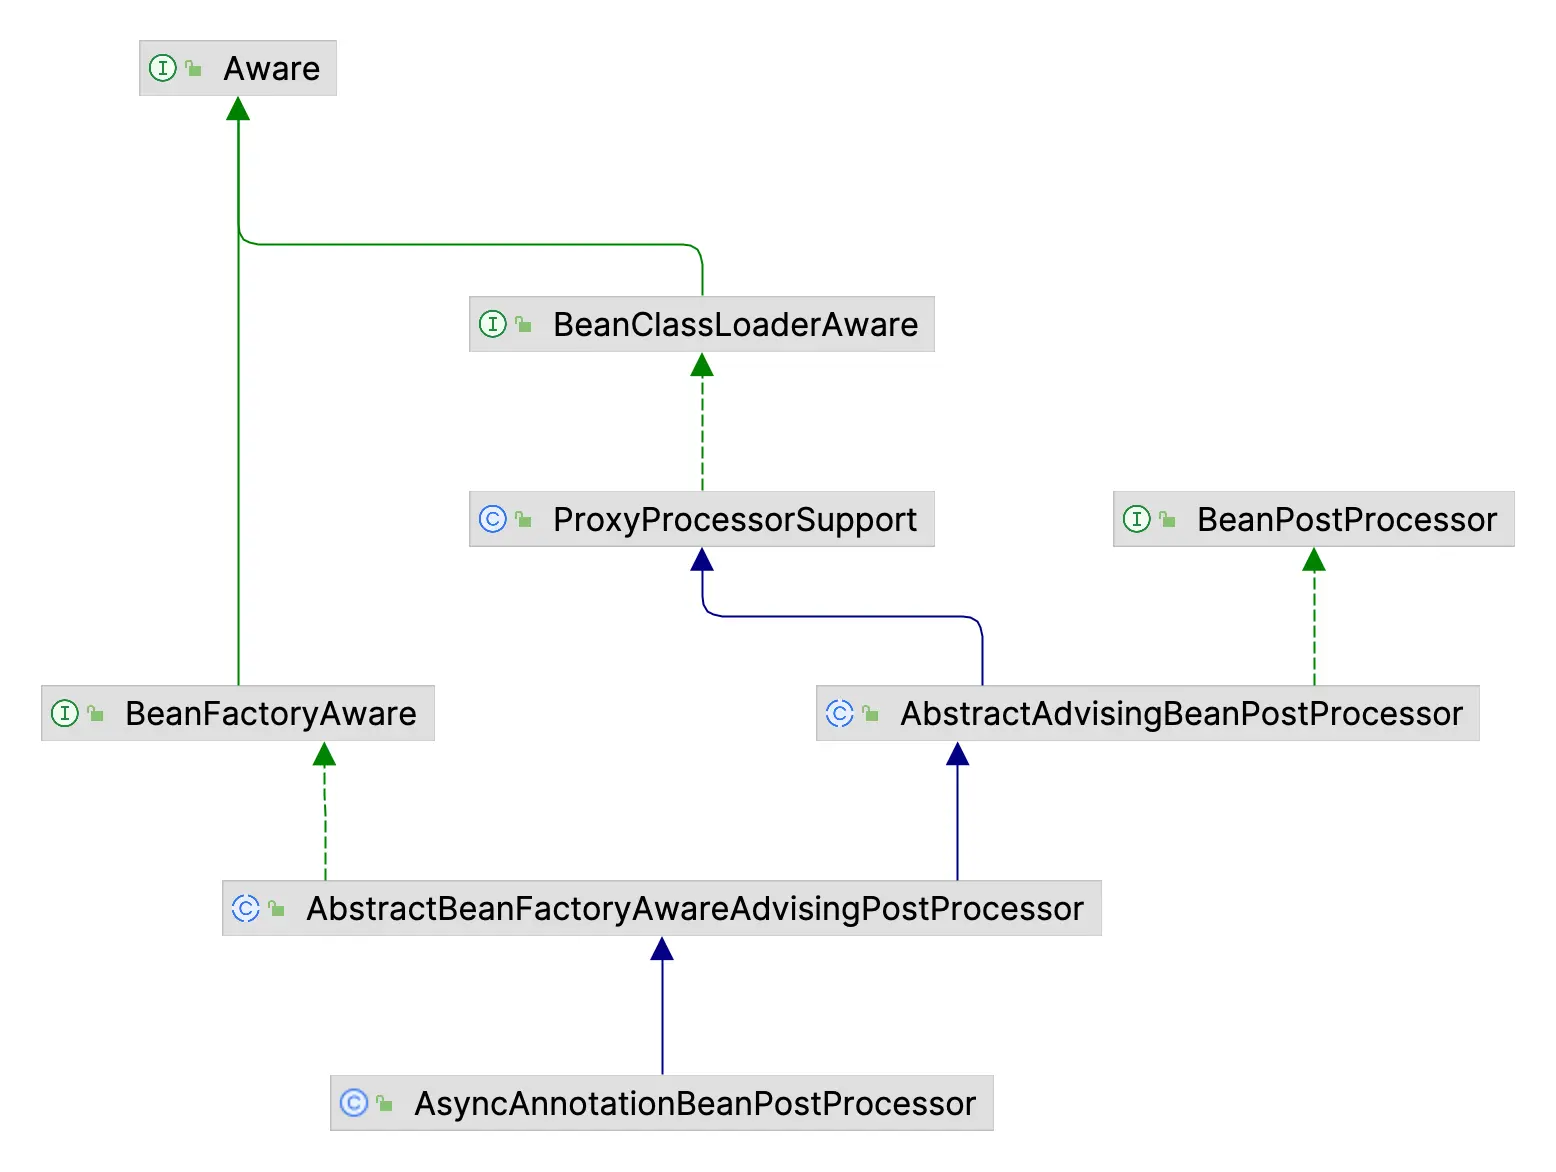
首先可以看到AsyncAnnotationBeanPostProcessor继承自AbstractBeanFactoryAwareAdvisingPostProcessor抽象类,并分别实现了BeanFactoryAware和继承了AbstractAdvisingBeanPostProcessor。
其中BeanFactoryAware提供了获取beanFactory的能力,AbstractAdvisingBeanPostProcessor实现了BeanPostProcessor,提供了后置处理器的能力。
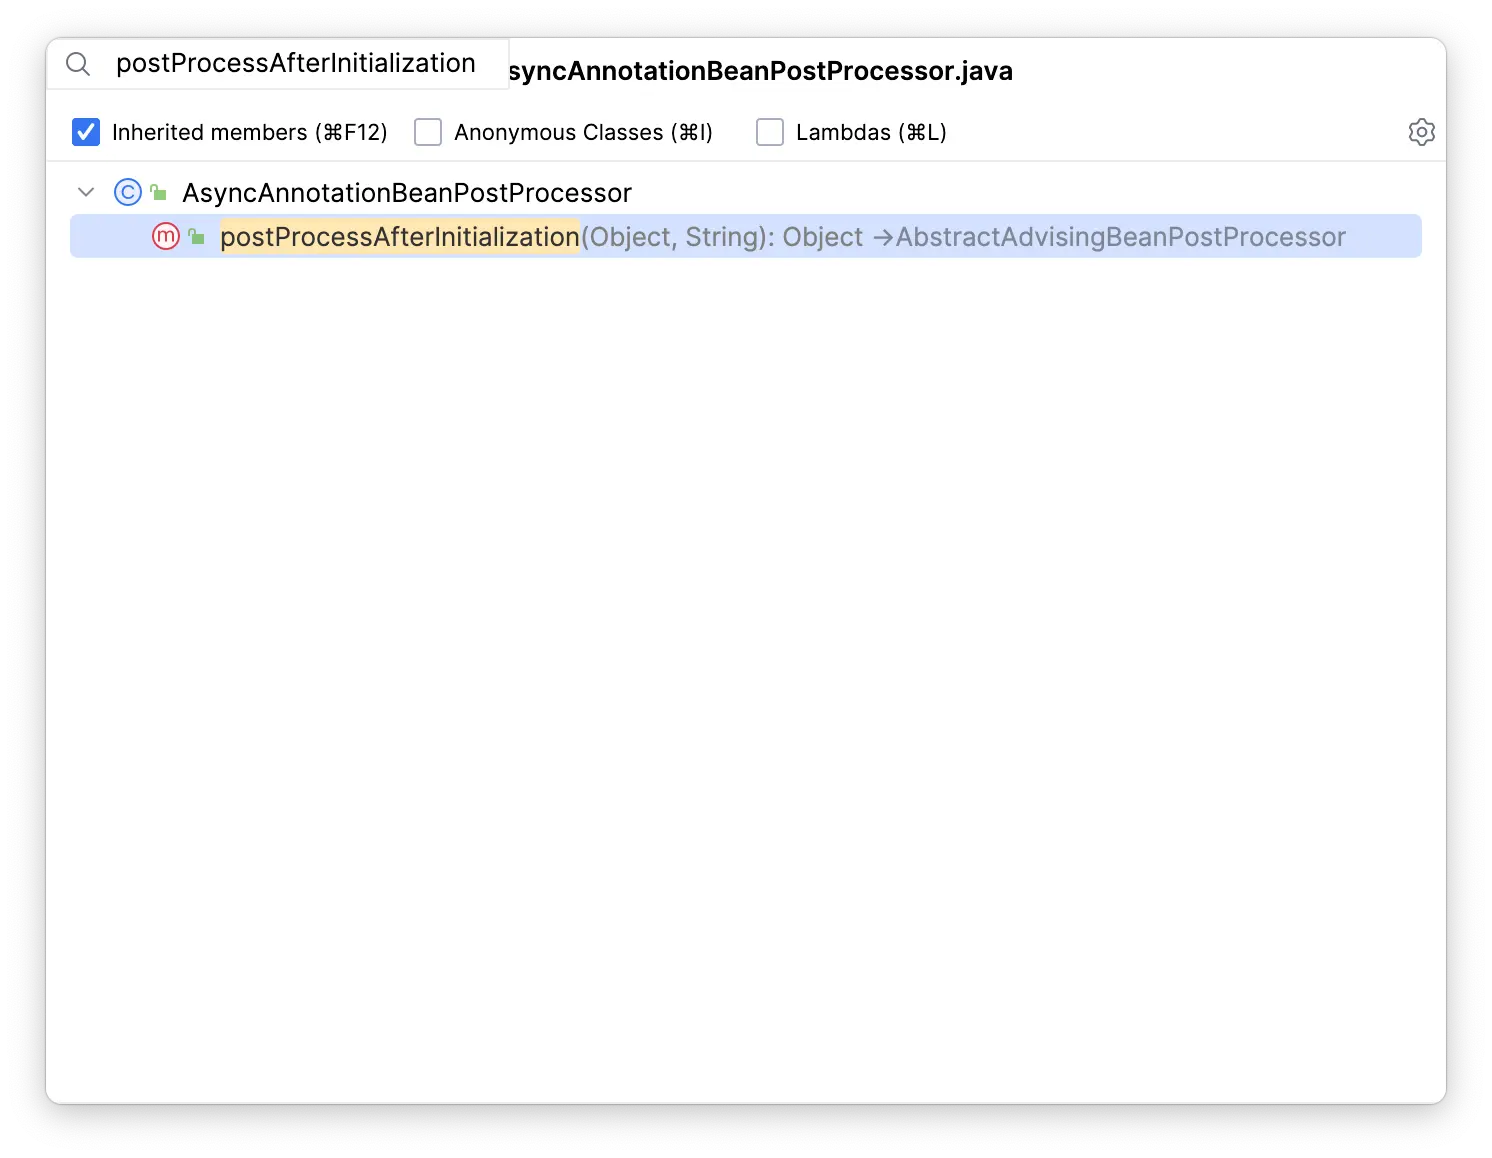
根据以上信息可以猜测为Bean添加异步代理的功能应该在BeanPostProcessor提供的后置处理方法中,也就是postProcessBeforeInitialization或者postProcessAfterInitialization方法。在AsyncAnnotationBeanPostProcessor类中搜索了一下这两个方法,发现postProcessAfterInitialization是在AbstractAdvisingBeanPostProcessor中实现的,另一个方法没有任何逻辑。那就进入这个方法一探究竟。
因为我知道我是在AsyncService类的方法中定义了异步方法,所以直接打了一个条件断点,看看具体执行结果。
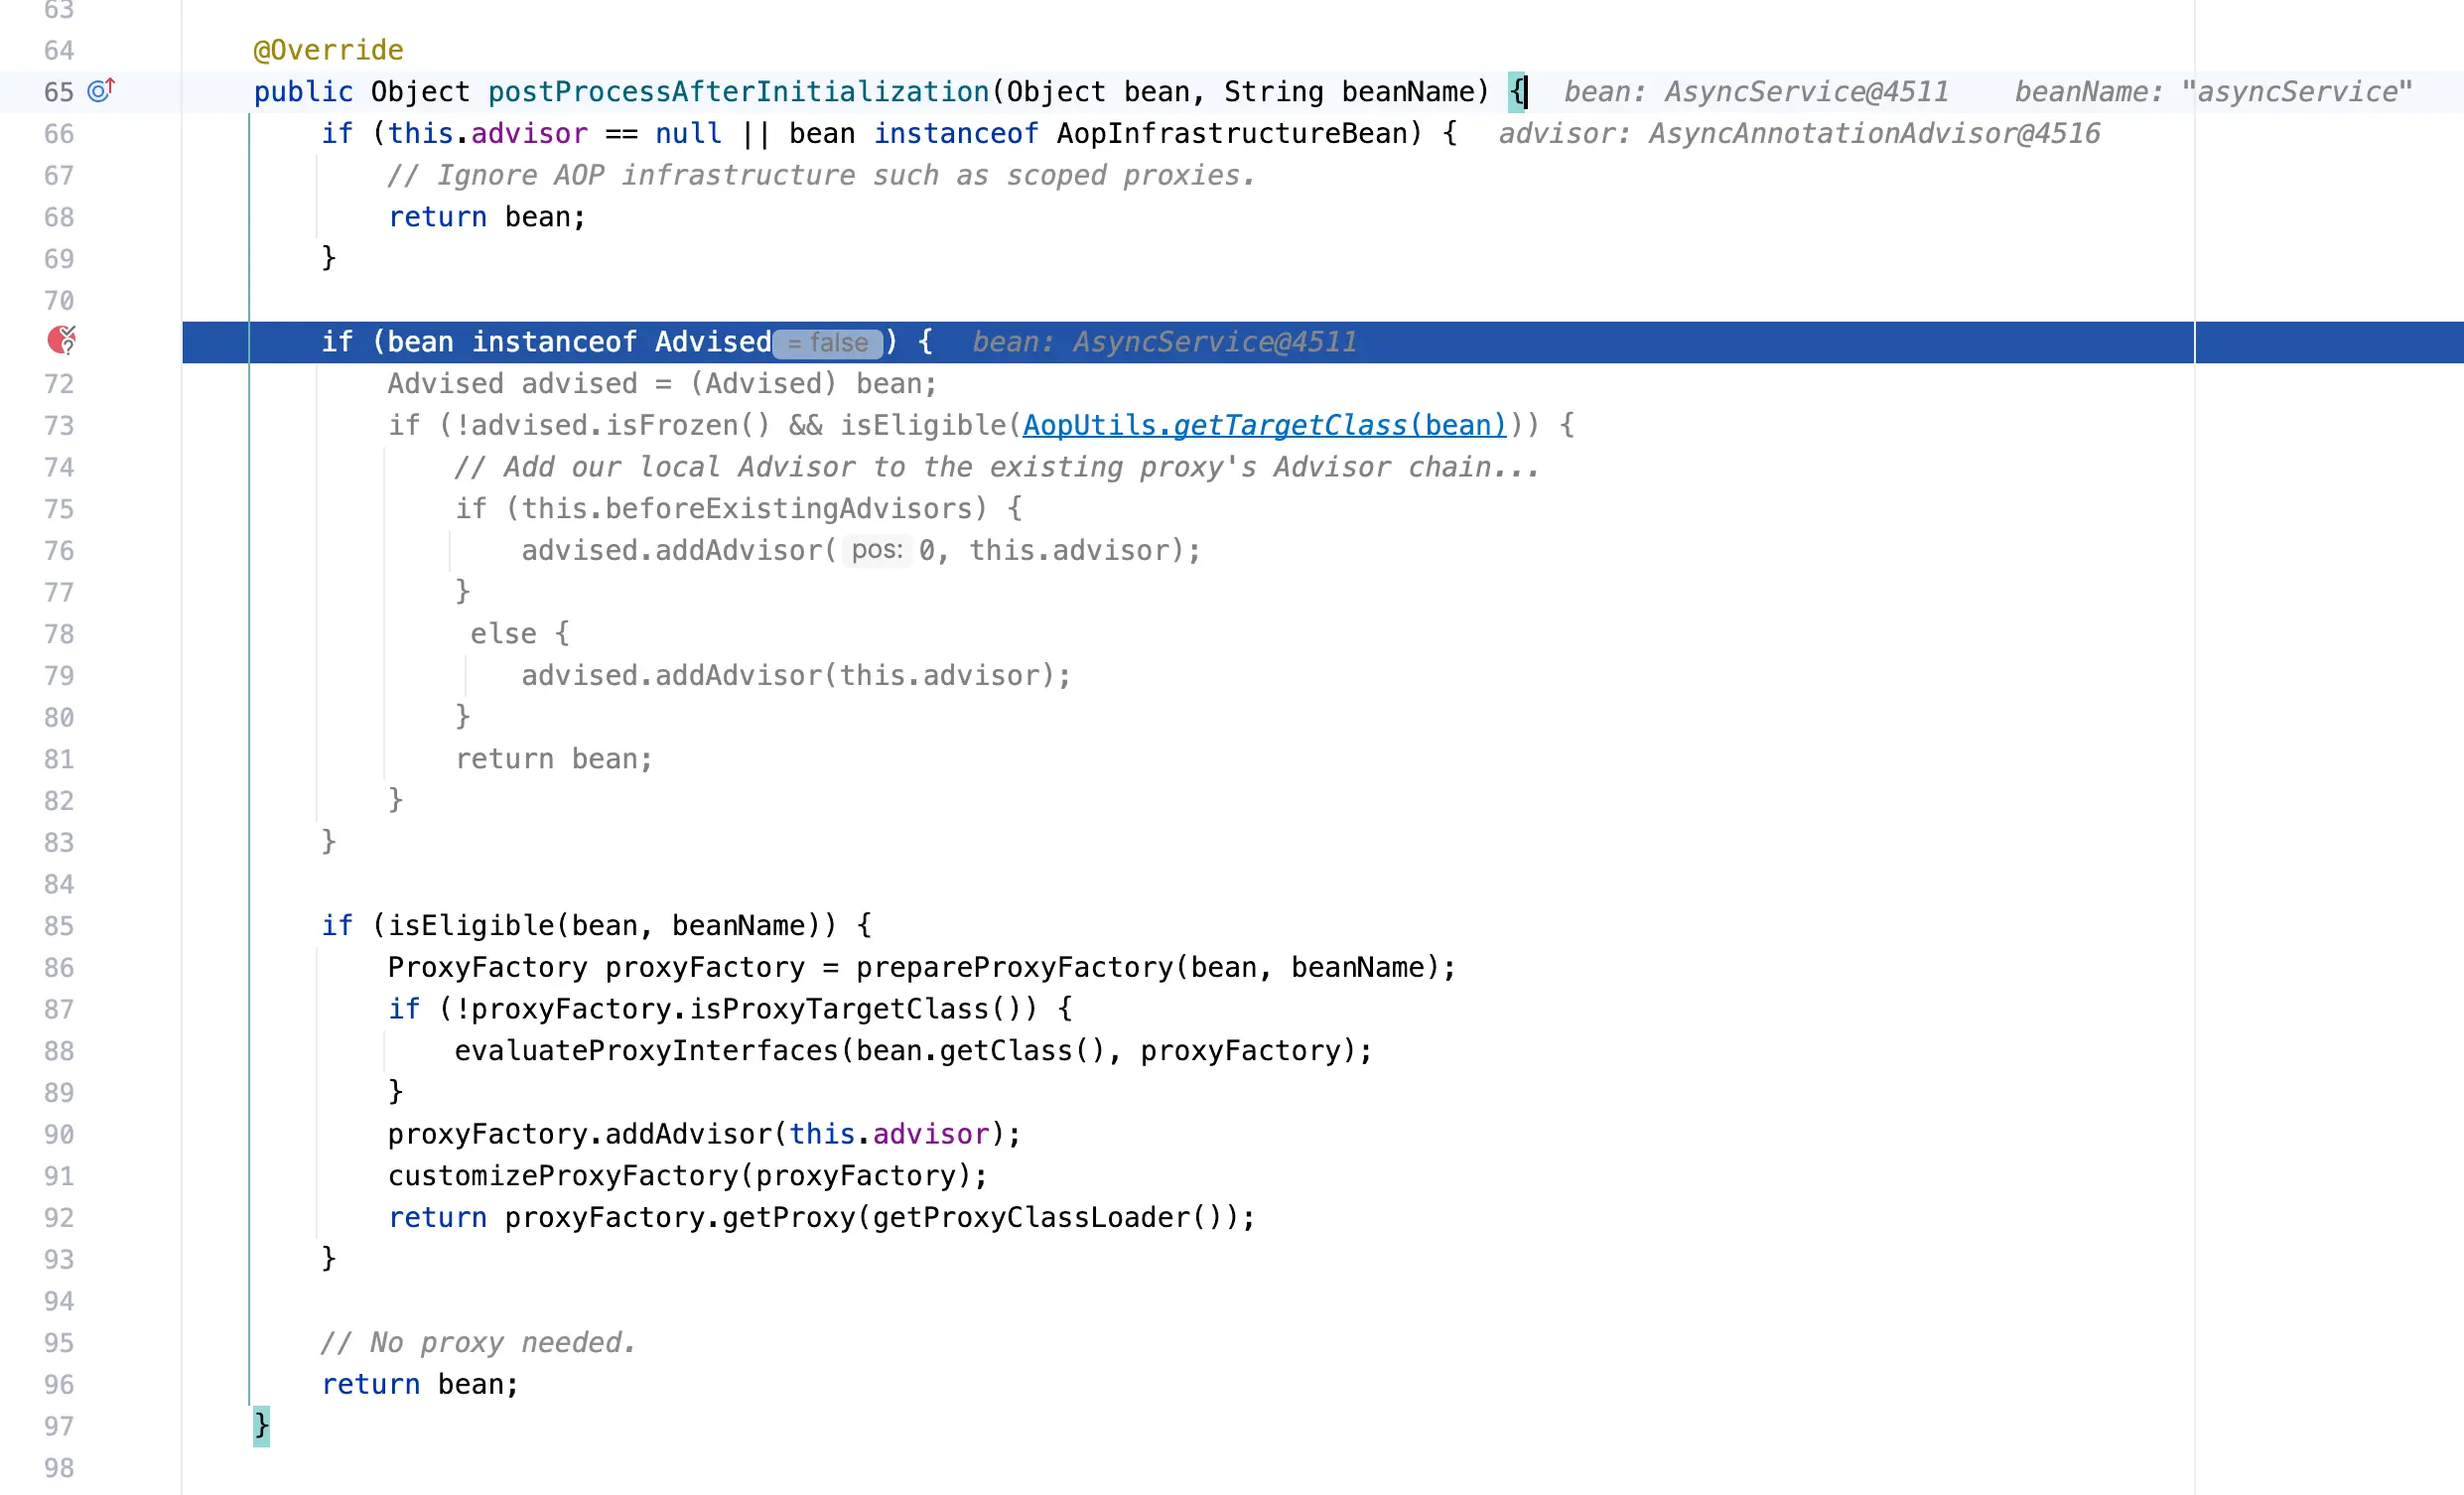
可以看到断点下面的代码是灰色的,说明IDEA根据变量预测不会执行这些代码,而第85行的if代码块是黑色,说明会执行到这里。
这里根据代码的名称很容易看出来,是为bean添加了一个切面,这个切面是当前类的 this.advisor成员变量。也就是说this.advisor切面中有异步执行的逻辑。那么接下来就要弄清楚这个this.advisor是怎么来的。
这里教大家一个技巧,在IDEA中可以给这个成员变量打一个断点,当这个变量被修改或被访问的时候就会停下来。
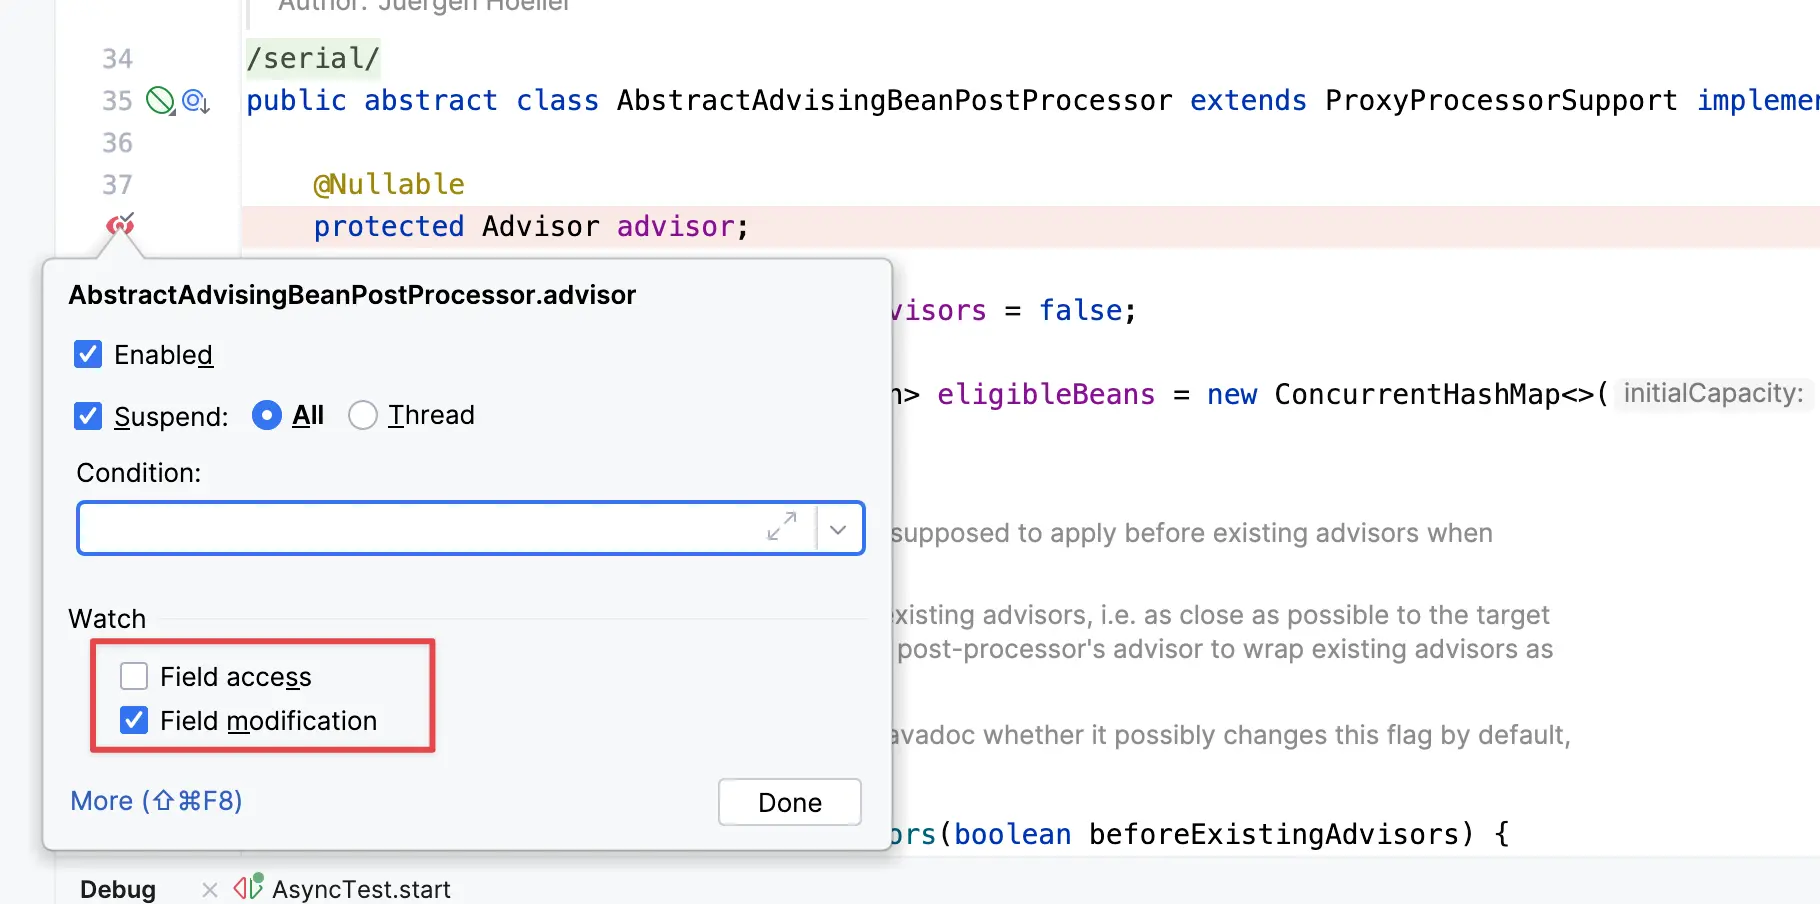
打完断点debug后,发现停在了setBeanFactory方法上,这个是BeanFactoryAware提供的能力。
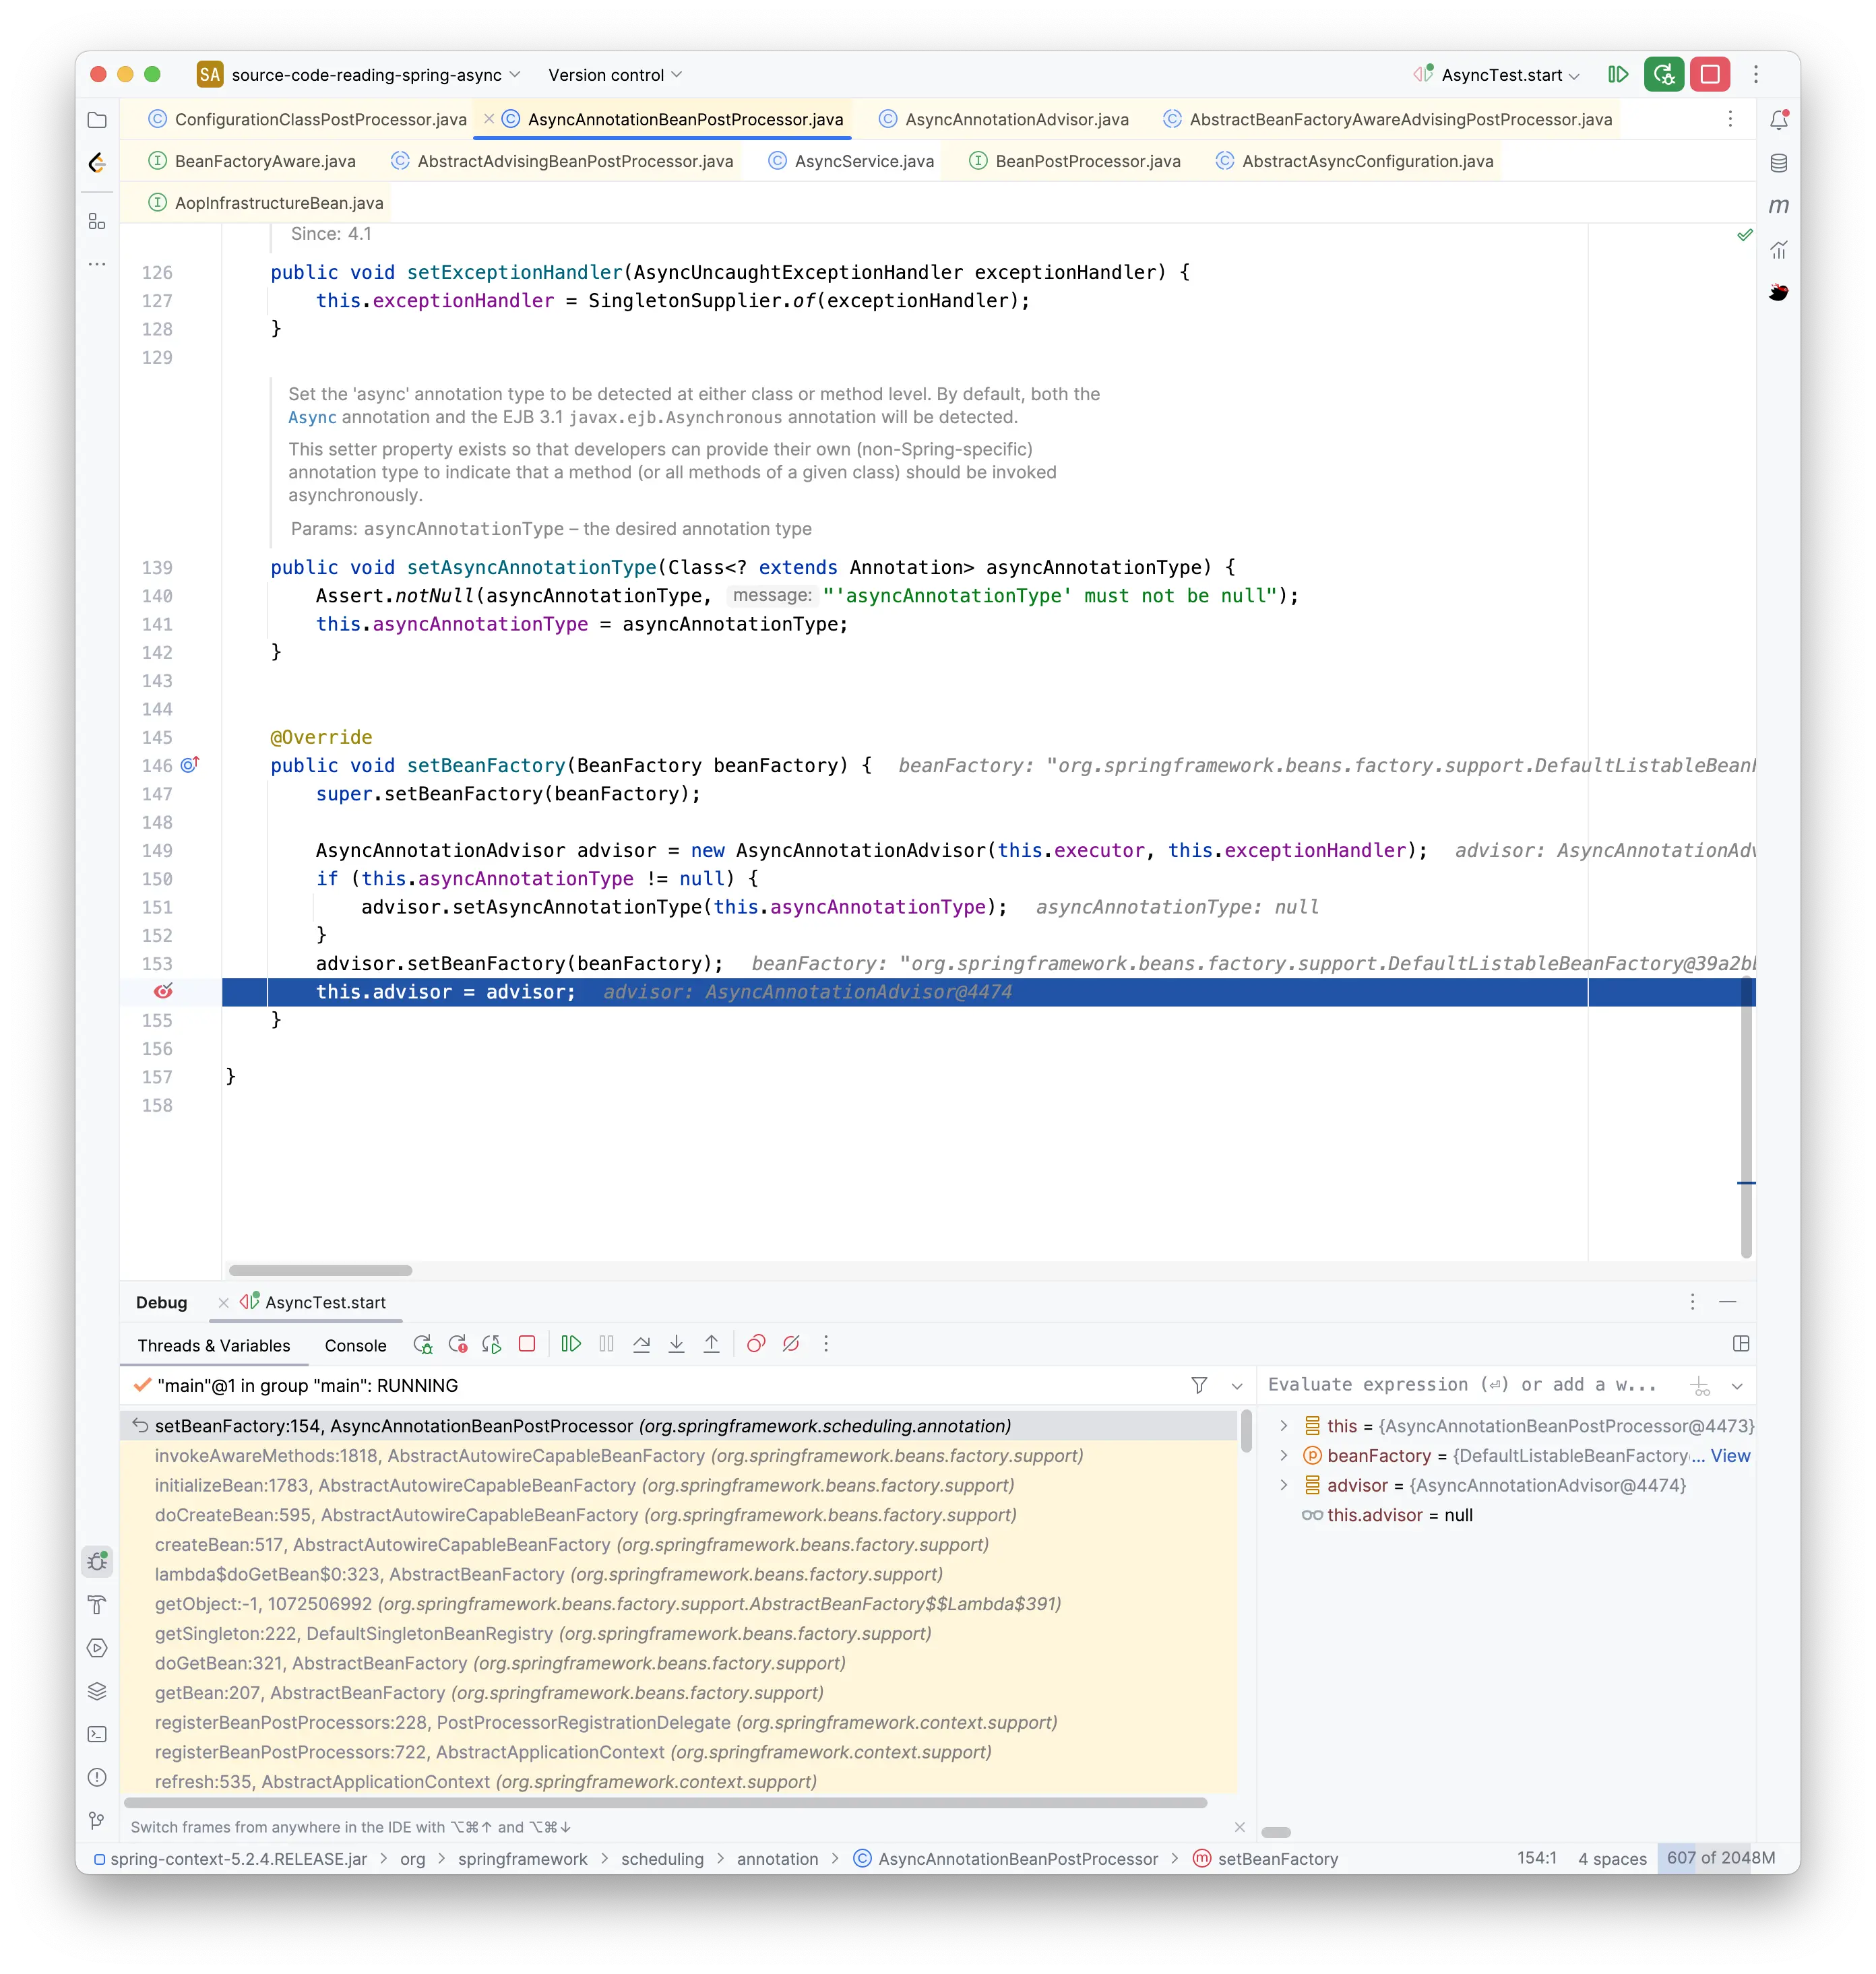
可以看到在第149行创建了一个advisor对象,这个对象配置了this.executor、this.exceptionHandler两个对象,跟前面看到的代码类似。不过这两个变量仍然为null,说明目前仍然没有初始化线程池。
那么接下来的重点就是AsyncAnnotationAdvisor这个切面类了。
AsyncAnnotationAdvisor
先看一下AsyncAnnotationAdvisor的类图。
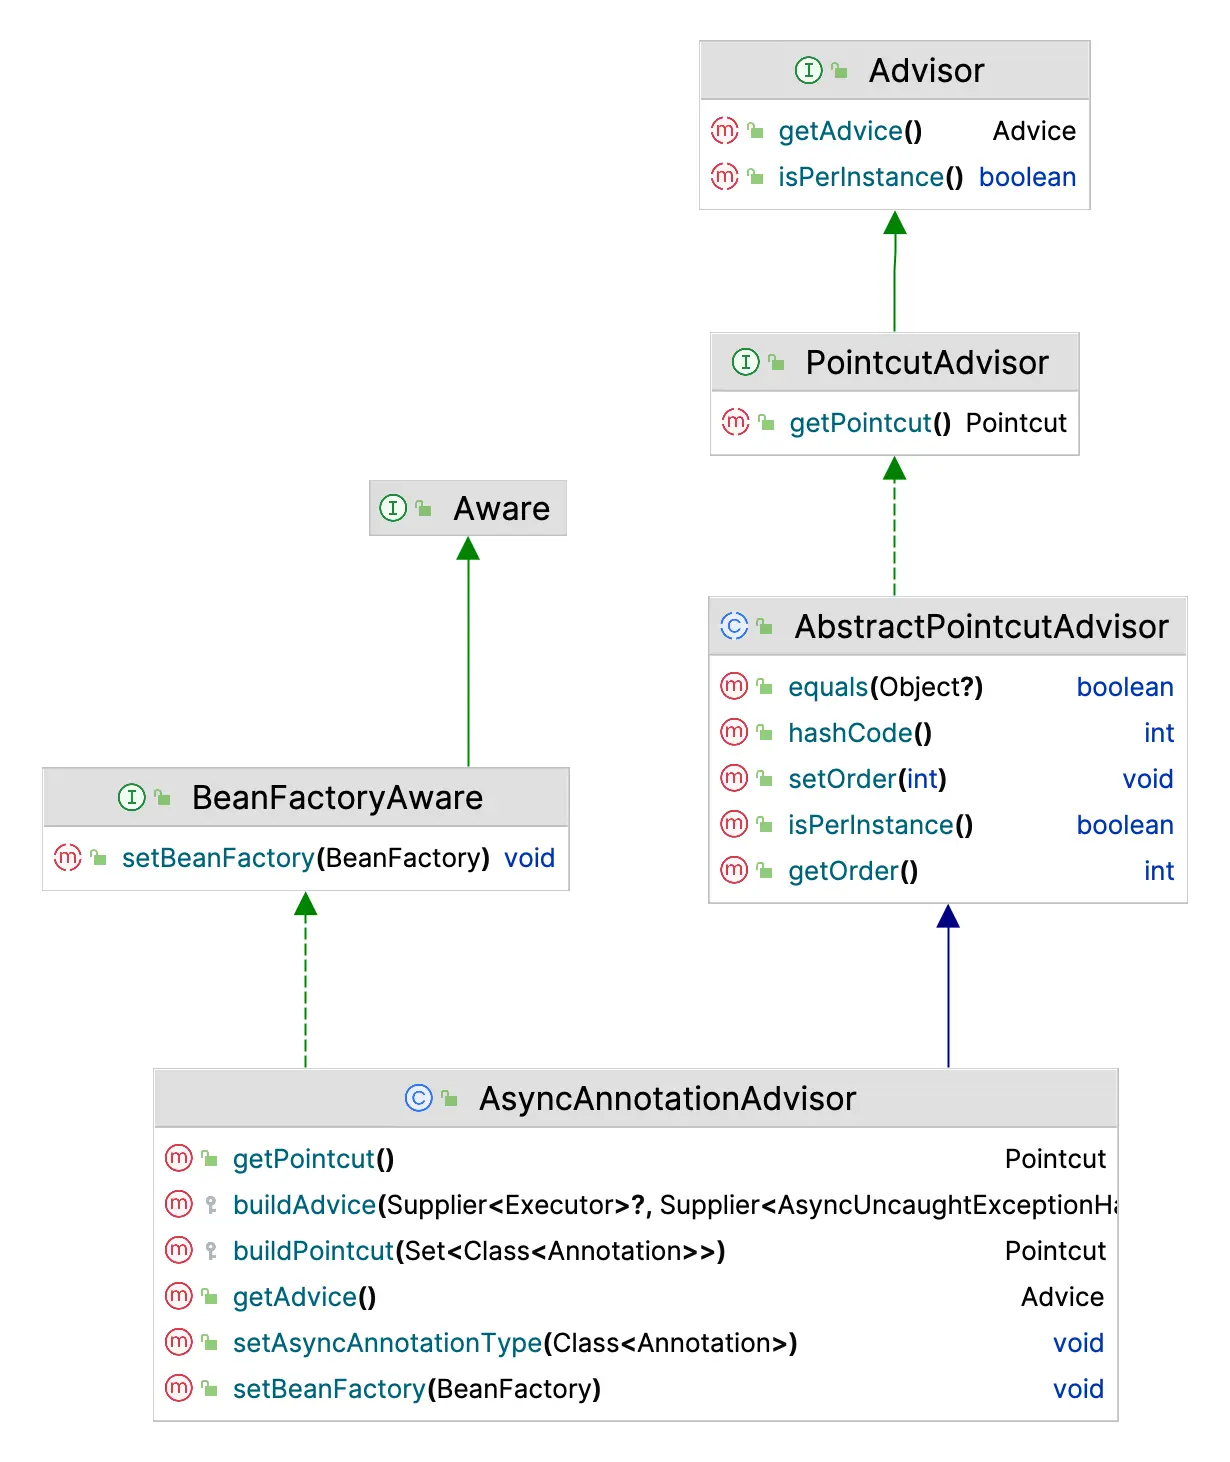
跟前面的类一样实现了BeanFactoryAware接口,可以获取beanFactory。
另一边则是继承了AbstractPointcutAdvisor,上面实现了PointcutAdvisor和Advisor接口。虽然这两个接口之前没有见过,但是根据名称来看,getPointcut方法应该是获取切点,getAdvice方法则是获取切面。
切点的话应该是根据@Async注解来判断某个方法是否需要异步执行,那么重点应该在getAdvice方法。
在AsyncAnnotationAdvisor找到了getAdvice的实现,但只是返回成员变量:

继续分析发现,advice变量是在构造方法中通过调用的内部方法buildAdvice生成的。
public AsyncAnnotationAdvisor(@Nullable Supplier<Executor> executor, @Nullable Supplier<AsyncUncaughtExceptionHandler> exceptionHandler) {

  Set<Class<? extends Annotation>> asyncAnnotationTypes = new LinkedHashSet<>(2);
  asyncAnnotationTypes.add(Async.class);
  try {
    asyncAnnotationTypes.add((Class<? extends Annotation>)
        ClassUtils.forName("javax.ejb.Asynchronous", AsyncAnnotationAdvisor.class.getClassLoader()));
  }
  catch (ClassNotFoundException ex) {
    // If EJB 3.1 API not present, simply ignore.
  }
  // 这里生成了advice对象。
  this.advice = buildAdvice(executor, exceptionHandler);
  this.pointcut = buildPointcut(asyncAnnotationTypes);
}
感觉离真相不远了。继续进入buildAdvice方法。
protected Advice buildAdvice(@Nullable Supplier<Executor> executor, @Nullable Supplier<AsyncUncaughtExceptionHandler> exceptionHandler) {
  AnnotationAsyncExecutionInterceptor interceptor = new AnnotationAsyncExecutionInterceptor(null);
  interceptor.configure(executor, exceptionHandler);
  return interceptor;
}
这里创建了一个interceptor对象,并配置了构造方法中传来的executor和exceptionHandler。不过从之前的代码可以知道,这里仍然是null。继续分析AnnotationAsyncExecutionInterceptor类。
AnnotationAsyncExecutionInterceptor
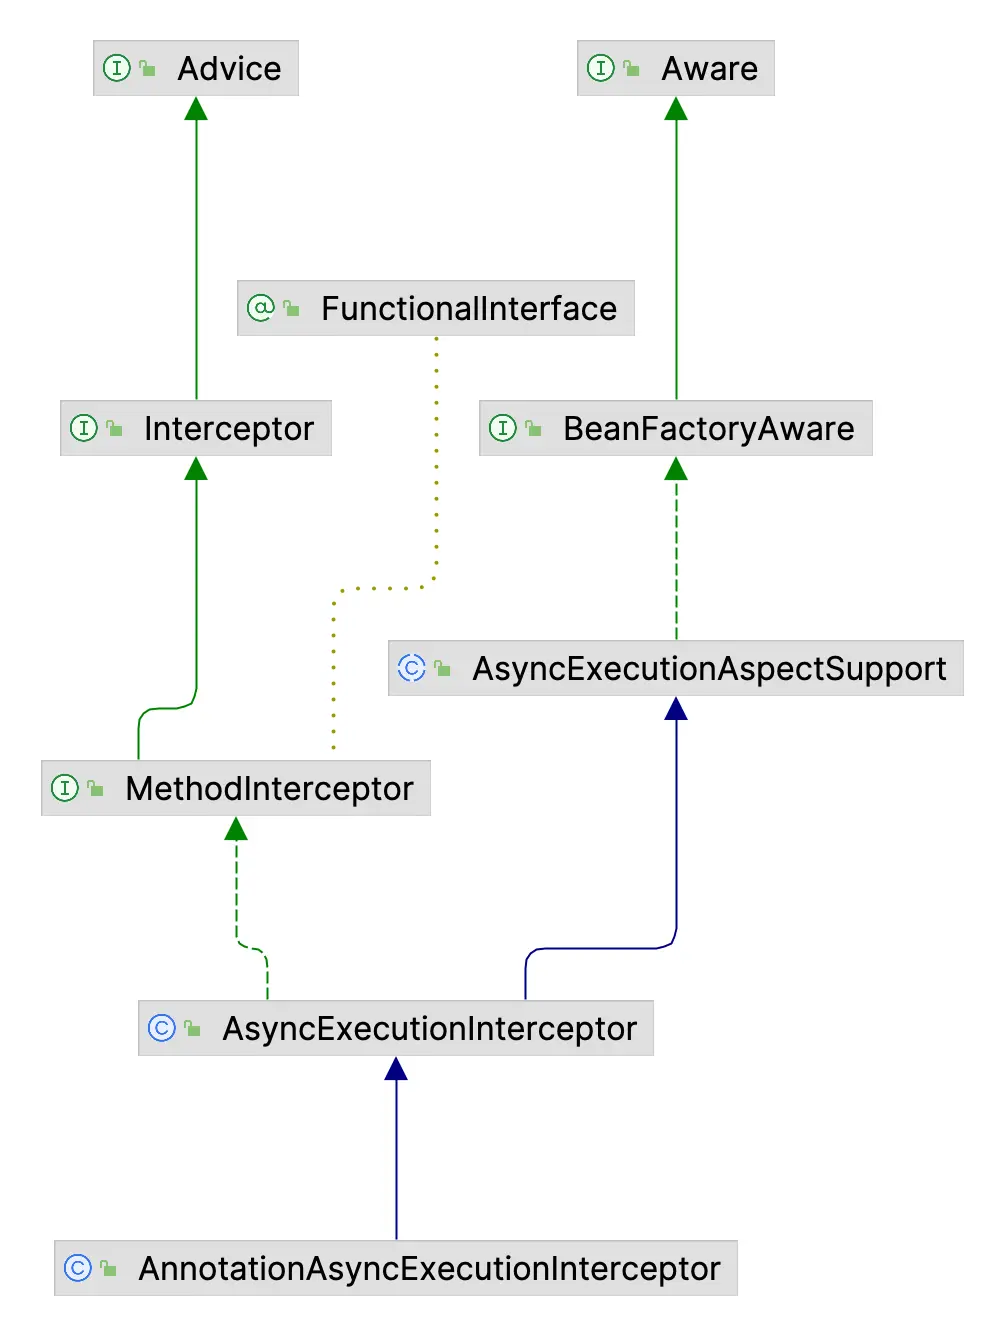
在这个类的类图中,我们发现了一个叫MethodInterceptor的类,看一下这个类的方法有那些。
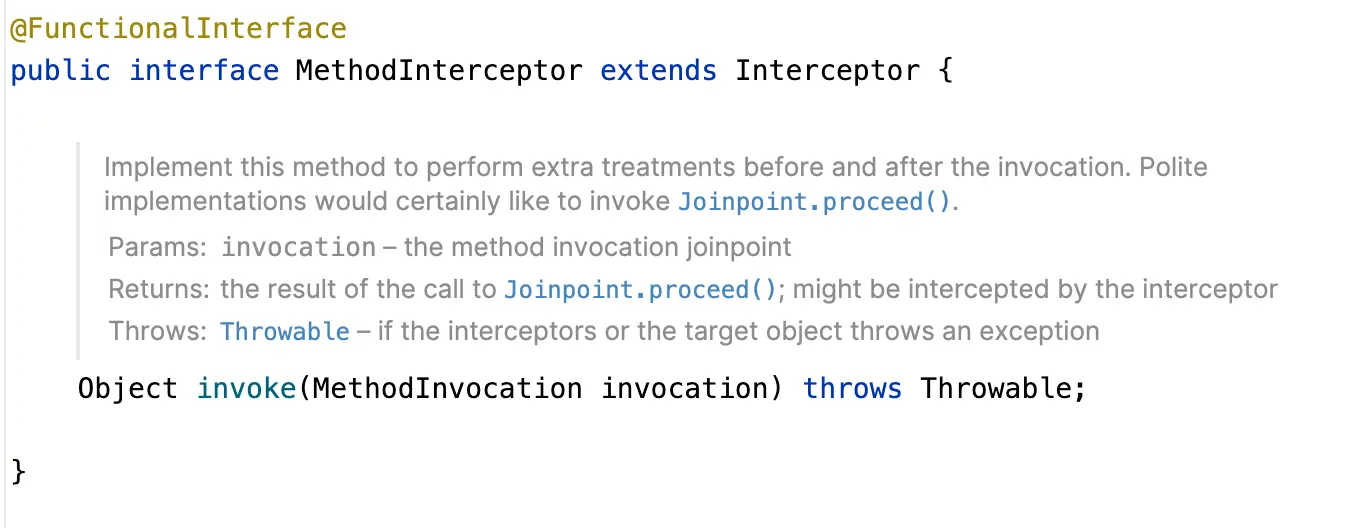
看到这个有没有一股很熟悉的感觉,跟JDK动态代理的invoke方法非常相似,可以猜测,这个方法的实现,应该就是异步代理的核心逻辑。
搜索invoke方法发现,这个方法是在AsyncExecutionInterceptor中实现的,这个方法的源码如下:
@Override
@Nullable
public Object invoke(final MethodInvocation invocation) throws Throwable {
  Class<?> targetClass = (invocation.getThis() != null ? AopUtils.getTargetClass(invocation.getThis()) : null);
  Method specificMethod = ClassUtils.getMostSpecificMethod(invocation.getMethod(), targetClass);
  final Method userDeclaredMethod = BridgeMethodResolver.findBridgedMethod(specificMethod);
	// 这里发现了获取executor
  AsyncTaskExecutor executor = determineAsyncExecutor(userDeclaredMethod);
  if (executor == null) {
    throw new IllegalStateException("No executor specified and no default executor set on AsyncExecutionInterceptor either");
  }

  Callable<Object> task = () -> {
    try {
      Object result = invocation.proceed();
      if (result instanceof Future) {
        return ((Future<?>) result).get();
      }
    }
    catch (ExecutionException ex) {
      handleError(ex.getCause(), userDeclaredMethod, invocation.getArguments());
    }
    catch (Throwable ex) {
      handleError(ex, userDeclaredMethod, invocation.getArguments());
    }
    return null;
  };

  return doSubmit(task, executor, invocation.getMethod().getReturnType());
}
在这个方法中,我们一眼就发现了在第8行中调用了determineAsyncExecutor方法来获取executor。不过不急,先来分析一下这个方法的其他代码。
在获取executor后,又创建了一个Callable的task对象,在task的方法中调用了真正的业务方法,并且在catch中处理异常,简单看了一下,就是通过前面获取的exceptionHandler对象进行处理的,对这个有兴趣的可以自己看一下源码,这里就不过多介绍了。
创建完task后,通过调用doSubmit方法向线程池提交任务。
@Nullable
protected Object doSubmit(Callable<Object> task, AsyncTaskExecutor executor, Class<?> returnType) {
  if (CompletableFuture.class.isAssignableFrom(returnType)) {
    return CompletableFuture.supplyAsync(() -> {
      try {
        return task.call();
      }
      catch (Throwable ex) {
        throw new CompletionException(ex);
      }
    }, executor);
  }
  else if (ListenableFuture.class.isAssignableFrom(returnType)) {
    return ((AsyncListenableTaskExecutor) executor).submitListenable(task);
  }
  else if (Future.class.isAssignableFrom(returnType)) {
    return executor.submit(task);
  }
  else {
    executor.submit(task);
    return null;
  }
}
前面说到在invoke方法中通过调用determineAsyncExecutor获取了executor对象,那我们进入到determineAsyncExecutor中看一下。
/**
 * 决定执行指定方法的时候使用哪一个executor
 */
@Nullable
protected AsyncTaskExecutor determineAsyncExecutor(Method method) {
  // 获取method对应的executor,这个executors的类型是Map<Method, AsyncTaskExecutor> executors
  AsyncTaskExecutor executor = this.executors.get(method);
  if (executor == null) {
    Executor targetExecutor;
    // 获取指定的executor名称
    String qualifier = getExecutorQualifier(method);
    if (StringUtils.hasLength(qualifier)) {
      // 如果qualifier不为空,则根据qualifier获取对应的executor实例
      targetExecutor = findQualifiedExecutor(this.beanFactory, qualifier);
    }
    else {
      // 如果没有指定的qualifier,则获取默认的executor
      targetExecutor = this.defaultExecutor.get();
    }
    if (targetExecutor == null) {
      return null;
    }
    executor = (targetExecutor instanceof AsyncListenableTaskExecutor ?
        (AsyncListenableTaskExecutor) targetExecutor : new TaskExecutorAdapter(targetExecutor));
    this.executors.put(method, executor);
  }
  return executor;
}
在这个方法的第7行中,根据method对象从this.executors中获取对应的executor,这个this.executors是一个Map对象,key的类型是Method,value的类型是AsyncTaskExecutor,这行代码的作用是获取当前method对应的线程池执行器。
但是我有点疑惑,原来异步并不是使用同一个线程池吗,那是在哪里对每个异步方法配置不同的线程池呢?我带着这个疑问继续往下看。
接下来是判断有没有在map中获取到对应的executor,如果有则直接返回,否则执行if代码块的代码。
在第11行中,通过getExecutorQualifier方法获取了qualifier的字符串对象,如果获取到的字符串不为空,则调用findQualifiedExecutor获取executor,否则通过 this.defaultExecutor.get()获取executor,根据这个名称来看,this.defaultExecutor.get()就是用来获取默认的executor,也就是线程池对象的。
保留对qualifier的疑问,先来看一下 this.defaultExecutor.get()是怎么来的。
通过追溯代码发现,这个对象是在当前方法的构造方法中创建的,关键代码如下:
private SingletonSupplier<Executor> defaultExecutor;

public AsyncExecutionAspectSupport(@Nullable Executor defaultExecutor) {
  // 获取默认的线程池对象
  this.defaultExecutor = new SingletonSupplier<>(defaultExecutor, () -> getDefaultExecutor(this.beanFactory));
  this.exceptionHandler = SingletonSupplier.of(SimpleAsyncUncaughtExceptionHandler::new);
}
看到第5行代码,可以大胆猜测一下,defaultExecutor就是前面传入的null值,而如果defaultExecutor为null,则会调用getDefaultExecutor()方法获取默认的线程池。
我们点进去getDefaultExecutor看一下具体的代码。
@Nullable
protected Executor getDefaultExecutor(@Nullable BeanFactory beanFactory) {
  if (beanFactory != null) {
    try {
      // 获取TaskExecutor的bean对象
      return beanFactory.getBean(TaskExecutor.class);
    }
    catch (NoUniqueBeanDefinitionException ex) {
      logger.debug("Could not find unique TaskExecutor bean", ex);
      try {
        // 根据DEFAULT_TASK_EXECUTOR_BEAN_NAME名称获取Executor的bean对象
        // 其中DEFAULT_TASK_EXECUTOR_BEAN_NAME = taskExecutor
        return beanFactory.getBean(DEFAULT_TASK_EXECUTOR_BEAN_NAME, Executor.class);
      }
      catch (NoSuchBeanDefinitionException ex2) {
        if (logger.isInfoEnabled()) {
          logger.info("More than one TaskExecutor bean found within the context, and none is named " +
              "'taskExecutor'. Mark one of them as primary or name it 'taskExecutor' (possibly " +
              "as an alias) in order to use it for async processing: " + ex.getBeanNamesFound());
        }
      }
    }
    catch (NoSuchBeanDefinitionException ex) {
      logger.debug("Could not find default TaskExecutor bean", ex);
      try {
        // 根据DEFAULT_TASK_EXECUTOR_BEAN_NAME名称获取Executor的bean对象
        // 其中DEFAULT_TASK_EXECUTOR_BEAN_NAME = taskExecutor
        return beanFactory.getBean(DEFAULT_TASK_EXECUTOR_BEAN_NAME, Executor.class);
      }
      catch (NoSuchBeanDefinitionException ex2) {
        logger.info("No task executor bean found for async processing: " +
            "no bean of type TaskExecutor and no bean named 'taskExecutor' either");
      }
      // Giving up -> either using local default executor or none at all...
    }
  }
  return null;
}
点进来可以看到,首先通过beanFactory尝试获取TaskExecutor的实例bean对象,如果抛出了NoUniqueBeanDefinitionException,即发现了多个TaskExecutor的实例,或者一个实例都没有,再通过DEFAULT_TASK_EXECUTOR_BEAN_NAME名称重新获取,其中DEFAULT_TASK_EXECUTOR_BEAN_NAME的名称是taskExecutor。
已经找到获取executor对象的地方了,可是它到底是哪里定义的呢?别急,先打个断点看看返回的是个啥东西吧。
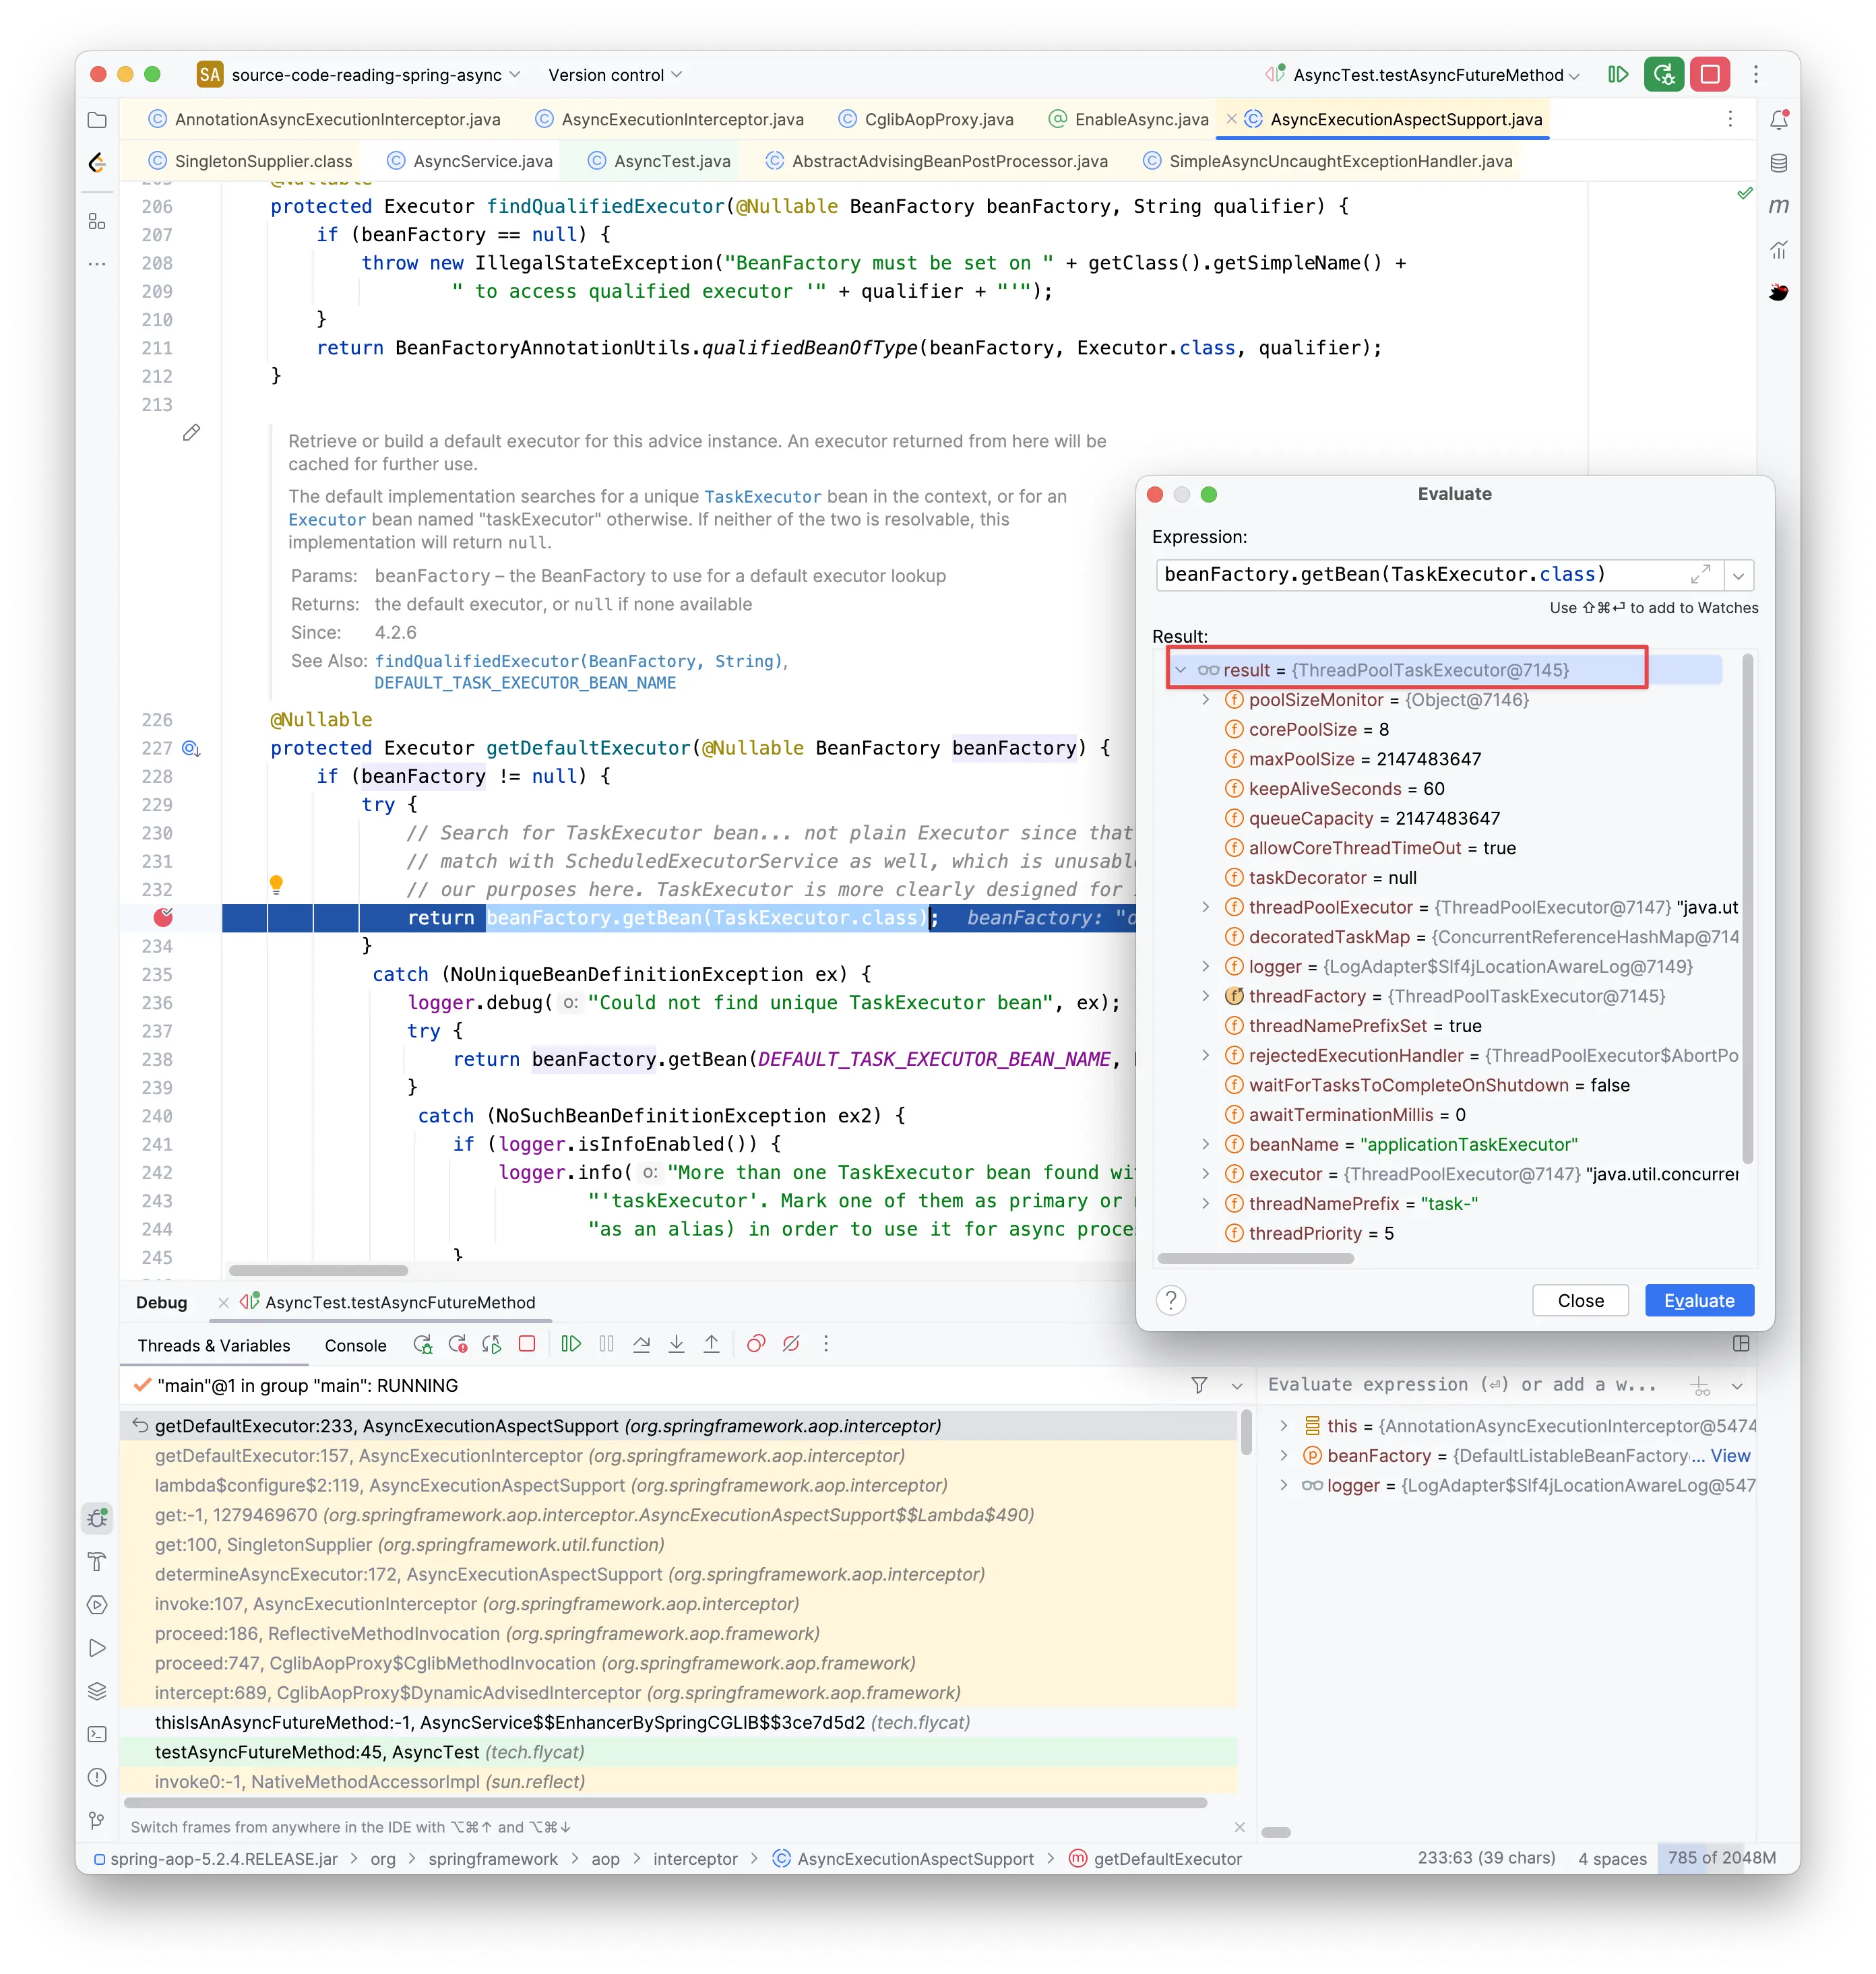
通过打断点,并使用表达式计算器计算获取的bean对象,发现它的类名称是ThreadPoolTaskExecutor。既然都已经找到具体的线程池类,那就简单了,在ThreadPoolTaskExecutor类里面找到构造方法或者是看起来像初始化操作的方法,再打个断点就好了。
果然在ThreadPoolTaskExecutor中找到了一个initializeExecutor的方法,姑且认为这个是一个初始化方法好了,打个断掉调试一下,结果如下:

果然代码停下来了,从断点的堆栈里面看到了一个非常熟悉的afterPropertiesSet,这个是InitializingBean提供的一个能力,所以单例Bean初始化完成之后会调用实现了这个接口的对象的afterPropertiesSet()接口,而在afterPropertiesSet()中调用了initialize()方法,initialize()最终会调用initializeExecutor(),也就是当前断点所在的方法。
其实看到这里就已经很清晰了,已经看到了创建executor的代码。具体代码如下:
@Override
protected ExecutorService initializeExecutor(
    ThreadFactory threadFactory, RejectedExecutionHandler rejectedExecutionHandler) {
	// 创建阻塞队列,其中queueCapacity=Integer.MAX_VALUE
  BlockingQueue<Runnable> queue = createQueue(this.queueCapacity);

  ThreadPoolExecutor executor;
  if (this.taskDecorator != null) {
    executor = new ThreadPoolExecutor(
        this.corePoolSize, this.maxPoolSize, this.keepAliveSeconds, TimeUnit.SECONDS,
        queue, threadFactory, rejectedExecutionHandler) {
      @Override
      public void execute(Runnable command) {
        Runnable decorated = taskDecorator.decorate(command);
        if (decorated != command) {
          decoratedTaskMap.put(decorated, command);
        }
        super.execute(decorated);
      }
    };
  }
  else {
    executor = new ThreadPoolExecutor(
        this.corePoolSize, this.maxPoolSize, this.keepAliveSeconds, TimeUnit.SECONDS,
        queue, threadFactory, rejectedExecutionHandler);

  }

  if (this.allowCoreThreadTimeOut) {
    executor.allowCoreThreadTimeOut(true);
  }

  this.threadPoolExecutor = executor;
  return executor;
}

/**
 * 创建阻塞队列,如果queueCapacity大于0,则创建LinkedBlockingQueue,否则创建SynchronousQueue
 */
protected BlockingQueue<Runnable> createQueue(int queueCapacity) {
  if (queueCapacity > 0) {
    return new LinkedBlockingQueue<>(queueCapacity);
  }
  else {
    return new SynchronousQueue<>();
  }
}
通过debug发现,创建线程池的几个核心参数值如下:
- 核心线程池数量corePoolSize=8
- 最大线程池数量maxPoolSize=2147483647(也就是Integer.MAX_VALUE)
- 存活时间keepAliveSeconds=60
- 阻塞队列queue=LinkedBlockingQueue类
- 拒绝策略rejectedExecutionHandler=ThreadPoolExecutor.AbortPolicy
另外我通过debug corePoolSize变量发现,这些参数是可以通过TaskExecutionProperties定义的,也就是可以在application.properties中手动配置,有兴趣的可以自己debug一下,这里贴一下配置项以及默认配置。
spring.task.execution.pool.queueCapacity=2147483647
spring.task.execution.pool.coreSize=8
spring.task.execution.pool.maxSize=2147483647
# 是否允许核心线程回收
spring.task.execution.pool.allowCoreThreadTimeout=true
spring.task.execution.pool.keepAlive=60s
# 线程名称前缀
spring.task.execution.threadNamePrefix=task-
到这里我们终于明白了为什么说不要使用默认使用的线程池了,默认线程池的最大线程数和队列大小,都是取的Integer.MAX_VALUE,可创建的异步线程数量接近于无限,如果有大量的异步线程,很可能导致资源耗尽,从而OOM。
至此此次阅读源码的目标已经实现了,不过我还有个感兴趣的地方,以及前面还有一个疑问没有解决。如果对这部分不感兴趣可以跳过后面的拓展阅读这一小节。
拓展阅读
获取异步执行的返回值
不知道还有没有印象,在AsyncExecutionInterceptor的invoke方法中,执行doSubmit提交任务时,根据不同的返回类型有不同的执行逻辑。这里重新贴一下代码:
@Nullable
protected Object doSubmit(Callable<Object> task, AsyncTaskExecutor executor, Class<?> returnType) {
  if (CompletableFuture.class.isAssignableFrom(returnType)) {
    return CompletableFuture.supplyAsync(() -> {
      try {
        return task.call();
      }
      catch (Throwable ex) {
        throw new CompletionException(ex);
      }
    }, executor);
  }
  else if (ListenableFuture.class.isAssignableFrom(returnType)) {
    return ((AsyncListenableTaskExecutor) executor).submitListenable(task);
  }
  else if (Future.class.isAssignableFrom(returnType)) {
    return executor.submit(task);
  }
  else {
    executor.submit(task);
    return null;
  }
}
可以看到这里通过业务方法的返回值做了不同的处理逻辑,如果返回值是CompletableFuture、ListenableFuture、Future类型,在提交异步操作之后,还会同步返回对应的对象,也就是说通过@Async注解实现的异步方法,是可以异步获取到该方法返回的对象的,只是以前都不知道还能这样用,这里通过看源码又学会了一个新的用法。
我们来测试一下,在AsyncService添加一个异步方法,返回值是CompletableFuture,并通过return返回执行结果,修改后的代码如下:
@Service
public class AsyncService {
    @Async
    public void thisIsAnAsyncMethod() {
			// 此处代码省略
    }

    @Async
    public CompletableFuture<String> thisIsAnAsyncCompletableFutureMethod() {
        System.out.println("线程名称:" + Thread.currentThread().getName() + "开始");
        try {
            Thread.sleep(5000);
        } catch (InterruptedException e) {
            throw new RuntimeException(e);
        }
        System.out.println("线程名称:" + Thread.currentThread().getName() + "结束");
        return CompletableFuture.completedFuture("异步方法执行完毕");
    }
}
然后修改一下测试类,改成调用thisIsAnAsyncCompletableFutureMethod方法,并且通过返回的completableFuture获取异步执行后的结果并打印,修改后的代码如下:
@SpringBootTest(classes = Application.class)
public class AsyncTest {
    @Resource
    private AsyncService asyncService;

    @Test
    public void start() throws Exception {
        // 此处代码省略
    }

    @Test
    public void testAsyncCompletableFutureMethod() throws Exception {
        long start = System.currentTimeMillis();
        CompletableFuture<String> completableFuture = asyncService.thisIsAnAsyncCompletableFutureMethod();
        System.out.println("异步执行的结果为: " + completableFuture.get());
        long end = System.currentTimeMillis();

        System.out.println("调用完成,用时" + (end - start) + "ms");
        Thread.sleep(5000);
    }
}
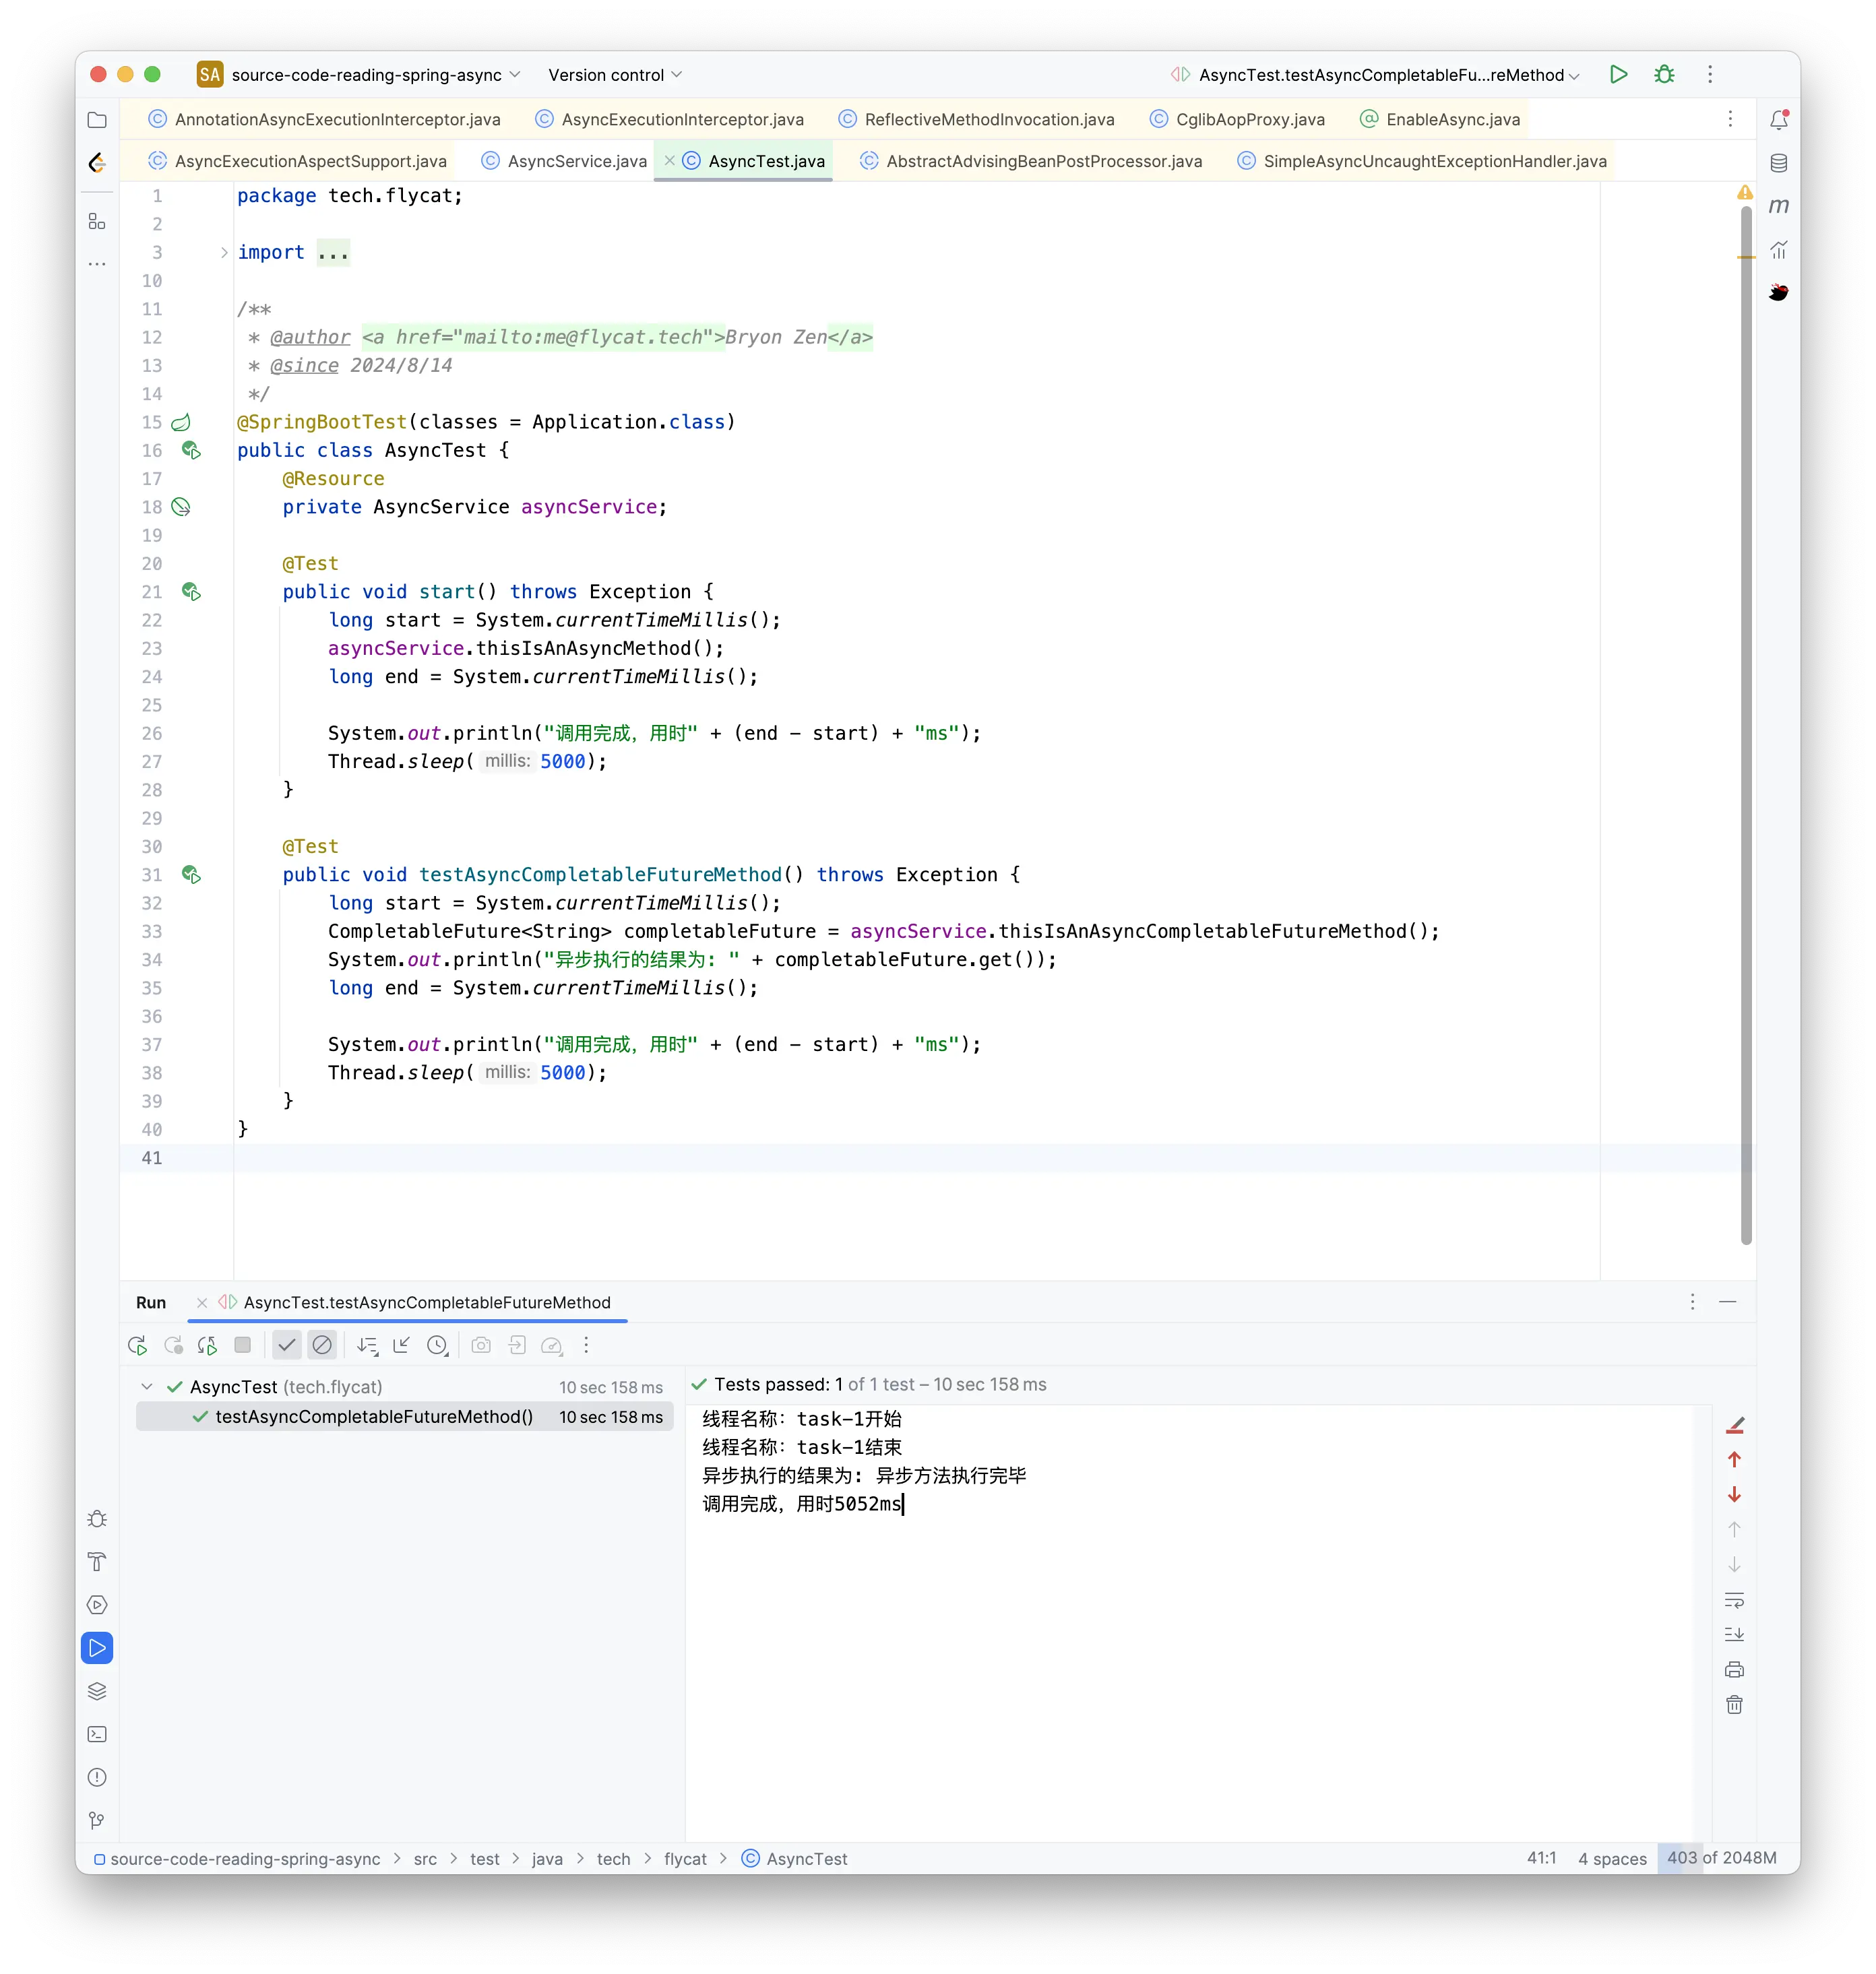
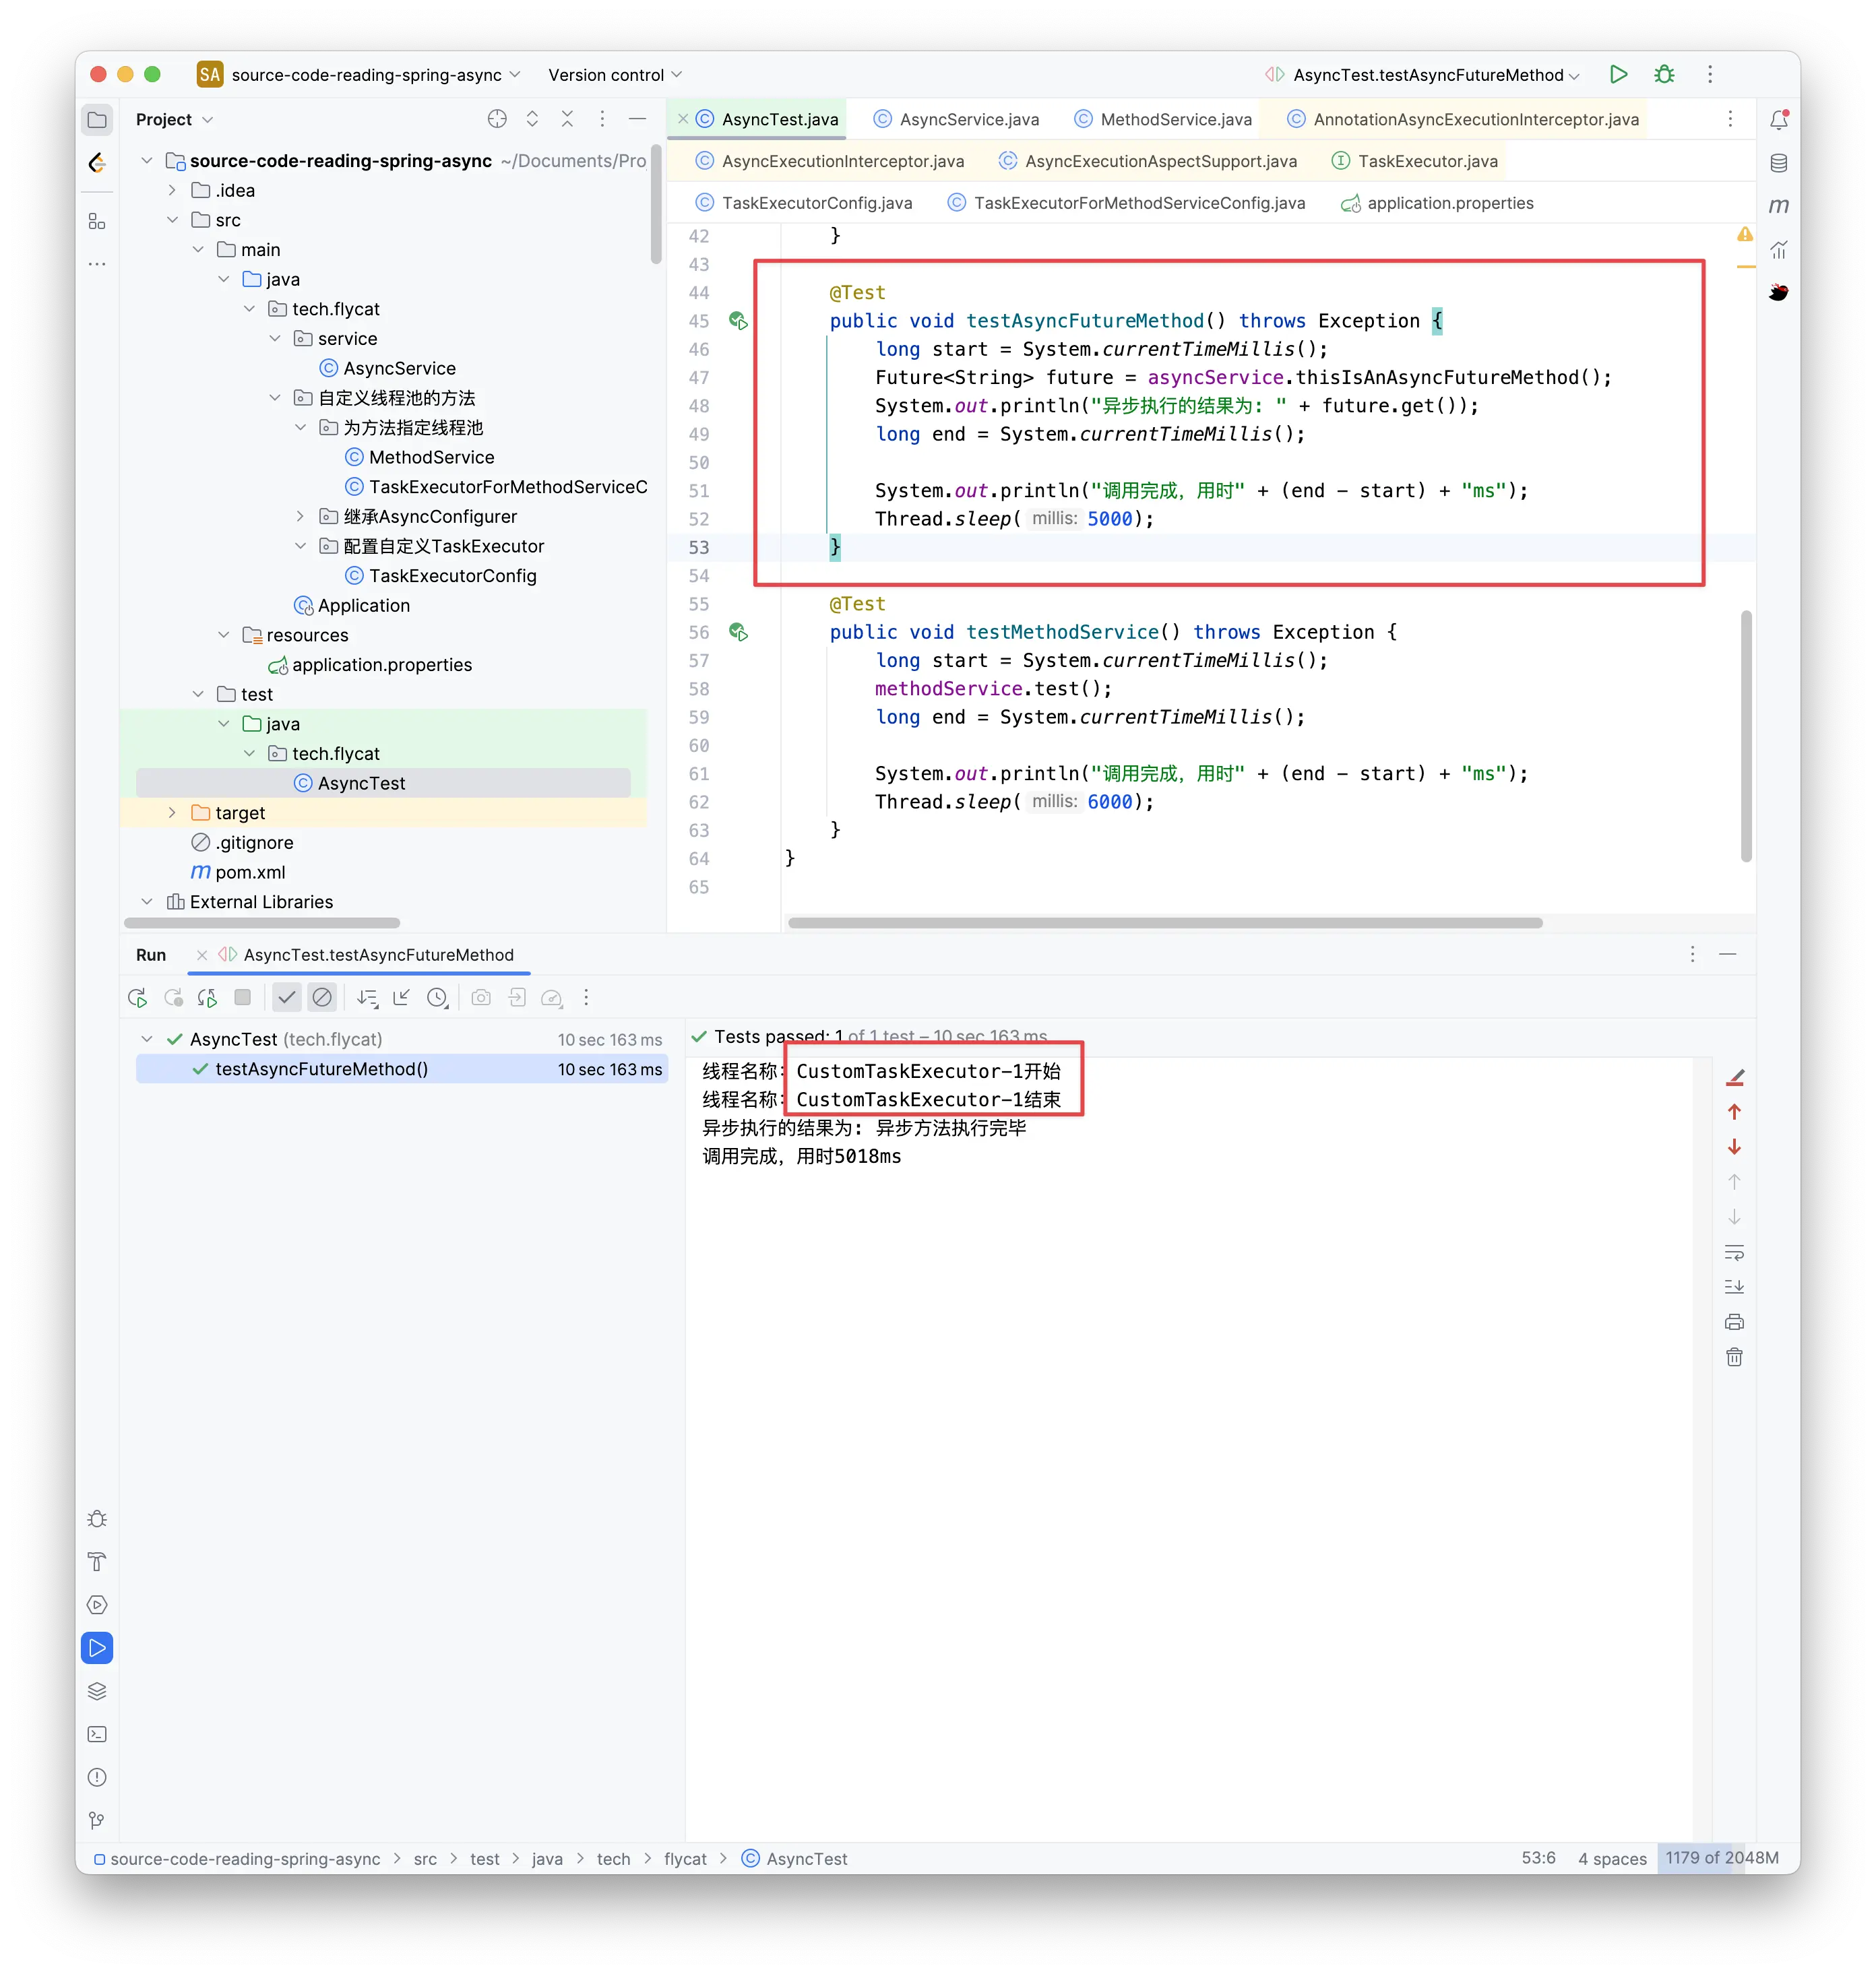
执行单元测试,可以看到,同步代码中获取到了异步执行的结果。
其他的Future和ListenableFuture也是同理,有兴趣可以自己试一下。
为异步方法配置指定线程池
在前面还有一个疑惑:“异步并不是使用同一个线程池,那是在哪里对每个异步方法配置不同的线程池呢”。
我重新贴一下这里的代码:
/**
 * 决定执行指定方法的时候使用哪一个executor
 */
@Nullable
protected AsyncTaskExecutor determineAsyncExecutor(Method method) {
  // 获取method对应的executor,这个executors的类型是Map<Method, AsyncTaskExecutor> executors
  AsyncTaskExecutor executor = this.executors.get(method);
  if (executor == null) {
    Executor targetExecutor;
    // 获取指定的executor名称
    String qualifier = getExecutorQualifier(method);
    if (StringUtils.hasLength(qualifier)) {
      // 如果qualifier不为空,则根据qualifier获取对应的executor实例
      targetExecutor = findQualifiedExecutor(this.beanFactory, qualifier);
    }
    else {
      // 如果没有指定的qualifier,则获取默认的executor
      targetExecutor = this.defaultExecutor.get();
    }
    if (targetExecutor == null) {
      return null;
    }
    executor = (targetExecutor instanceof AsyncListenableTaskExecutor ?
        (AsyncListenableTaskExecutor) targetExecutor : new TaskExecutorAdapter(targetExecutor));
    this.executors.put(method, executor);
  }
  return executor;
}
可以看到通过调用getExecutorQualifier方法,并根据传入的method对象获取到一个qualifier,然后再根据这个qualifier再调用findQualifiedExecutor获取targetExecutor。
先看后者,其最终会执行下面的代码,可以看到qualifier其实是一个bean的名称,那这个bean名称是怎么获取的呢。
public static <T> T qualifiedBeanOfType(BeanFactory beanFactory, Class<T> beanType, String qualifier)
    throws BeansException {

  Assert.notNull(beanFactory, "BeanFactory must not be null");

  if (beanFactory instanceof ListableBeanFactory) {
    // Full qualifier matching supported.
    return qualifiedBeanOfType((ListableBeanFactory) beanFactory, beanType, qualifier);
  }
  else if (beanFactory.containsBean(qualifier)) {
    // Fallback: target bean at least found by bean name.
    return beanFactory.getBean(qualifier, beanType);
  }
  else {
    throw new NoSuchBeanDefinitionException(qualifier, "No matching " + beanType.getSimpleName() +
        " bean found for bean name '" + qualifier +
        "'! (Note: Qualifier matching not supported because given " +
        "BeanFactory does not implement ConfigurableListableBeanFactory.)");
  }
}
再回到getExecutorQualifier方法,发现当前类里面getExecutorQualifier是一个抽象方法,还记得AnnotationAsyncExecutionInterceptor的类图吗,AnnotationAsyncExecutionInterceptor就是继承自AsyncExecutionInterceptor,那其具体的方法实现自然是在AnnotationAsyncExecutionInterceptor里面了,其代码如下:
	@Override
	@Nullable
	protected String getExecutorQualifier(Method method) {
		Async async = AnnotatedElementUtils.findMergedAnnotation(method, Async.class);
		if (async == null) {
			async = AnnotatedElementUtils.findMergedAnnotation(method.getDeclaringClass(), Async.class);
		}
		return (async != null ? async.value() : null);
	}
看到这里恍然大悟,原来是拿的@Async对象的value属性,在标记@Async注解的时候,通过配置value属性可以指定线程池对象。
Spring提供的单例实现
在获取executor时,并不是直接用Executor来接收,而是用了一个SingletonSupplier。回顾一下代码:
private SingletonSupplier<Executor> defaultExecutor;

public AsyncExecutionAspectSupport(@Nullable Executor defaultExecutor) {
  // 获取默认的线程池对象
  this.defaultExecutor = new SingletonSupplier<>(defaultExecutor, () -> getDefaultExecutor(this.beanFactory));
  this.exceptionHandler = SingletonSupplier.of(SimpleAsyncUncaughtExceptionHandler::new);
}
这个SingletonSupplier是个什么东西呢?我们看下它的源码:
public class SingletonSupplier<T> implements Supplier<T> {
    @Nullable
    private final Supplier<? extends T> instanceSupplier;
    @Nullable
    private final Supplier<? extends T> defaultSupplier;
    @Nullable
    private volatile T singletonInstance;

    public SingletonSupplier(@Nullable T instance, Supplier<? extends T> defaultSupplier) {
        this.instanceSupplier = null;
        this.defaultSupplier = defaultSupplier;
        this.singletonInstance = instance;
    }

    @Nullable
    public T get() {
        T instance = this.singletonInstance;
        if (instance == null) {
            synchronized(this) {
                instance = this.singletonInstance;
                if (instance == null) {
                    if (this.instanceSupplier != null) {
                        instance = this.instanceSupplier.get();
                    }

                    if (instance == null && this.defaultSupplier != null) {
                        instance = this.defaultSupplier.get();
                    }

                    this.singletonInstance = instance;
                }
            }
        }

        return instance;
    }

  	// 省略其他代码
}
我们看看get()方法,是不是非常熟悉,没错,就是双重检查锁实现的单例模式,以后如果要使用单例模式,就不用再造轮子了,直接使用这个现成的类就好了。
流程梳理
再来梳理一下整个流程:
1、首先通过@EnableAsync注解作为突破口,找到了AsyncConfigurationSelector类,在这个类中根据mode判断加载哪个配置类,默认是ProxyAsyncConfiguration。
2、再根据ProxyAsyncConfiguration配置类,发现了后置处理器AsyncAnnotationBeanPostProcessor,在后置处理器中为满足要求的Bean添加了切面类AsyncAnnotationAdvisor。
3、在AsyncAnnotationAdvisor中创建了切点,并创建了一个代理对象AnnotationAsyncExecutionInterceptor
4、在AnnotationAsyncExecutionInterceptor的invoke中执行了提交异步的代码,并在这之前从beanFactory中获取了线程池对象(executor)
5、通过打断点的方式,发现executor的默认对象是ThreadPoolTaskExecutor的实现类,并且找到了初始化的方法initializeExecutor,并找到了线程池的参数。
如何自定义线程池
既然不能使用默认的线程池,那有什么办法可以自定义线程池呢?根据前面源码阅读,能想到以下几种方法:
修改Spring默认线程池的参数
还记得看源码时发现了TaskExecutionProperties配置类,这个就是用来配置Spring创建默认线程池的参数的,在application.properties中添加以下配置:
spring.task.execution.pool.queueCapacity=128
spring.task.execution.pool.coreSize=8
spring.task.execution.pool.maxSize=128
# 是否允许核心线程回收
spring.task.execution.pool.allowCoreThreadTimeout=true
spring.task.execution.pool.keepAlive=60s
# 线程名称前缀
spring.task.execution.threadNamePrefix=custom-
运行结果如下:
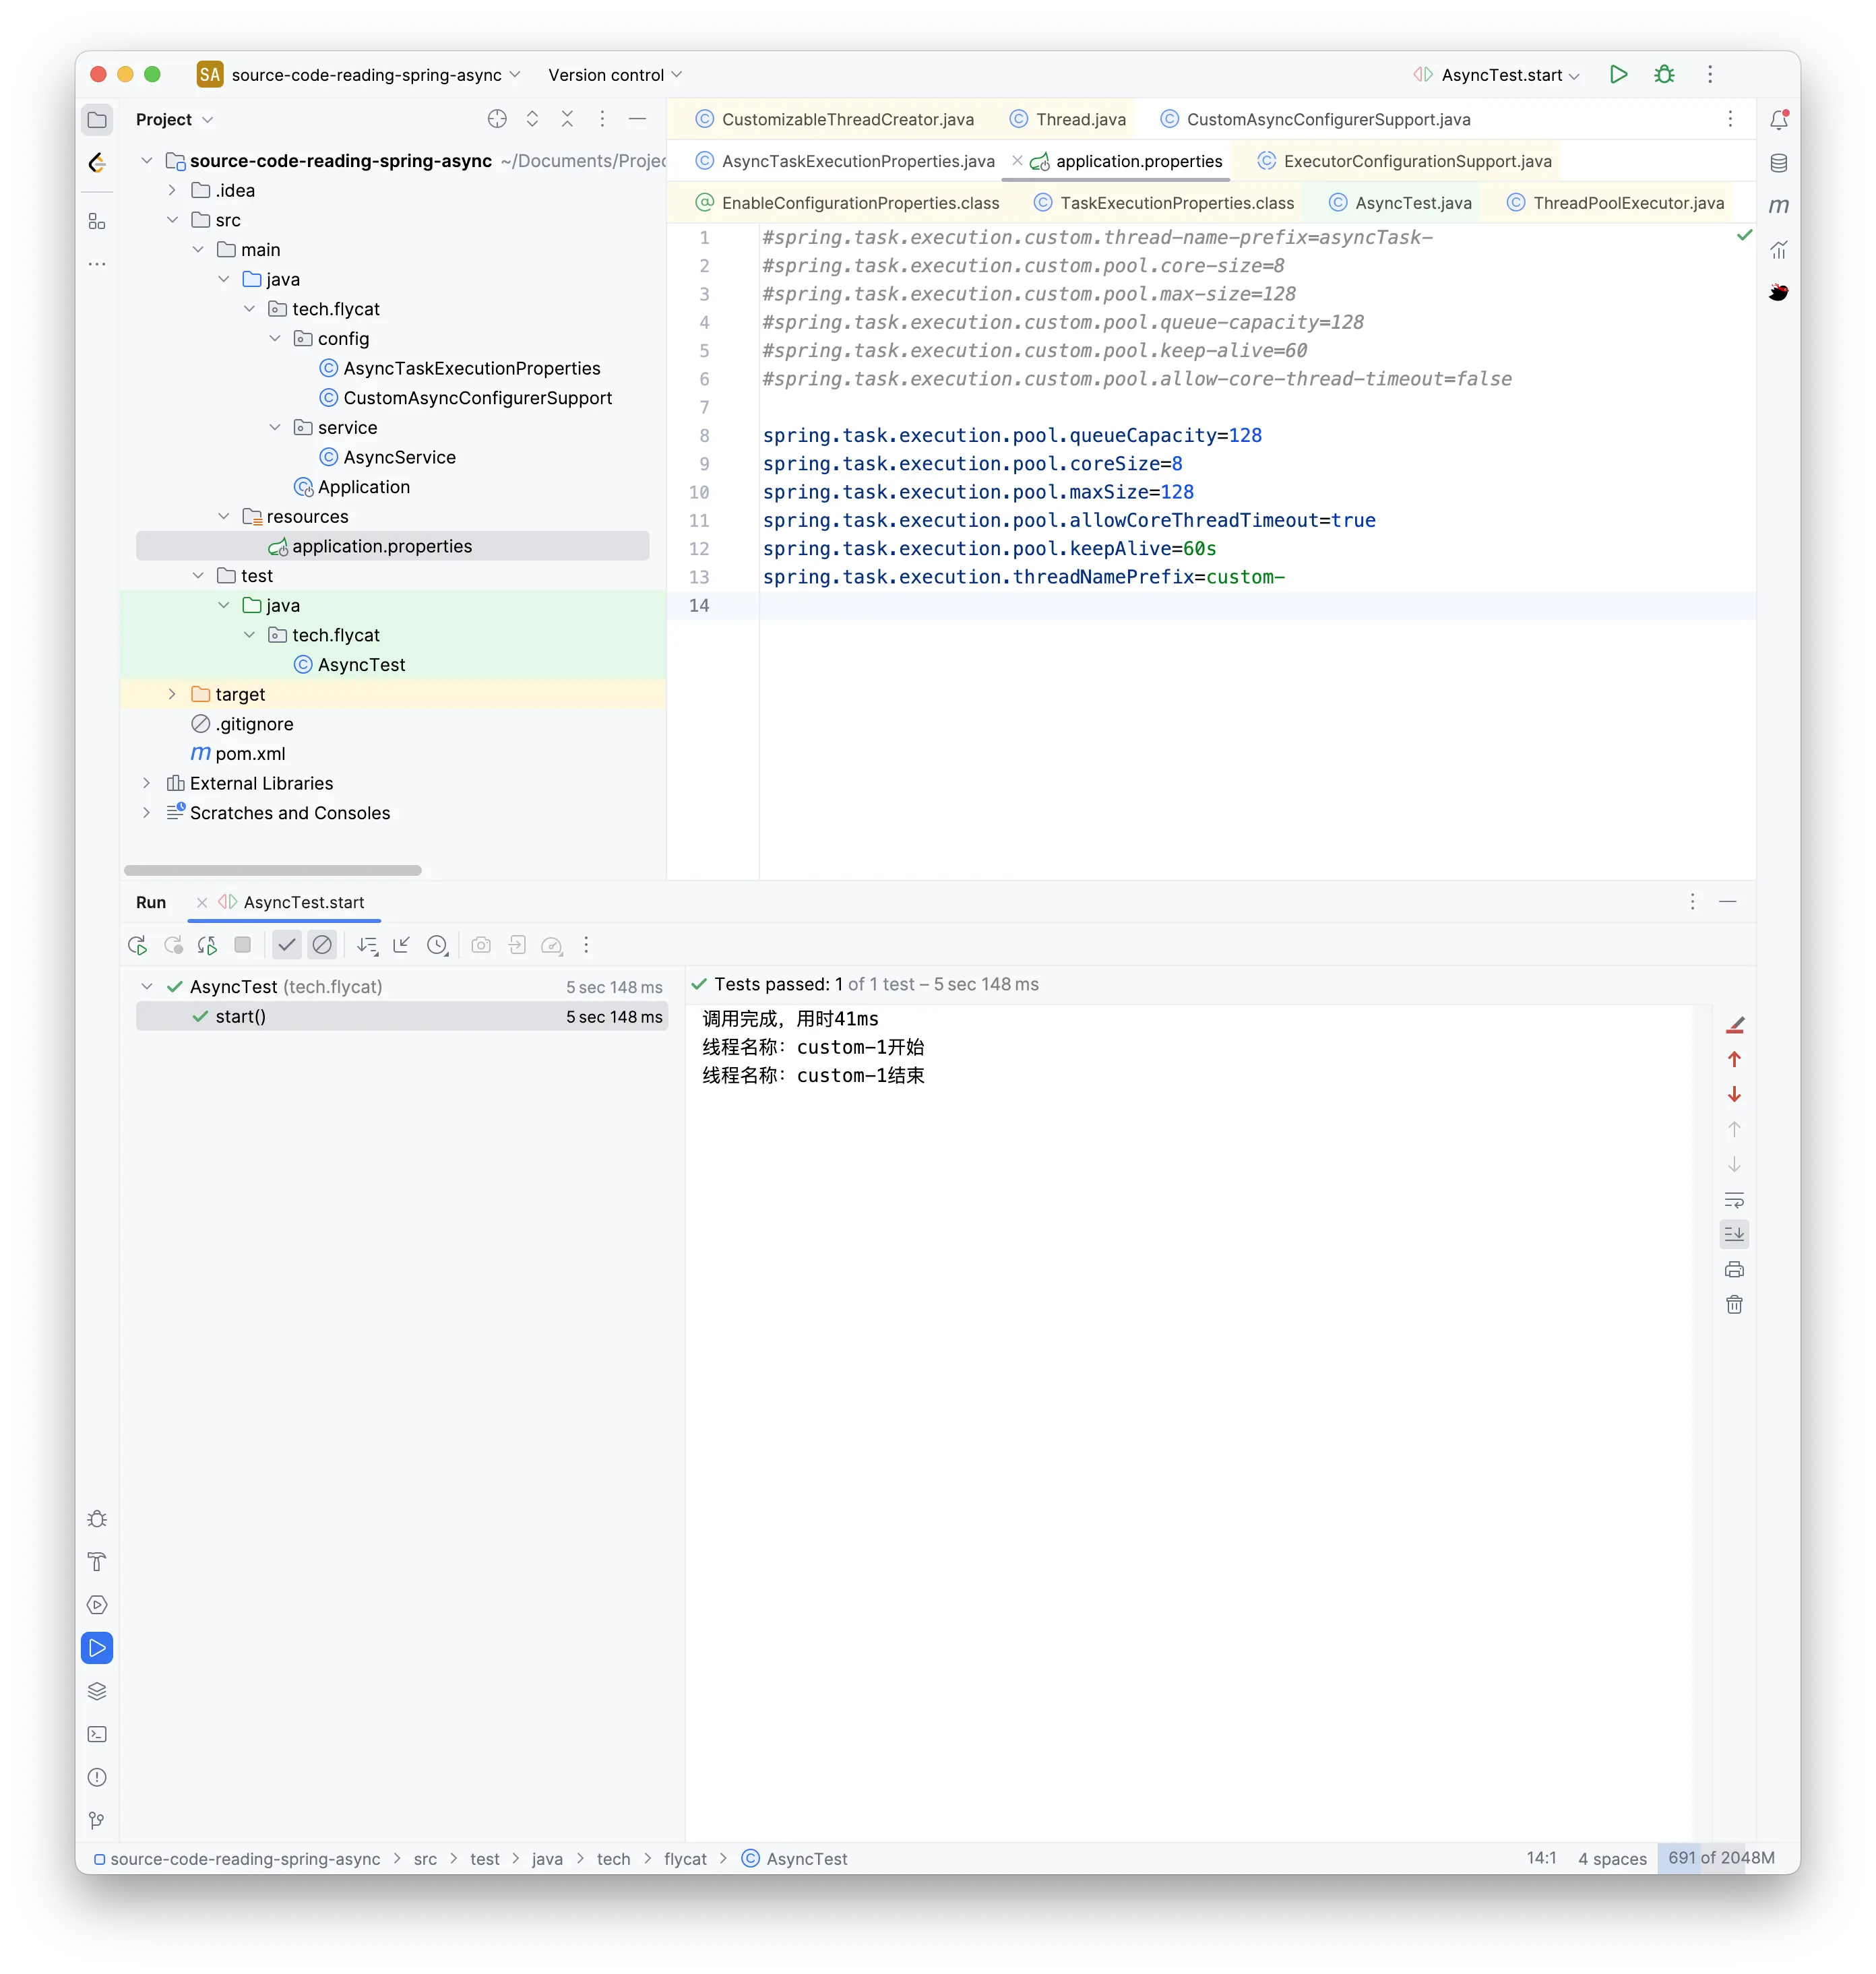
线程名称同样变成了自定义配置。
这个方法是最简单的,也是比较推荐的。
继承AsyncConfigurer
不知道各位还记不记得,我最初在AbstractAsyncConfiguration的setConfigurers中打了个断点,以为线程池是在那个时候创建的,但实际上并没有运行到这一行代码,回顾一下源码:
@Configuration
public abstract class AbstractAsyncConfiguration implements ImportAware {
	@Nullable
	protected Supplier<Executor> executor;
	@Nullable
	protected Supplier<AsyncUncaughtExceptionHandler> exceptionHandler;

  // 省略其他代码...

	/**
	 * 通过自动注入,获取所有的AsyncConfigurer子类
	 */
	@Autowired(required = false)
	void setConfigurers(Collection<AsyncConfigurer> configurers) {
		if (CollectionUtils.isEmpty(configurers)) {
			return;
		}
		if (configurers.size() > 1) {
			throw new IllegalStateException("Only one AsyncConfigurer may exist");
		}
		AsyncConfigurer configurer = configurers.iterator().next();
		this.executor = configurer::getAsyncExecutor;
		this.exceptionHandler = configurer::getAsyncUncaughtExceptionHandler;
	}
}
这里通过自动注入AsyncConfigurer的子类,来获取executor和exceptionHandler配置,不过配置多个。
那我们就试一下。
在我准备实现AsyncConfigurer类的时候,我看到了这样一行注释:
Consider using AsyncConfigurerSupport providing default implementations for both methods if only one element needs to be customized. Furthermore, backward compatibility of this interface will be insured in case new customization options are introduced in the future.
如果executor和exceptionHandler只有一个需要自定义,可以考虑使用AsyncConfigurerSupport来提供默认的实现类。
我只需要测试executor,那直接继承AsyncConfigurerSupport就好了。
先定义一个配置类,用于配置线程池参数
/**
 * 线程池参数配置类
 * @author <a href="mailto:me@flycat.tech">Bryon Zen</a>
 * @since 2024/8/15
 */
@Data
@Configuration
@ConfigurationProperties(prefix = "spring.task.execution.custom")
public class AsyncTaskExecutionProperties {
    private Pool pool = new Pool();
    // 线程名称前缀
    private String threadNamePrefix = "asyncTask-";

  	@Data
    public static class Pool {
        // 线程池队列大小
        private int queueCapacity = 128;
        // 核心线程池数量
        private int coreSize = Runtime.getRuntime().availableProcessors();
        // 最大线程数量
        private int maxSize = Runtime.getRuntime().availableProcessors() * 4;
        // 是否允许核心线程关闭
        private boolean allowCoreThreadTimeout = false;
        // 空闲线程超时时间
        private Long keepAlive = 60L;
    }
}
定义继承AsyncConfigurerSupport的线程池配置类
/**
 * @author <a href="mailto:me@flycat.tech">Bryon Zen</a>
 * @since 2024/8/15
 */
@Component
public class CustomAsyncConfigurerSupport extends AsyncConfigurerSupport {
    private final AtomicInteger threadCount = new AtomicInteger(0);

    @Resource
    private AsyncTaskExecutionProperties asyncTaskExecutionProperties;

    @Override
    public Executor getAsyncExecutor() {
        // 获取配置
        AsyncTaskExecutionProperties.Pool pool = asyncTaskExecutionProperties.getPool();
        // 工作队列
        ArrayBlockingQueue<Runnable> workQueue = new ArrayBlockingQueue<>(pool.getQueueCapacity());
        // 线程创建工厂
        ThreadFactory threadFactory = r -> {
            String threadName = asyncTaskExecutionProperties.getThreadNamePrefix() + threadCount.incrementAndGet();
            return new Thread(r, threadName);
        };

        ThreadPoolExecutor threadPoolExecutor = new ThreadPoolExecutor(pool.getCoreSize(), pool.getMaxSize(), pool.getKeepAlive(), TimeUnit.SECONDS, workQueue, threadFactory);
        threadPoolExecutor.allowCoreThreadTimeOut(pool.isAllowCoreThreadTimeout());
        return threadPoolExecutor;
    }
}
运行单元测试代码:
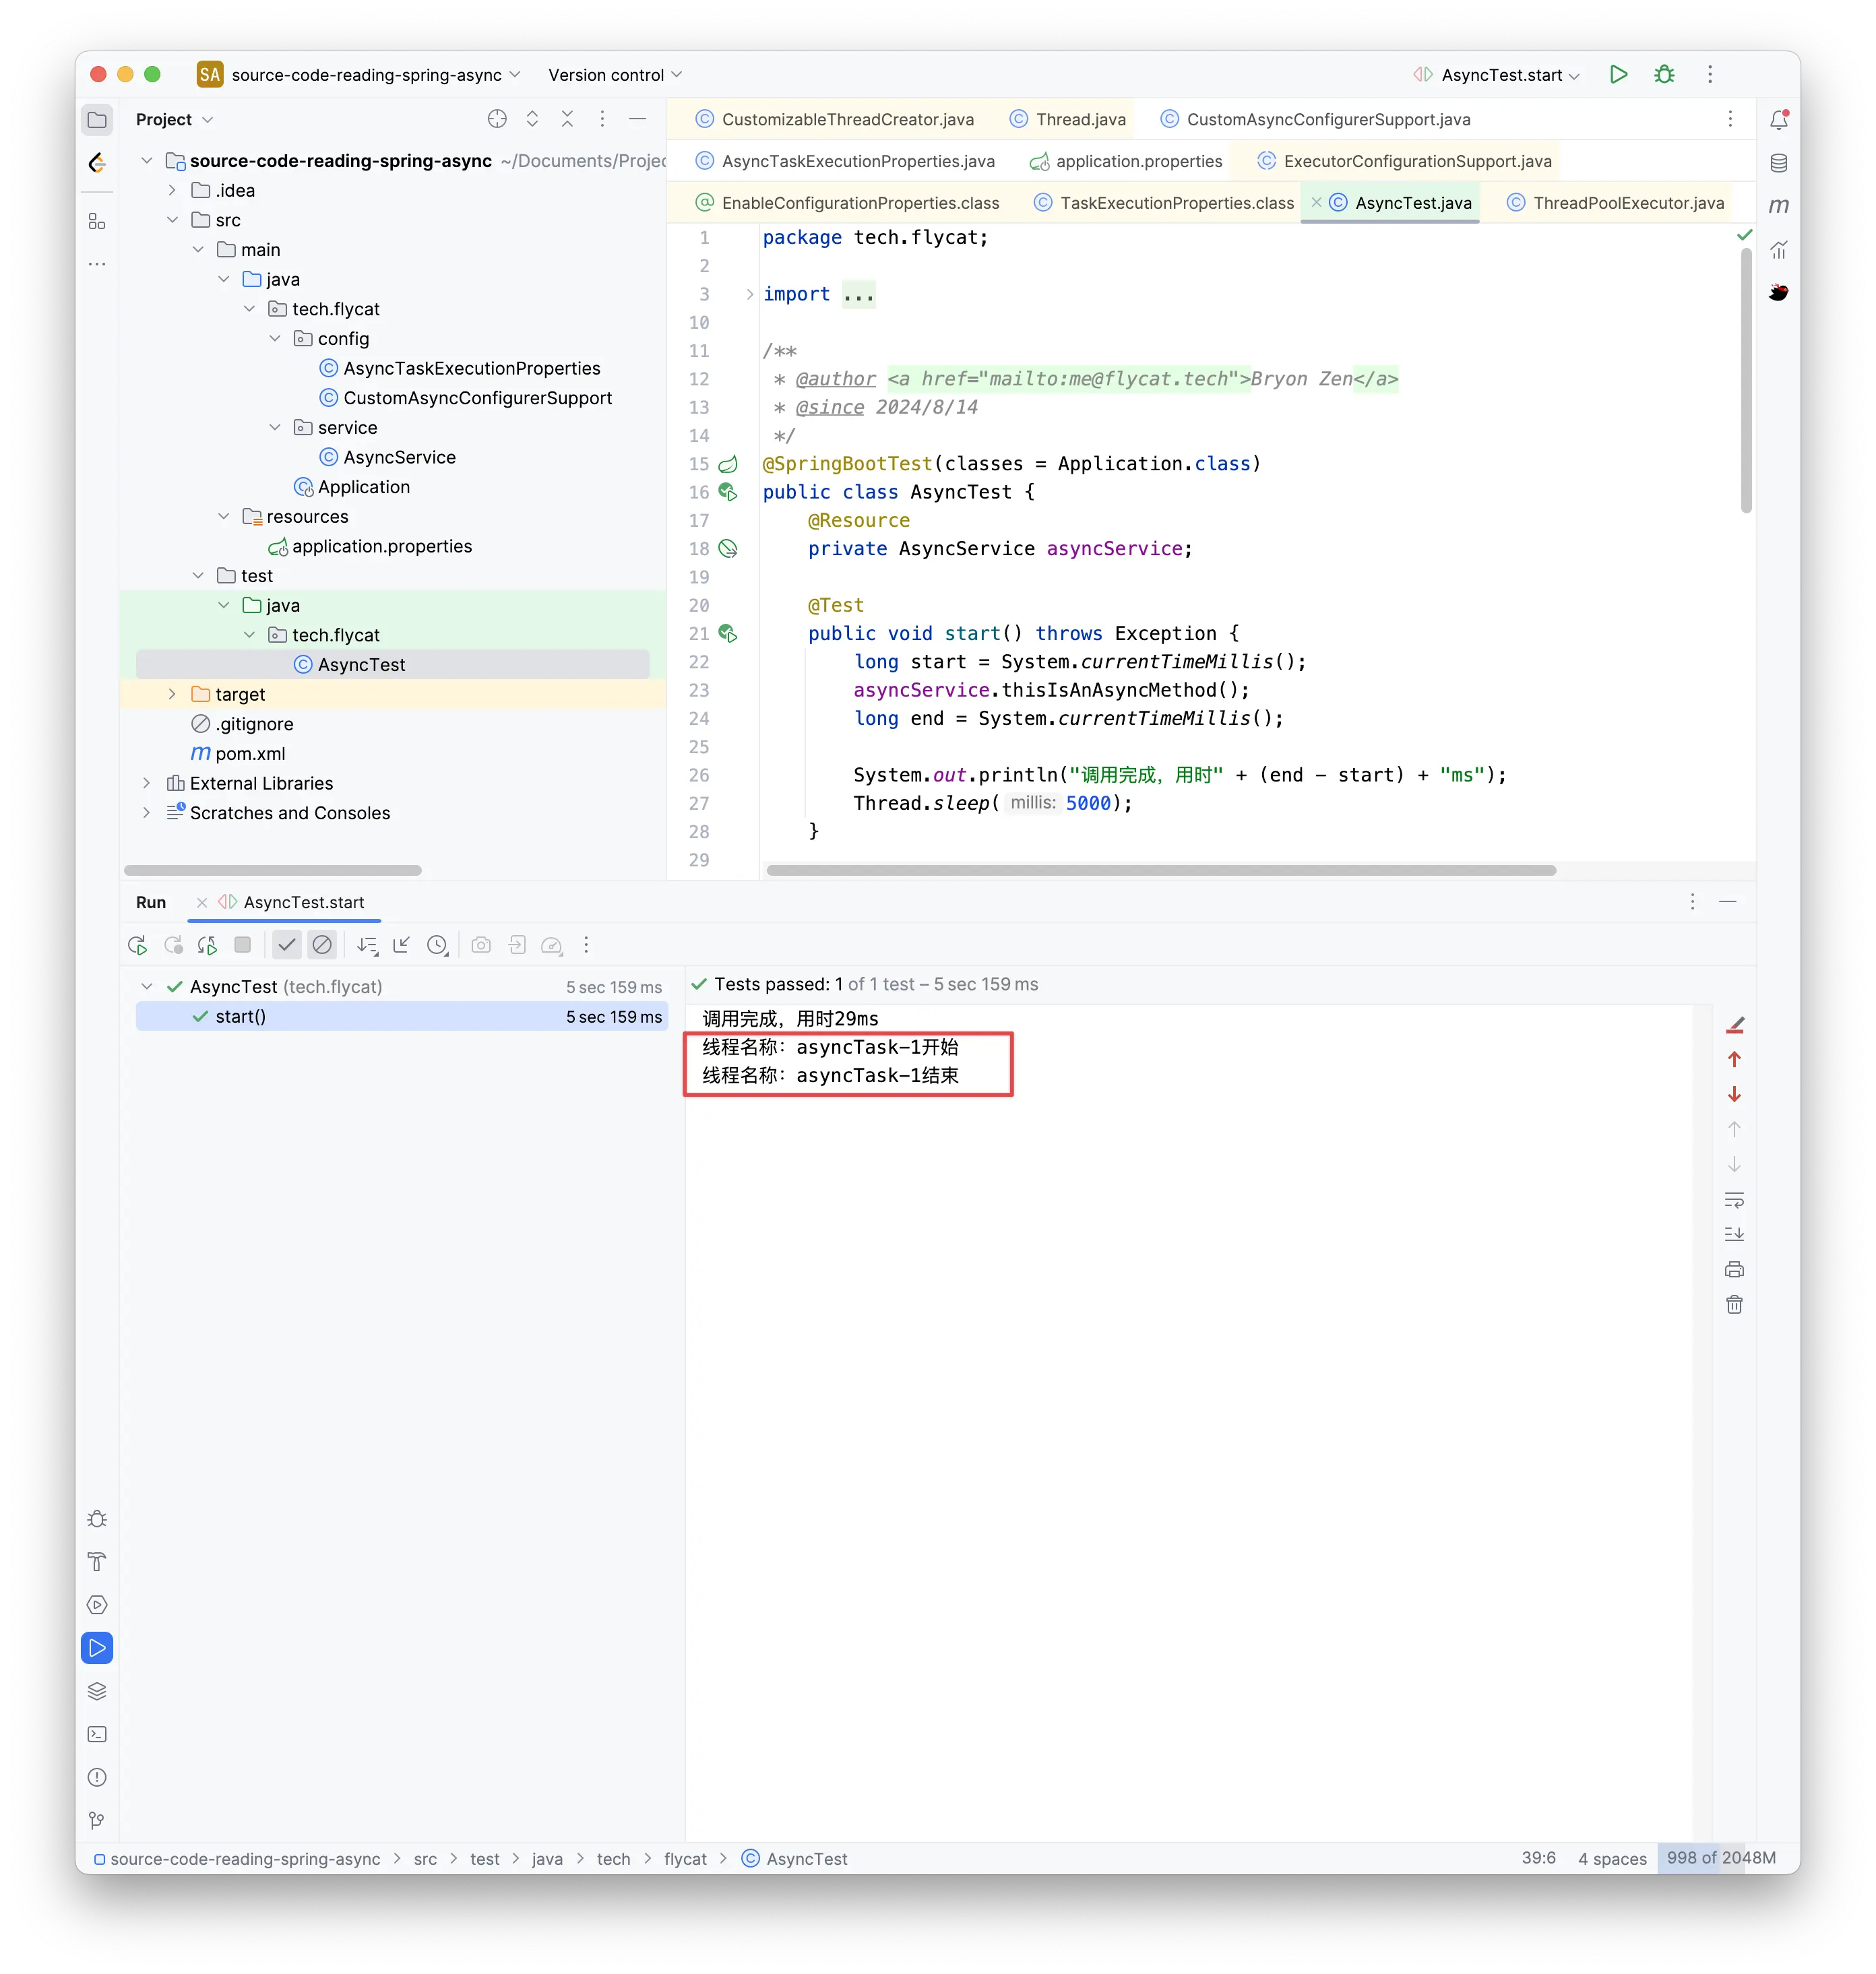
可以看到线程名称变成了asyncTask-1,说明自定义线程池已经生效。
配置自定义TaskExecutor
不知道大家还记不记得,在qualifiedBeanOfType的方法中,先根据TaskExecutor类型获取实例,如果失败再获取名称为taskExecutor的bean,那么我们只需要定义一个名称为 taskExecutor的bean就好了。
不过可能会有人有疑问,会不会跟spring默认的线程池名称重复呢?我们再debug下:
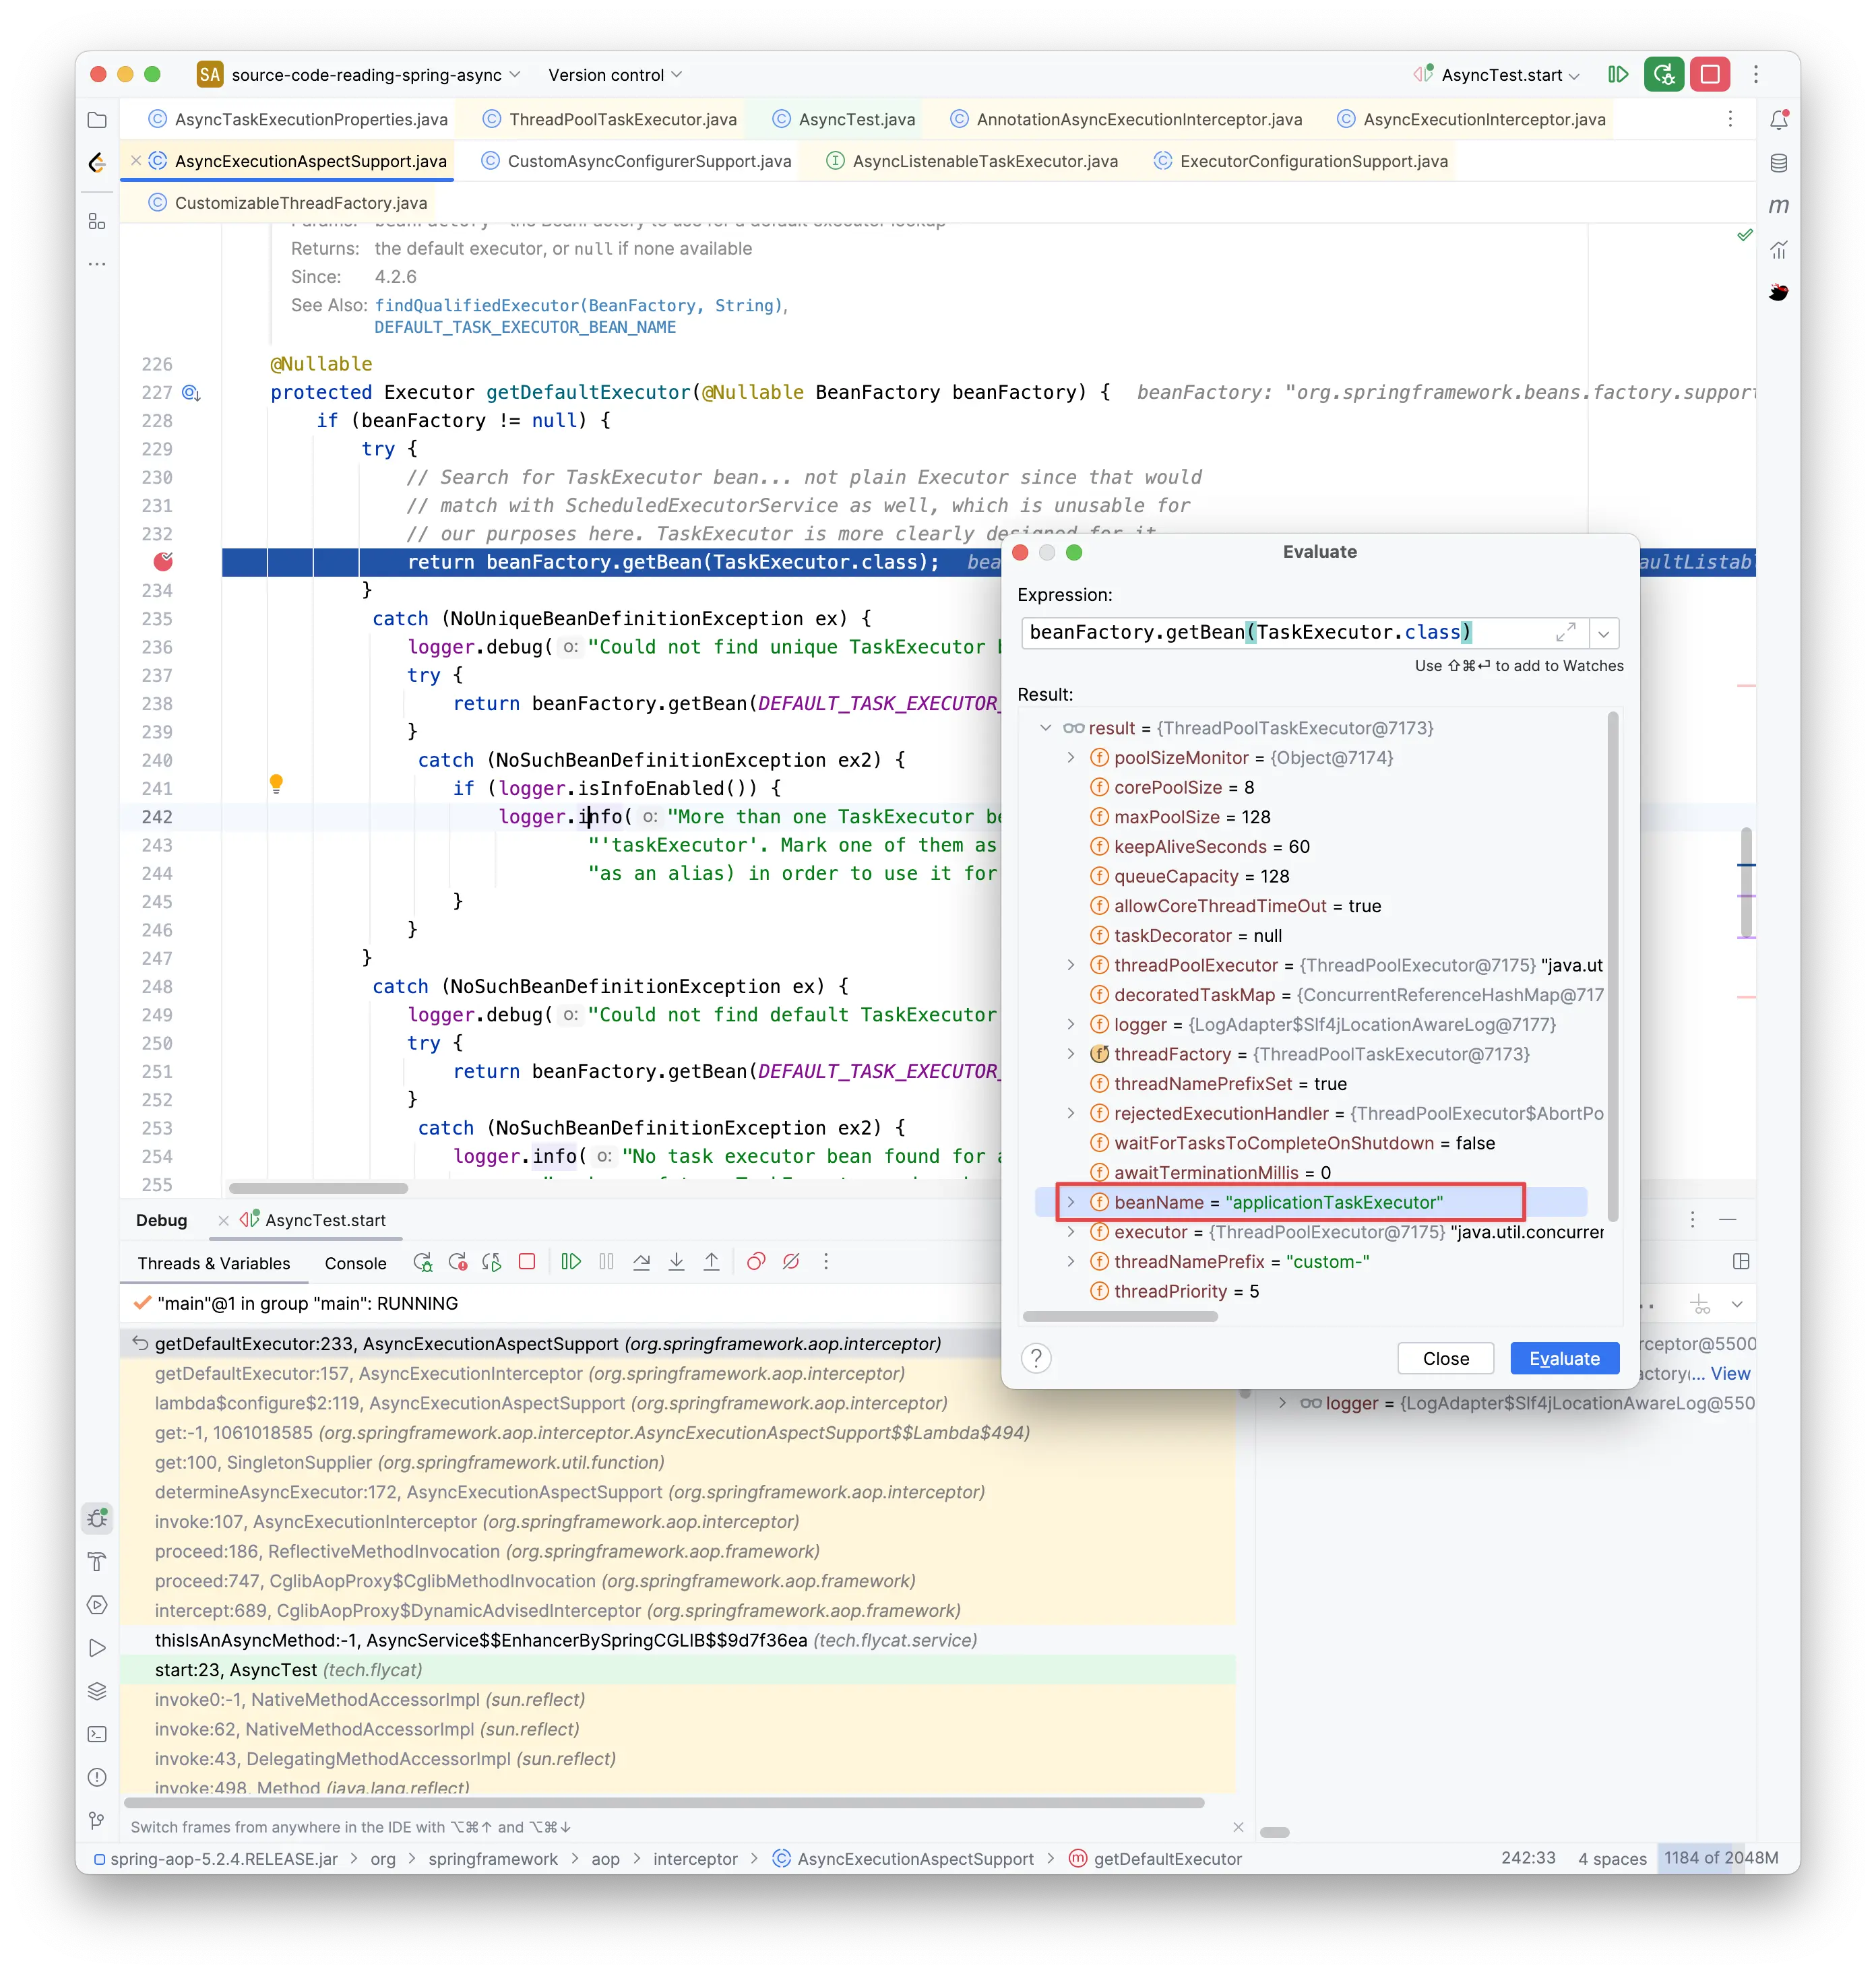
发现了吗,spring默认的线程池名称是 applicationTaskExecutor,如果获取到相同的TaskExecutor实例,则会以我们自己定义的名称为taskExecutor的为准。
配置代码如下:
/**
 * @author <a href="mailto:me@flycat.tech">Bryon Zen</a>
 * @since 2024/8/15
 */
@Configuration
public class TaskExecutorConfig {
    /**
    * bean的名称为方法名称
    */
  	@Bean
    public TaskExecutor taskExecutor() {
        ThreadPoolTaskExecutor taskExecutor = new ThreadPoolTaskExecutor();
        taskExecutor.setCorePoolSize(8);
        taskExecutor.setMaxPoolSize(16);
        taskExecutor.setQueueCapacity(128);
        taskExecutor.setAllowCoreThreadTimeOut(false);
        taskExecutor.setKeepAliveSeconds(60);
        taskExecutor.setThreadNamePrefix("CustomTaskExecutor-");
        return taskExecutor;
    }
}
执行结果如下:
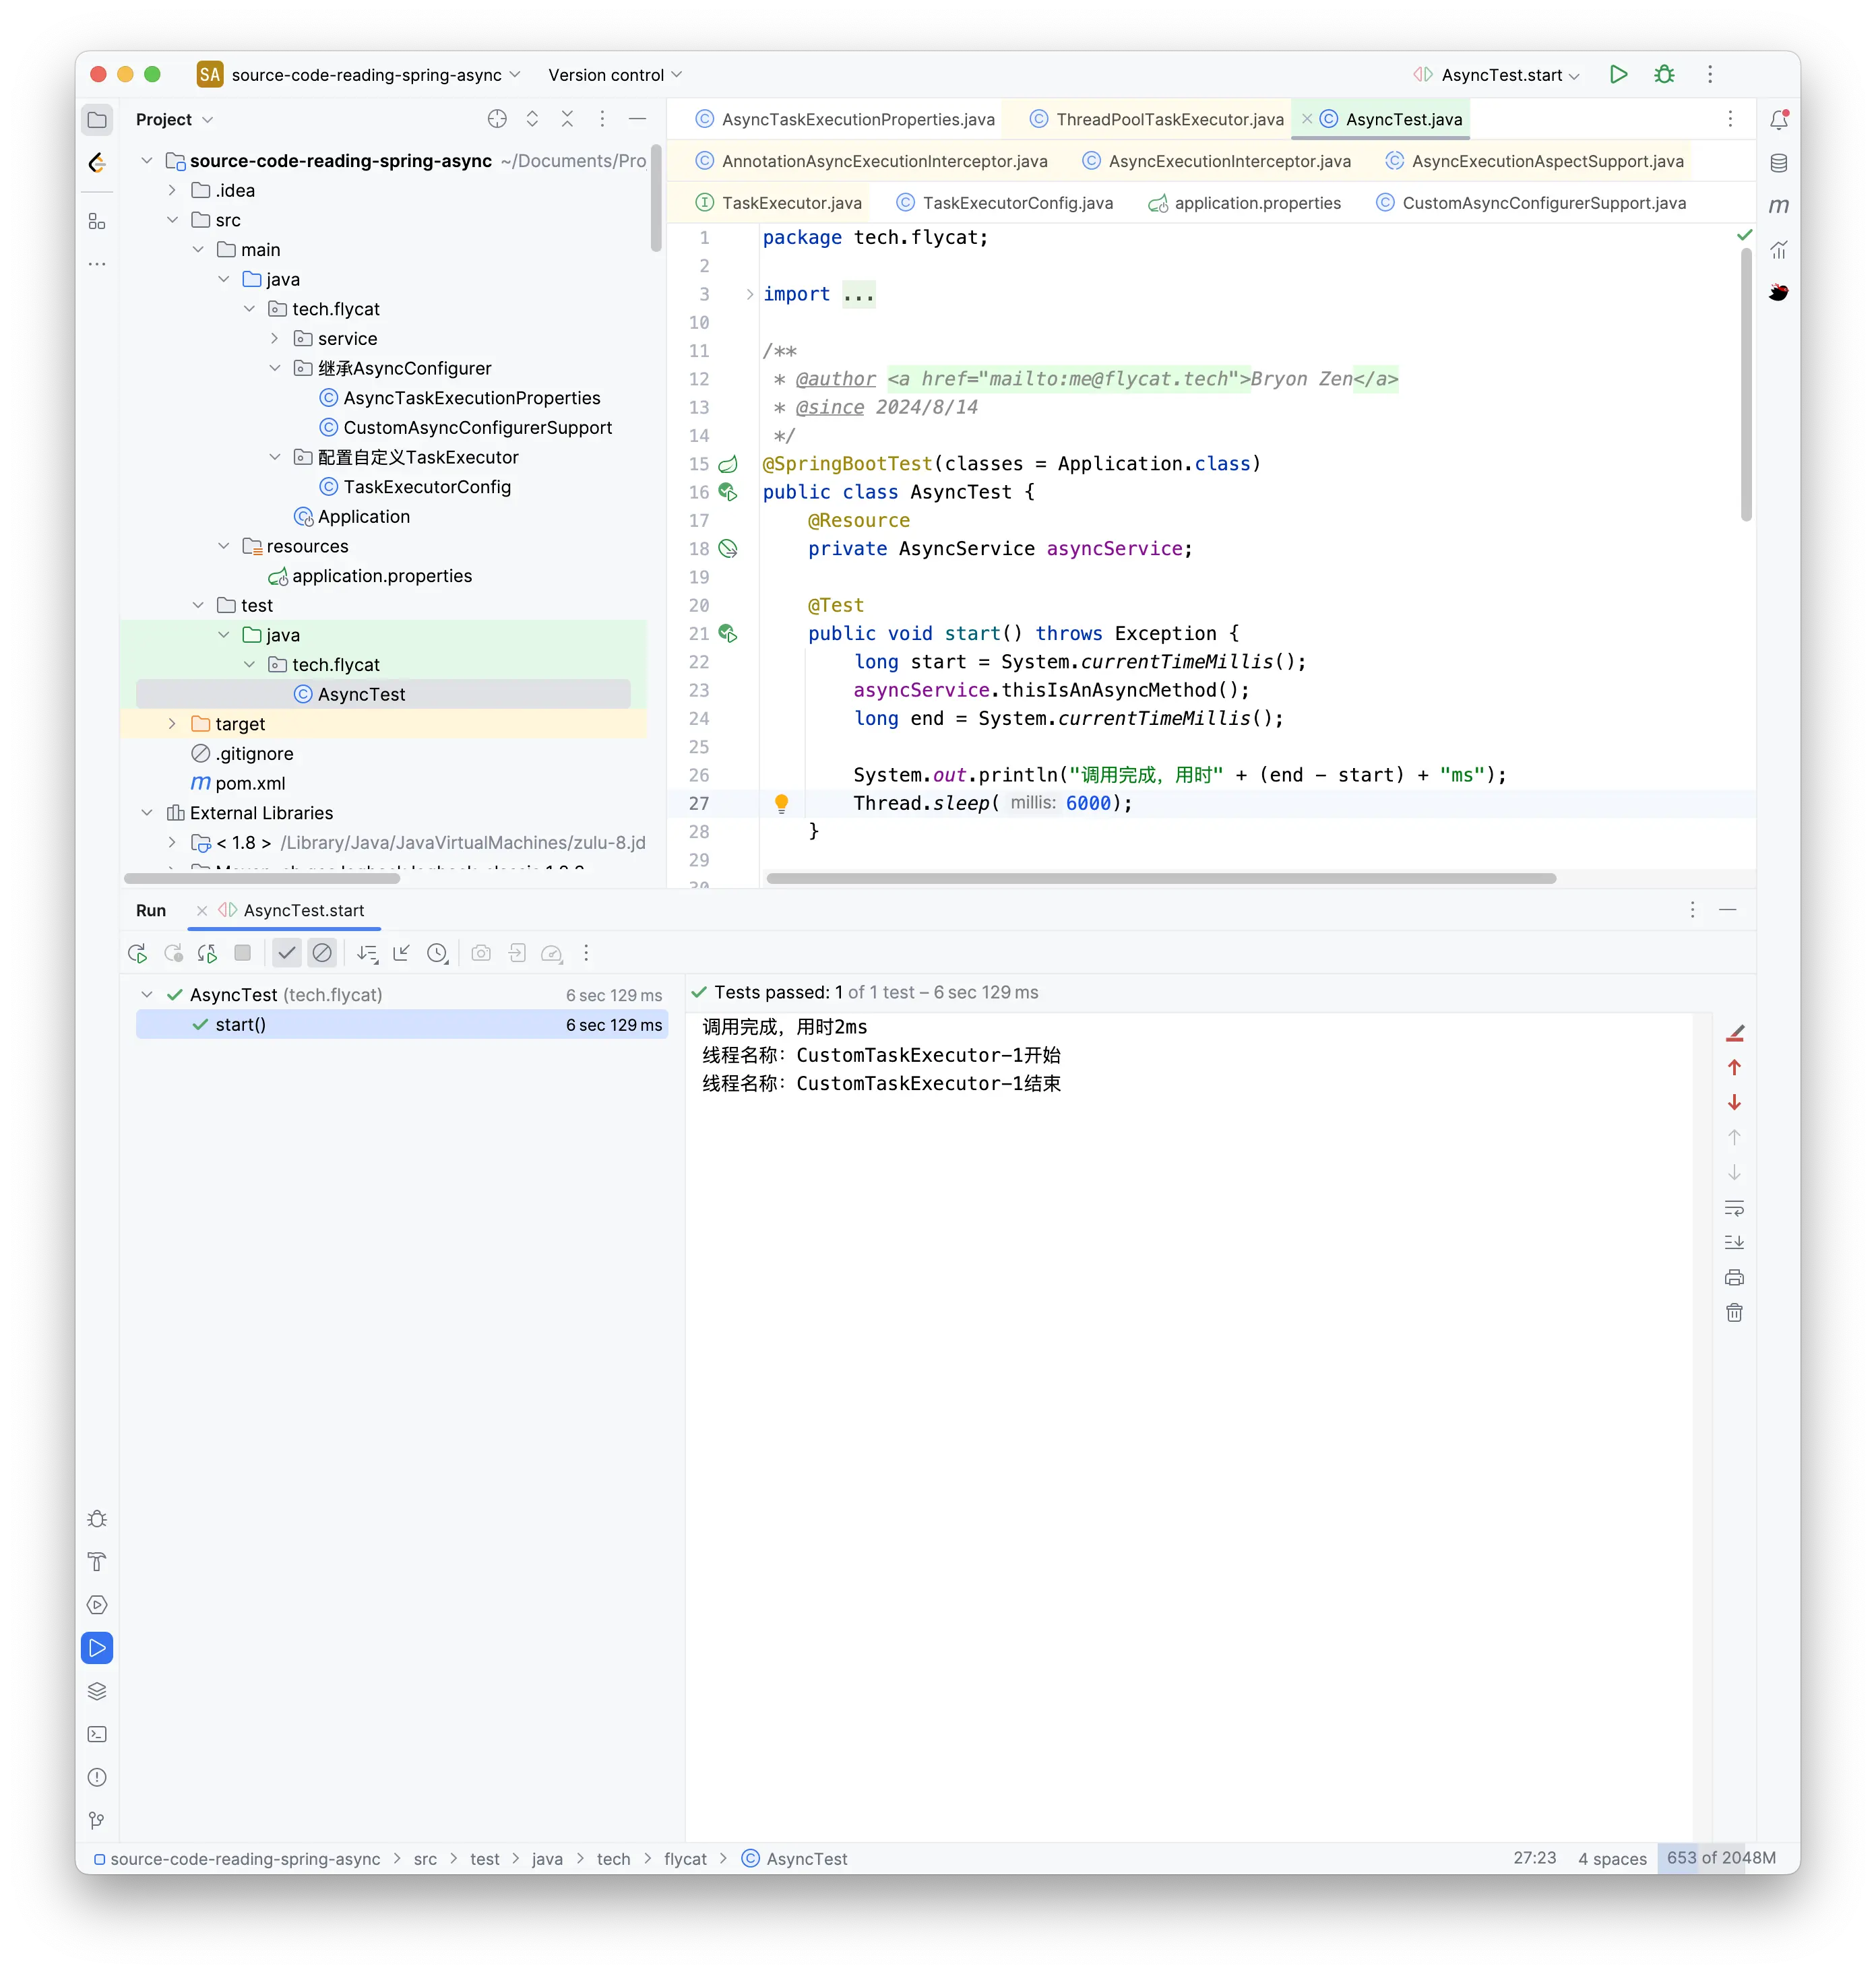
同样自定义线程名称生效了。
为方法指定线程池
在前面看源码时,我们看到过在@Async注解中可以配置一个value参数,这个参数用于指定线程池的bean名称。
先定义一个线程池配置:
/**
 * @author <a href="mailto:me@flycat.tech">Bryon Zen</a>
 * @since 2024/8/15
 */
@Configuration
public class TaskExecutorForMethodServiceConfig {
    @Bean(name = "taskExecutorForMethodService")
    public TaskExecutor taskExecutor() {
        ThreadPoolTaskExecutor taskExecutor = new ThreadPoolTaskExecutor();
        taskExecutor.setCorePoolSize(8);
        taskExecutor.setMaxPoolSize(16);
        taskExecutor.setQueueCapacity(128);
        taskExecutor.setAllowCoreThreadTimeOut(false);
        taskExecutor.setKeepAliveSeconds(60);
        taskExecutor.setThreadNamePrefix("taskExecutorForMethodService-");
        return taskExecutor;
    }
}
线程池bean名称为taskExecutorForMethodService,另外再定义一个类,并定义一个异步方法,并且指定线程池名称。
/**
 * @author <a href="mailto:me@flycat.tech">Bryon Zen</a>
 * @since 2024/8/15
 */
@Service
public class MethodService {
    @Async(value = "taskExecutorForMethodService")
    public void test() {
        System.out.println("为方法指定线程池,线程名称:" + Thread.currentThread().getName() + "开始");
        try {
            Thread.sleep(5000);
        } catch (InterruptedException e) {
            throw new RuntimeException(e);
        }
        System.out.println("为方法指定线程池,线程名称:" + Thread.currentThread().getName() + "结束");
    }
}
执行结果如下:
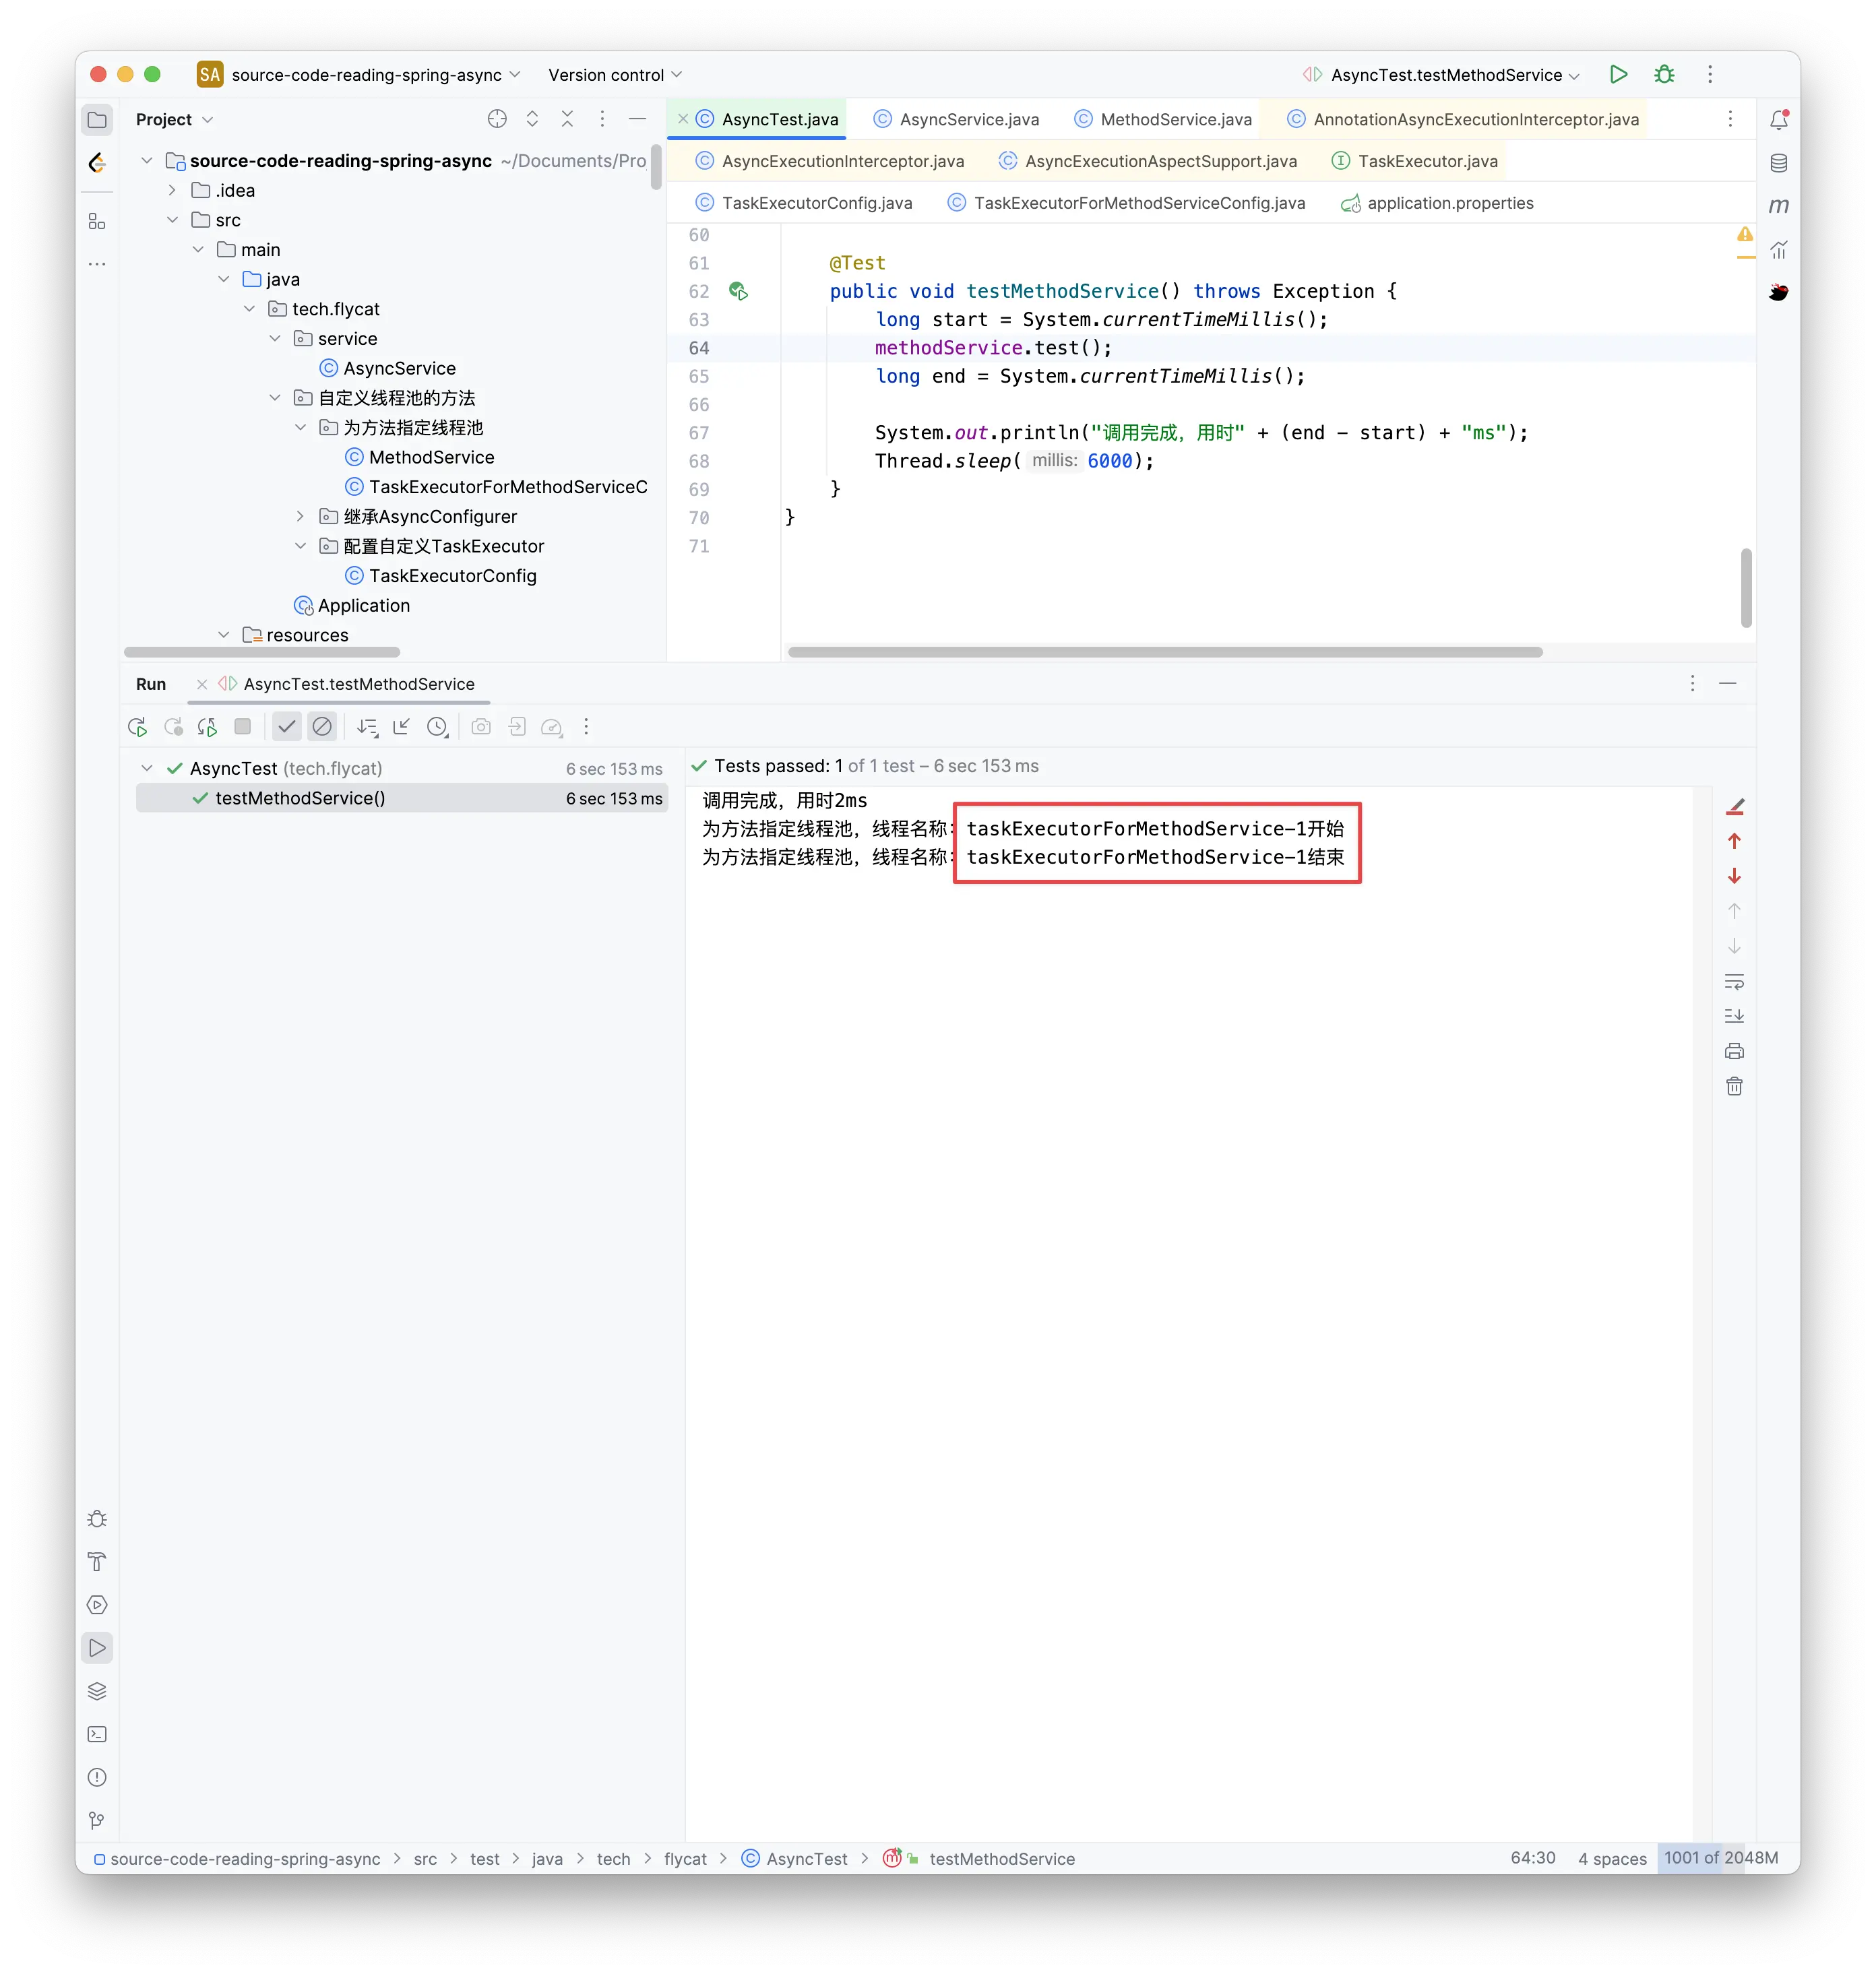
可以看到使用了指定的线程池。现在再执行一下未指定这个线程池的异步方法试试。
可以看到,使用的是前面定义的名称为taskExecutor的Bean的线程池。
源码地址:https://github.com/bryonzen/source-code-reading-spring-async